
Appearance
Website assistant
A see-through ask-bar at the bottom of your website, in the centre or at one side. Visitors type a question into it, a chat opens above the bar, and your AI agent answers there, without the visitor leaving the page. Your team can step into the same chat at any time.
The website assistant is its own channel, separate from the older Website widget, with its own tab in the app. The agent that answers is the Sales Platform agent you set up under Agent configuration.
When to choose it
| Website assistant | Website widget | |
|---|---|---|
| How it looks | A see-through bar at the bottom of the page, centre, left or right. The chat opens above it. | A round button in a corner that opens a chat window. |
| How a chat starts | The visitor types straight into the bar. No form first. | The visitor opens the window; a contact form can come first. |
| Extras | Quick buttons, pictures, voice input, a nudge line. | Contact form, social links, ad-style pop-ups, opening from your own buttons, recognising logged-in customers. |
| Install | One line of code. | Two blocks of code. |
Choose the website assistant for a modern look that suits any site, never changes yours, and lets visitors ask right away. Keep the widget if you rely on its contact form, ad-style pop-ups, your own "Chat with us" buttons, or recognising logged-in customers.
At a glance
| You need | Where in the app | Result |
|---|---|---|
| An agent to answer | Channels → pick the agent at the top → Assistant Bar (under Website) | The agent that answers on your site |
| Look, quick buttons, features, your sites | The Assistant Bar tab | How it looks and where it opens |
| The code | Install, once the website assistant is created | One line to add to your site |
Set it up in 4 steps:
- Open Channels, pick the agent at the top, and open Assistant Bar under Website (the Website assistant's row). It is first in the list.
- Choose the look and add your site under Where it shows.
- Click Create website assistant.
- Copy the code from Install and add it to every page of your site.
In the app
Channels live at app.mychatbot.app/channels. The tab shows the website assistant of the agent picked at the top of the page.
Set it up
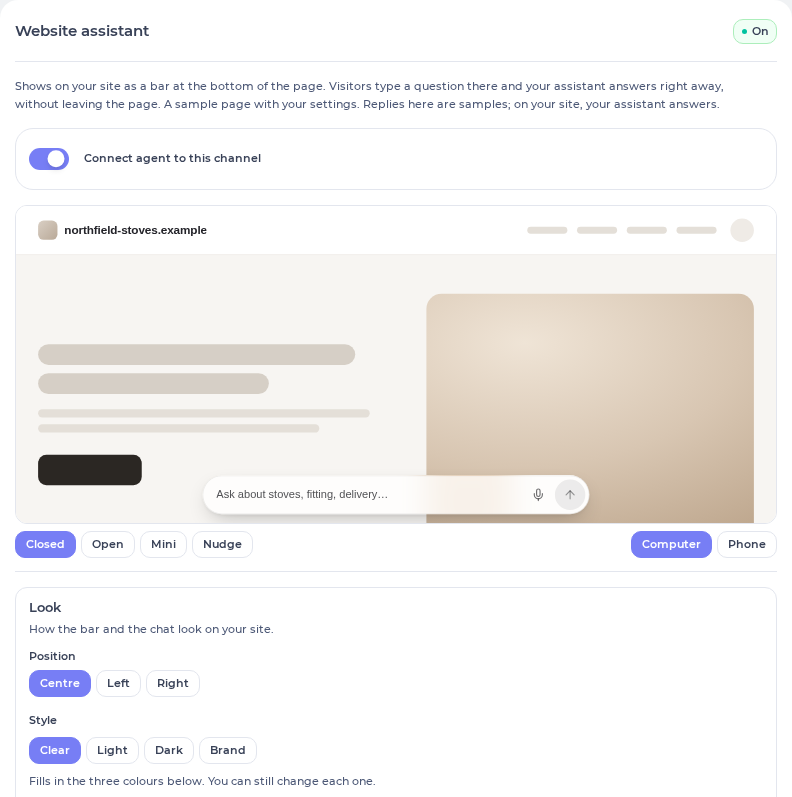
The tab has the on/off switch at the top, a live preview, and the settings under it. The preview shows your settings over your own homepage, the first site under Your sites: the live page when your site allows that, otherwise a picture of it. The first picture takes a few seconds, and a sample page stands in until it's ready, or when you haven't listed a site. Use Closed, Open, Mini and Nudge to see each state, and Computer or Phone to switch screens. Replies in the preview are samples. On your site, your agent answers.
Turn it on
- Until you create it, the tab shows Not set up. Adjust the settings, then click Create website assistant. It is created switched on, and your code appears under Install. Nothing shows on your site until you add that code.
- Connect agent to this channel switches your agent's replies on and off. With it off, the bar still shows on your site and visitors can still write. Their messages wait in Active chats for your team, and visitors see "Thanks. The team will reply here as soon as they can." To take the bar off your site, remove the code.
- Each agent has one website assistant. It belongs to the agent picked at the top of Channels, like every other channel.
- After a change, click Save. "Saved. Your site shows the change within a minute." You don't need to change the code on your site. Discard drops changes you haven't saved.
Set it up from your site
Under Set it up from your site, enter your website address and click Set it up from my site. We read your homepage and fill in the title, the subtitle, the greeting, the text in the bar, the colours, your logo and the quick buttons, in your site's language, and add your site to Your sites. Reading a site takes a few seconds.
Nothing is saved yet. A note lists what was filled in and which settings are guesses, and Undo puts back what you had. Check the preview, then click Save. If a site can't be read, nothing changes. On a website assistant you haven't created yet, add the logo after Create website assistant.
Look
| Setting | What it does |
|---|---|
| Position | Centre (the default), Left or Right: where the bar sits at the bottom of the page. On phones the bar always spans the screen. |
| Style | Shortcuts that fill in the three colours below: Clear, Light, Dark or Brand. Brand asks for Your brand colour and builds the three colours from it. You can still change each colour afterwards. |
| Bar, Chat, Button | The three colours. Bar: the bar, quick buttons and the visitor's messages. Chat: the open chat. Button: the send button, the badge behind initials or emoji, and highlights. Text colour is chosen for you, so it stays readable on any colour. |
| Opacity | From 60% to 95% (80% to start). Lower lets more of your page show through the bar and the chat. Text always stays easy to read: where it wouldn't be, the glass is made a little more solid. |
| Header icon | The picture at the top of the chat. Logo: your logo, see Add your logo. Initials: up to 2 letters; leave it empty to use the first letters of the title. Emoji: pick one or paste your own. |
| Title | Shown at the top of the chat. Usually your shop's or your agent's name, and it starts as the agent's name. Required, up to 60 characters. |
| Subtitle | A short line under the title, "AI assistant" to start. Leave it empty to hide it. Up to 60 characters. |
| Greeting | The first message visitors see when the chat opens, "Hi, how can I help you today?" to start. Up to 500 characters. |
| Text in the bar | What the empty bar says, for example "Ask about delivery, sizes or prices…". It starts as "Ask anything…". Required, up to 80 characters. |
Add your logo
With Header icon set to Logo, there are three ways to add it:
- Upload a logo picks a picture from your computer. Once there is one, the button reads Change logo.
- Use my site's logo takes the logo from your first site under Where it shows. The button shows once you've added a site.
- Paste a link into Or paste a link to an image or your website and click Use. A link to an image uses that image. A link to a page, such as your home page, uses the logo found on that page.
The picture is copied to MyChatBot, so visitors never load it from your server, and it keeps working if your site changes. It can be a PNG, JPG, GIF or WebP of up to 2 MB, and up to 4096 pixels on each side. SVG pictures aren't accepted. A square picture looks best. If the page has no logo to use, you see "We couldn't find a logo on that page. Upload one instead."
You can add a logo once the website assistant is created. Then click Save to show it on your site.
Quick buttons
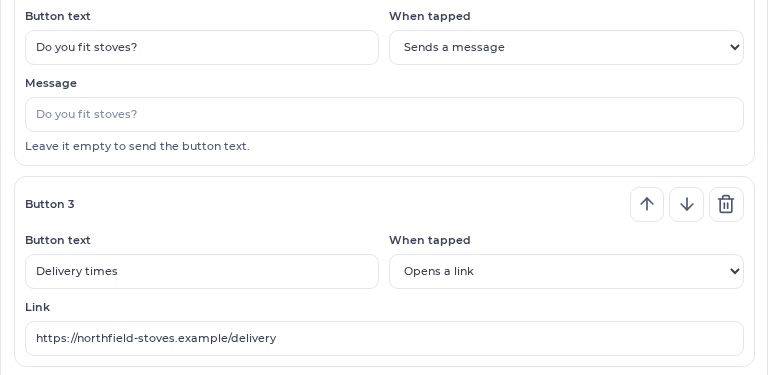
Ready-made questions and shortcuts visitors can tap instead of typing. Add up to 6 with Add a button, put them in order with the arrows, and remove one with the bin.
Where they show: In the chat (the default, at the bottom of the open chat), Above the bar, Both, or Off. They show until the visitor sends their first message.
Each button has a Button text (up to 40 characters) and a When tapped choice:
| When tapped | What happens |
|---|---|
| Sends a message | Sends the Message as if the visitor typed it. Leave it empty to send the button text. |
| Opens a link | Opens the Link in a new tab. Enter the full link, starting with https://. |
| Asks for a person | Sends the Message (or the button text) as a request for a person from your team. If your team gets handoff alerts, the chat goes straight to them; if not, your agent answers. See When a visitor asks for a person. |
| Adds a picture | Opens the visitor's photos so they can send a picture with their question. Works while Pictures is on. |
Features
| Setting | What it does |
|---|---|
| Pictures | On to start. Visitors can add a photo or a screenshot to their question. See Attaching pictures. |
| Voice input | On to start. A microphone in the bar lets visitors say their question instead of typing it. They tap it, speak for up to a minute and tap it again. The words then appear in the bar, and the visitor checks them and sends them. It works in all current browsers, including Chrome, Safari, Firefox, Edge and Brave. Turning speech into text doesn't use any of your messages: the question counts once the visitor sends it. |
| Nudge | Off to start. A short line above the bar that invites visitors to ask, for example "Have a question? Ask me." Set the Nudge text (up to 120 characters) and Show after (seconds), from 1 to 60 (4 to start). It shows while the chat is closed. A visitor who closes it with ✕ doesn't see it again that day. |
| Shrink while scrolling | Always (the default), On phones only, or Never. The bar shrinks to a small round button while visitors scroll down, and comes back when they scroll up. It doesn't shrink while a visitor is typing. |
| Hide “Powered by MyChatBot” | Removes the small "by MyChatBot" link at the top of the chat. Included in the Pro, Multipro and Corporate plans. On other plans, and on the free trial, the switch is shown but locked. If your plan changes to one without it, the link comes back on its own. |
Where it shows
| Setting | What it does |
|---|---|
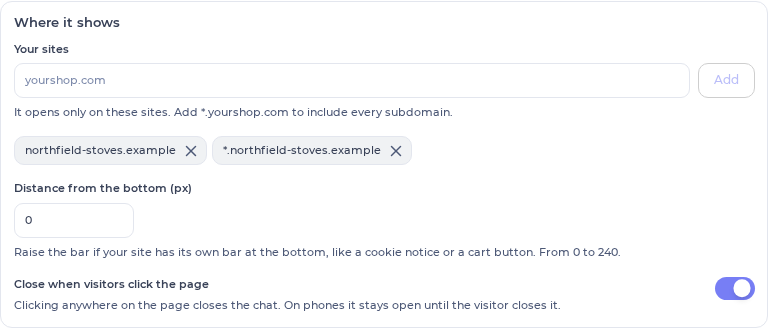
| Your sites | The sites where it opens. Type an address and click Add, up to 20 sites. yourshop.com covers exactly that address. Add *.yourshop.com as well to include every subdomain, such as www.yourshop.com. An address typed without https:// counts as https://. |
| Distance from the bottom (px) | Raises the bar by 0 to 240 pixels, so it doesn't cover your site's own bar at the bottom, like a cookie notice or a cart button. |
| Close when visitors click the page | On to start. On a computer, clicking anywhere on the page closes the chat. On phones the chat stays open until the visitor closes it. |
With no sites listed, your code works on any site
Until you add a site, the website assistant opens on any site that has your code, including a site where someone copied it, and your agent's replies there count toward your plan. The tab warns you while the list is empty. Add your own site before you put the code on it.
Let Claude set it up from your site
With the MyChatBot plugin for Claude Code or Codex, you can ask Claude to set up the website assistant for one of your agents from your website address, for example "Set up the website assistant for my shop's agent from yourshop.com". Claude reads your site and fills in:
| From your site | Setting |
|---|---|
| Your shop's name, a short line under it, a greeting and the text for the empty bar, in your site's language | Title, Subtitle, Greeting, Text in the bar |
| Your brand colour, with a light or dark look to suit your pages | Bar, Chat, Button |
| Your logo, when it finds one that shows well | Header icon |
| 3 to 5 questions your visitors are likely to ask, in your site's language | Quick buttons |
| Your site's address | Your sites, under Where it shows |
Claude tells you which settings are guesses, for example when part of your site couldn't be read, and gives you your privacy policy link if it found one. The website assistant is created switched on, and Claude gives you the code to add to your site (see Install). Nothing shows on your site until you add it.
Ask again later and Claude refreshes the look, the words, the quick buttons and the logo from your site. Your other settings stay as they are, and so do the sites on your list; your site's address is added if it isn't there.
Claude can also read your website assistant's settings and change single ones, such as the button colour or the quick buttons. Everything it sets can be changed in the tab afterwards.
This works with the plugin. The MyChatBot connector in the Claude app can't set up the website assistant. There, use Set it up from your site in the tab, which fills in the same settings.
Install
Once the website assistant is created, Install shows your code. Add it to every page of your site, just before </body>. It loads after your page, so it never slows it down. Copy code copies it.
html
<script async src="https://storage.googleapis.com/mychatbot-widget-assets/v1/assistant/assistant.js"
        data-key="wa_pk_…"></script>
The data-key part is different for each website assistant. It isn't a password: it only tells the code which website assistant to show. Your list of sites decides where it can open.
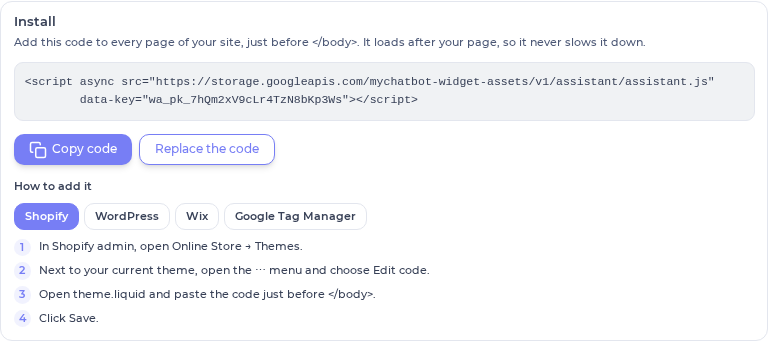
How to add it in the tab has short steps for each platform. In more detail:
Shopify
- In Shopify admin, open Online Store → Themes.
- Next to your current theme, open the ⋯ menu and choose Edit code.
- Under Layout, open theme.liquid.
- Paste the code just before
</body>, near the end of the file. - Click Save.
A site built with AI (Lovable, Bolt, v0, Replit, Cursor…)
The tab's AI-built site guide has a ready request with your own code inside. Click Copy request, then:
- Open your project in the tool you built it with.
- Paste the request into its chat and send it. It asks the AI to add the code to every page, just before
</body>, and to change nothing else. - When it's done, publish the site again.
The request reads like this, with your code at the end:
text
Add this script to every page of my website, just before the closing </body> tag.
Don't change anything else.

<script async src="https://storage.googleapis.com/mychatbot-widget-assets/v1/assistant/assistant.js"
        data-key="wa_pk_…"></script>
An HTML site
- Open your site's HTML file, often
index.html. If each page has its own file, do this in every one. - Paste the code just before
</body>. - Upload or deploy the site again, for example on Netlify, Vercel, GitHub Pages or your hosting.
WordPress
- Install a plugin for header and footer code, for example WPCode: Plugins → Add New Plugin, search for "WPCode", then Install Now and Activate.
- Open its Header & Footer page (Code Snippets → Header & Footer).
- Paste the code into the Footer box.
- Click Save Changes.
On WordPress.com, adding plugins needs a paid plan that allows them.
Wix
- In your site's dashboard, open Settings, then Custom code.
- Click + Add Custom Code and paste the code.
- Under Add Code to Pages, choose All pages. Under Place Code in, choose Body - end.
- Click Apply.
Custom code needs a paid Wix plan with your own domain connected.
Google Tag Manager
- In your container, open Tags → New → Tag Configuration → Custom HTML.
- Paste the code.
- Under Triggering, choose All Pages.
- Click Save, then Submit and Publish.
Any other site
Paste the code just before </body> in your site's template, or into the "custom code", "footer code" or "scripts" setting of your site builder. It has to be on every page where the bar should show. If the code ends up on a page twice, the bar still shows once.
Check it works
- Open your site. The bar appears at the bottom of the page.
- Ask a question. Your agent answers in the chat above the bar.
- Open Active chats in the app: the conversation is there, from the website assistant.
If nothing shows, check that the code is on the page and that the address in your browser matches Your sites (for example www.yourshop.com needs *.yourshop.com or www.yourshop.com on the list).
Replace the code
Replace the code gives your website assistant new code and stops the old code straight away. Use it when your code has ended up somewhere it shouldn't, for example on a site you no longer run. Your settings and past chats stay as they are.
The code on your site stops at once
After you confirm, the bar disappears from every site that still has the old code, and the new code appears in Install. Put the new code on your site straight after.
What visitors see
On a computer
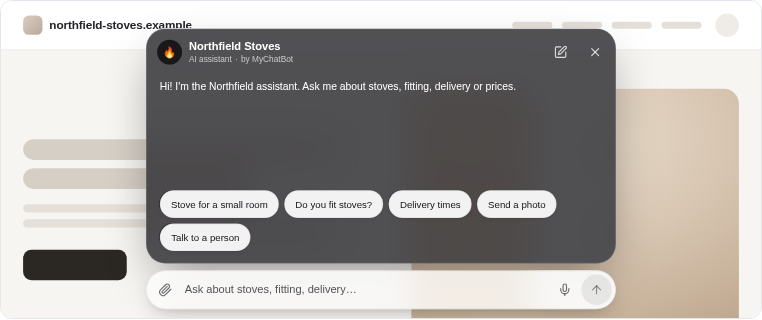
- The bar sits at the bottom of the page with your Text in the bar. Clicking it, or starting to type, opens the chat above it, with your header icon, title, greeting and quick buttons.
- Enter sends. Shift+Enter starts a new line. Dots show while your agent works. When it looks something up, a short line next to them says what it's doing, for example Searching the site… or Reading "Delivery"….
- Answers can include lists and links. Links open in a new tab.
- The pencil at the top starts a new conversation. ✕ or Esc closes the chat, and so does a click on the page, unless you turned that off.
- If a reply arrives while the chat is closed, its first line shows above the bar (or a red dot on the small round button, when the bar has shrunk).
- The conversation follows the visitor from page to page, and it's still there when they come back later in the same browser.
On a phone
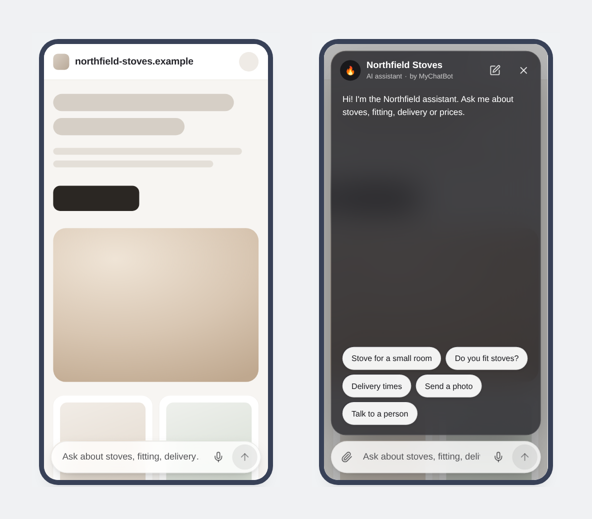
- The bar spans the screen with a small margin and stays clear of the phone's own bottom edge.
- Scrolling down shrinks it to a small round button, and scrolling up brings it back (with Shrink while scrolling set to Always or On phones only).
- The chat opens above the bar at nearly the full height of the screen, over a dimmed page. ✕, or a tap on the dimmed page, closes it.
- Quick buttons above the bar scroll sideways when there are more than fit.
Attaching pictures
With Pictures on, visitors can add a picture to their question in three ways:
- tap the paper clip in the bar;
- paste a screenshot into the bar (Ctrl+V, or Cmd+V on a Mac);
- drag a picture onto the bar or the chat.
A preview shows in the bar before sending, and ✕ removes it. A message can carry up to 4 pictures, each a JPEG, PNG, GIF or WebP of up to 10 MB. Your agent sees the pictures with the question.
When your team replies
Anyone on your team can answer in the same chat from Active chats. The visitor sees the reply in the chat, under the team member's name and marked Team. A reply sent from Active chats switches that chat to operator mode, so your agent stops answering there until it is switched back. See Manual takeover vs AI.
When a visitor asks for a person
What an Asks for a person quick button does depends on whether your team gets handoff alerts for this agent:
| Your agent has | What happens |
|---|---|
| A Flight Control Telegram group, or Assign a manager when a chat is handed over switched on under Handoff Control | The chat goes straight to your team, before your agent answers. It switches to operator mode and shows on the Attention tab of Active chats. Your team is alerted as for any handoff: the needs attention message in the Flight Control group and, with Assign a manager when a chat is handed over on, a manager is assigned and notified. Auto return from handoff applies as after any handoff. Your team's reply appears in the same chat. |
| Neither | Your agent is told the visitor wants a person and answers by its own instructions, which can include handing the chat over. |
Either way, right after their message the visitor sees "Thanks. The team will reply here as soon as they can.", with no typing dots.
If the chat is already with your team, the message joins it and no second alert goes out. See Notifications for each alert.
Privacy and security
- Only on your sites. With sites listed under Where it shows, the website assistant opens only there. On any other site, nothing shows.
- The page address without its private parts. With each message, your agent learns the title and address of the page the visitor is on, so it can answer about that page. Anything after
?or#in the address is left out, because those parts can hold password-reset links or order numbers. Only campaign tags that start withutm_are kept. - Pictures only. Visitors can attach JPEG, PNG, GIF or WebP pictures of up to 10 MB each, and no other files.
- Your site stays as it is. The website assistant never changes or restyles your site, and your site's styles never change it. If it can't load, nothing shows and your page works as before.
- Protection from automated traffic. Bots and scripts that flood the chat are held back the same way as on the website widget. See Protection from automated traffic.
FAQ
Does it slow my site down?
No. The code is about 17 KB, loads after your page, and doesn't hold it up. If it can't load, nothing shows and your page works as normal.
Does it work with my site?
Yes. It works on any site where you can add code before </body>, whatever it is built with. It keeps its own look, and your site's design stays exactly as it is.
Can I use it on two websites?
Each agent has one website assistant, so two websites with their own website assistants means two agents. On the Standard and Pro plans only one agent can be active at a time; see Plans. If both sites can share the same look and answers, one website assistant can also show on both: add each site under Your sites.
I'm on the Solo plan. Does it count as another channel?
The Solo plan includes one channel. The website widget and the website assistant are two ways to put your agent on your website, so together they count as that one channel: your website.
Can I keep the website widget too?
Yes. The widget keeps working as it is, and chats from both show in Active chats.
See also
- Website widget: the older corner chat widget
- Channels overview: every channel and what it needs
- Assistant configuration: what your agent knows and how it answers
- Chats & client analytics: answering visitors yourself