
Appearance
Zoho CRM Integration
Connect your MyChatBot agent to Zoho CRM so it can create and manage leads, deals, and contacts directly — no human hand-off. The agent runs CRM operations on its own, keeping your sales pipeline and customer records up to date.
At a glance
| You need | Where | Result |
|---|---|---|
| A server-based app | Zoho Developer Console | Client ID + Client Secret |
| OAuth tokens | Zoho OAuth flow | Access Token + Refresh Token |
| Credentials pasted in | MyChatBot → Integrations → Zoho | Agent linked to your CRM |
| Entities + fields toggled | Entities & Data Fields Configuration | Lead, deal, and contact actions available to the agent |
Connect in 4 steps:
- Create a Server-based Application in the Zoho Developer Console and copy its Client ID / Secret.
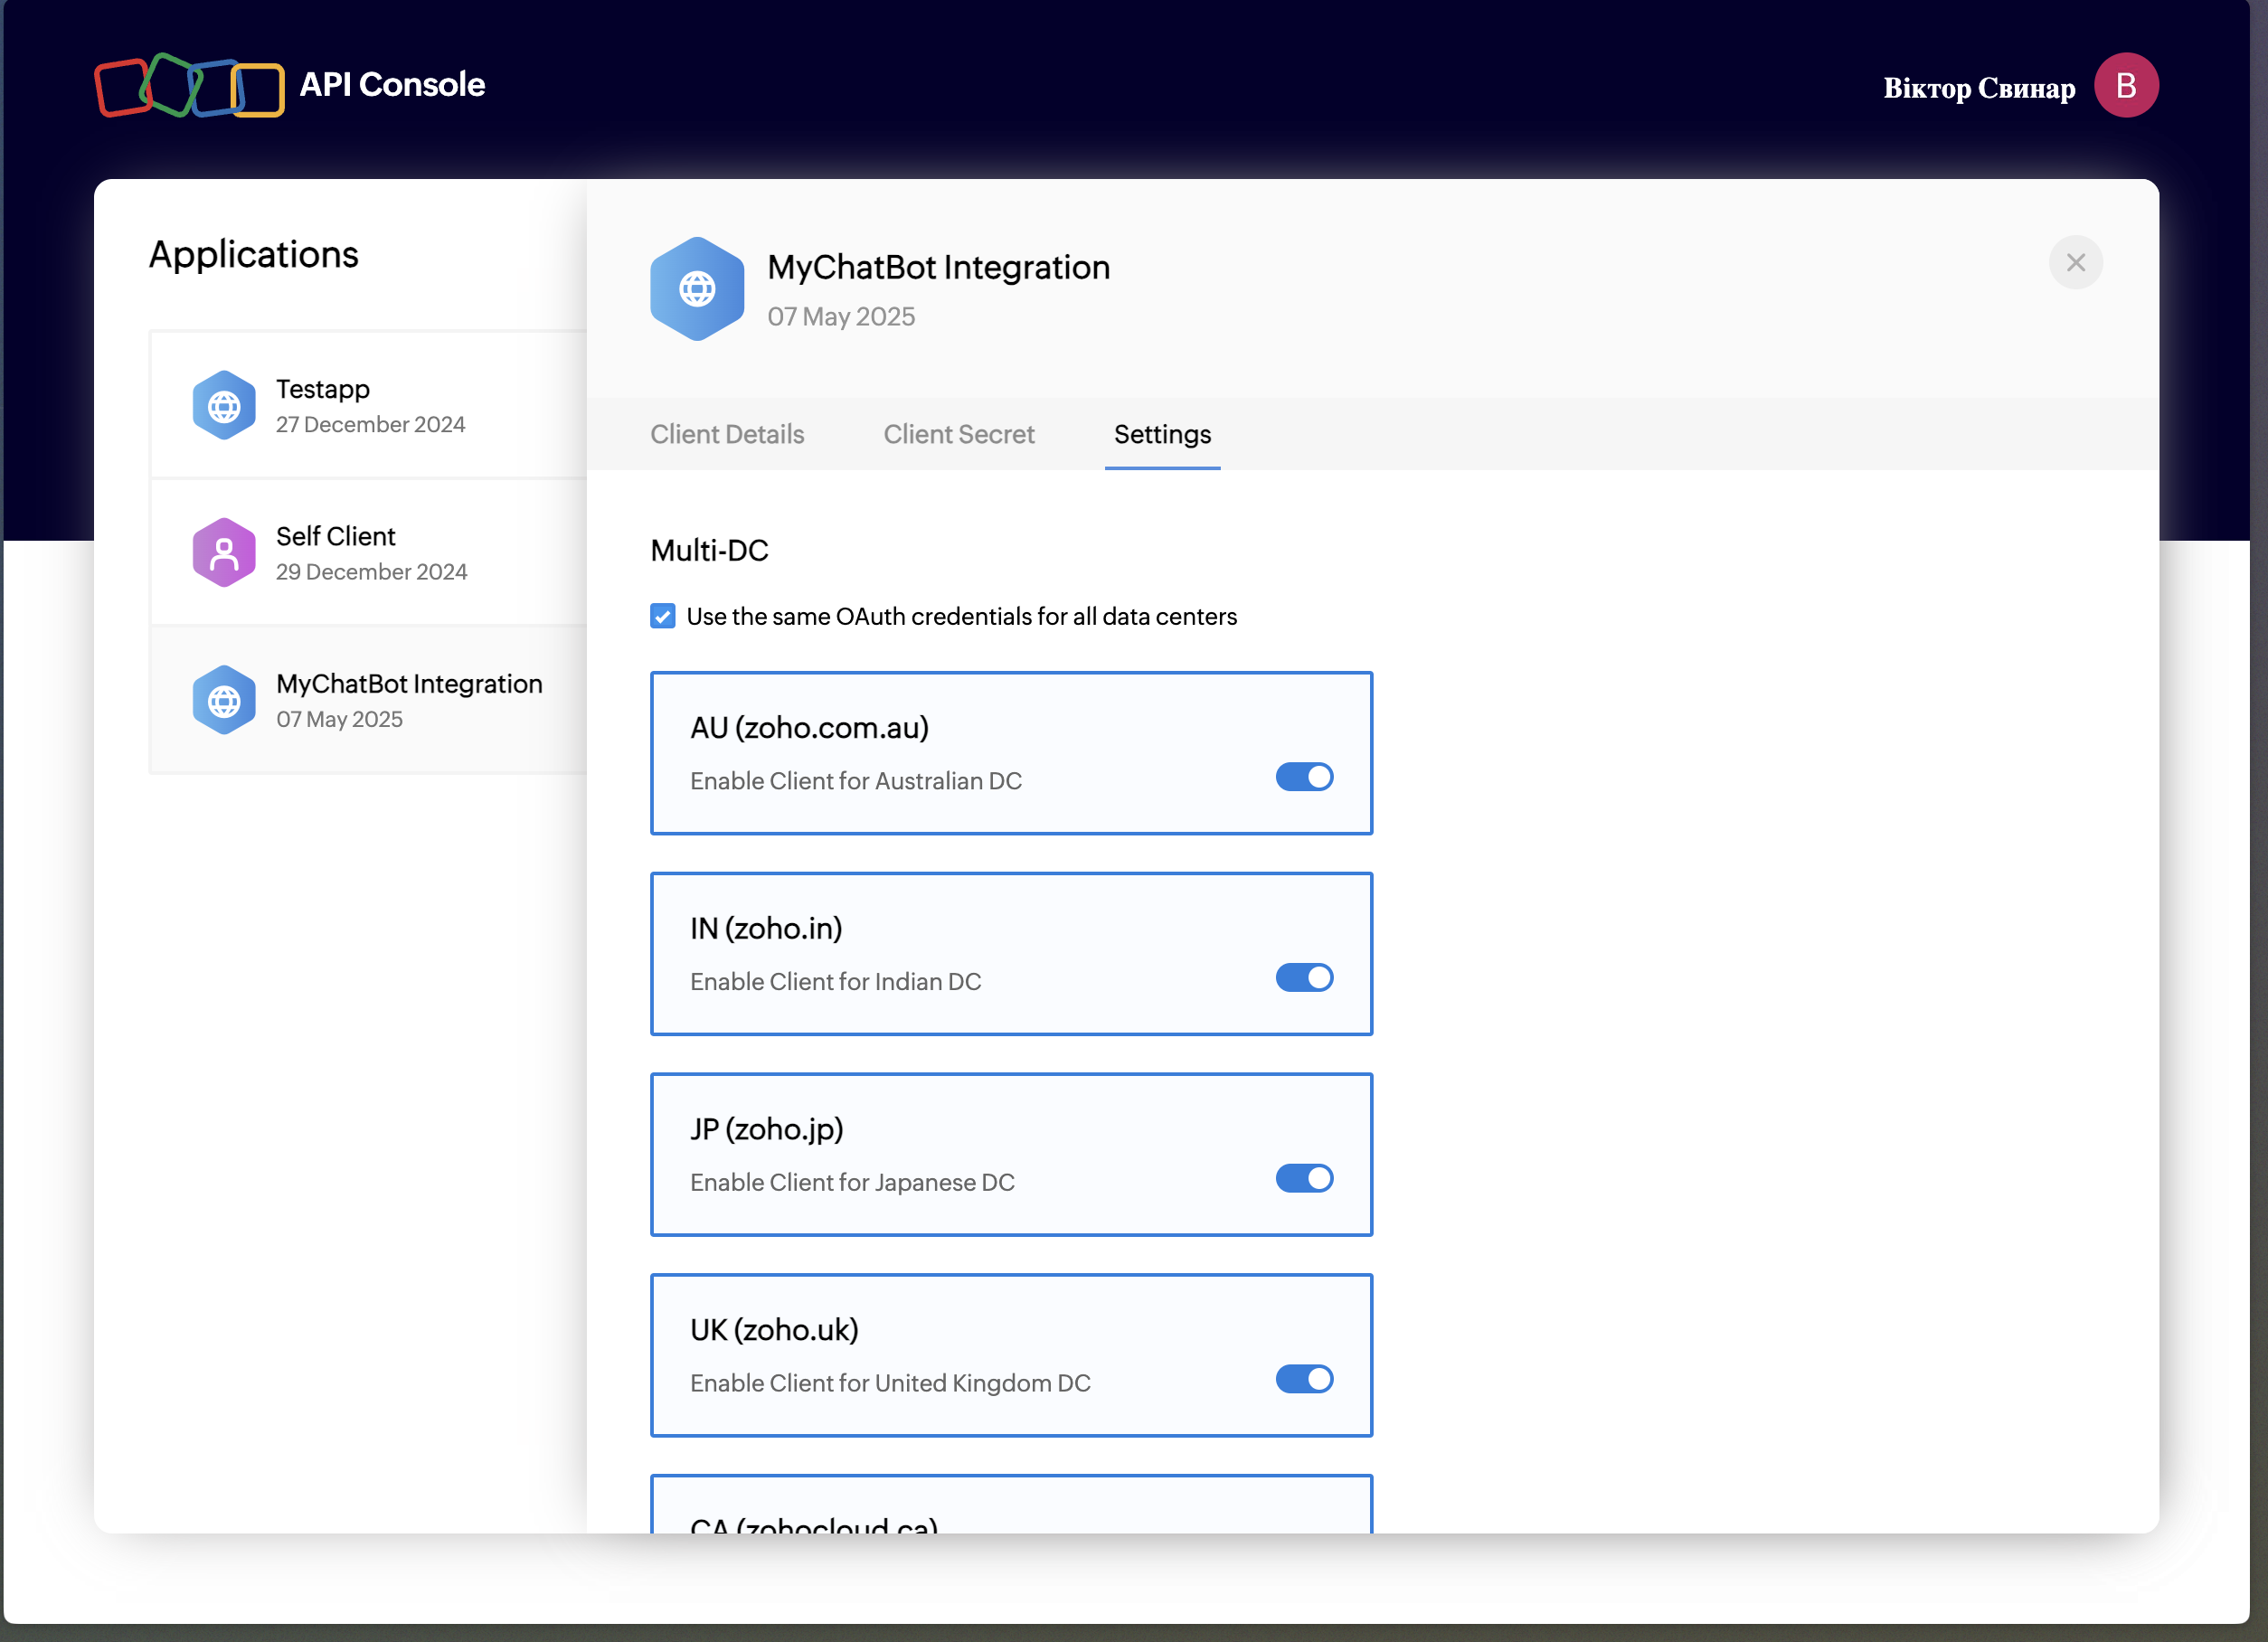
- Enable Multi-DC for the app.
- In MyChatBot, pick your agent and paste the Client ID, Client Secret, Access Token, and Refresh Token.
- Toggle the entities/fields your agent may use, then Apply fields.
App creation on Zoho
- Log in to your Zoho CRM account as an administrator and open the Zoho Developer Console.
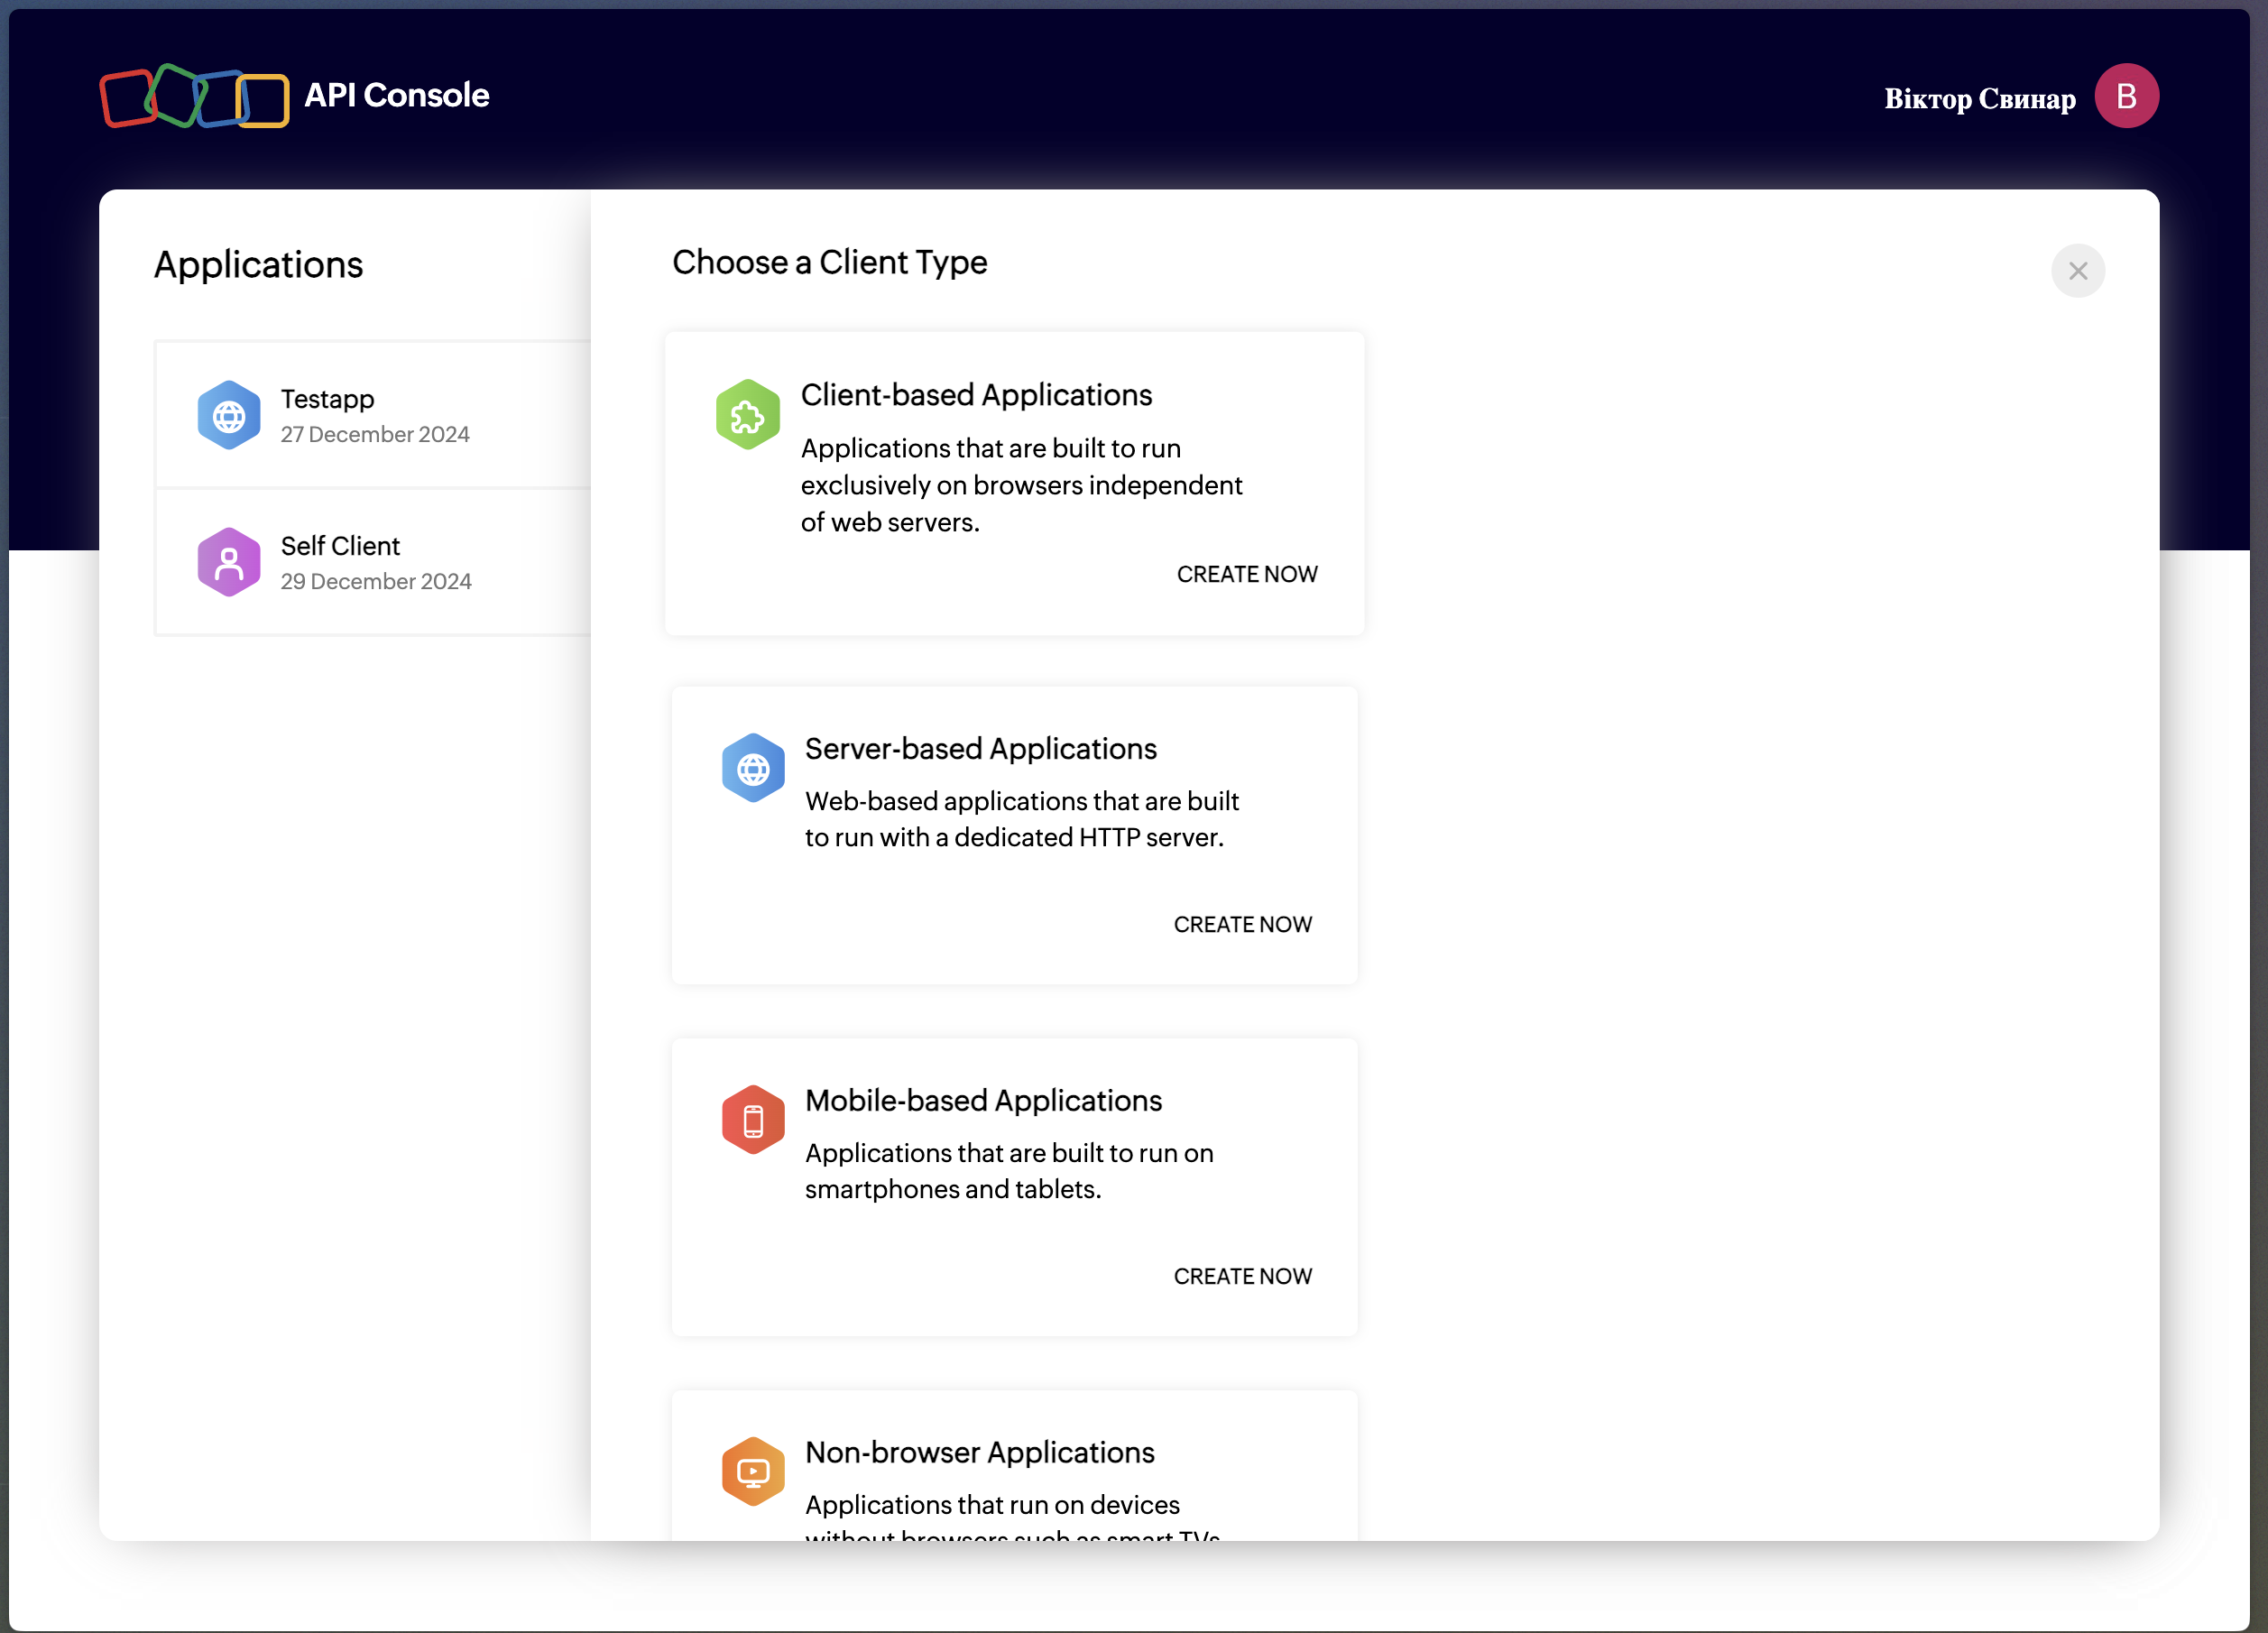
- Click Add Client.
- Select Server-based Applications.
- Fill in the required information:
- Client Name: MyChatBot Integration
- Homepage URL: https://app.mychatbot.app
- Authorized Redirect URIs: https://app.mychatbot.app/integration
- Description: AI assistant integration for Zoho CRM
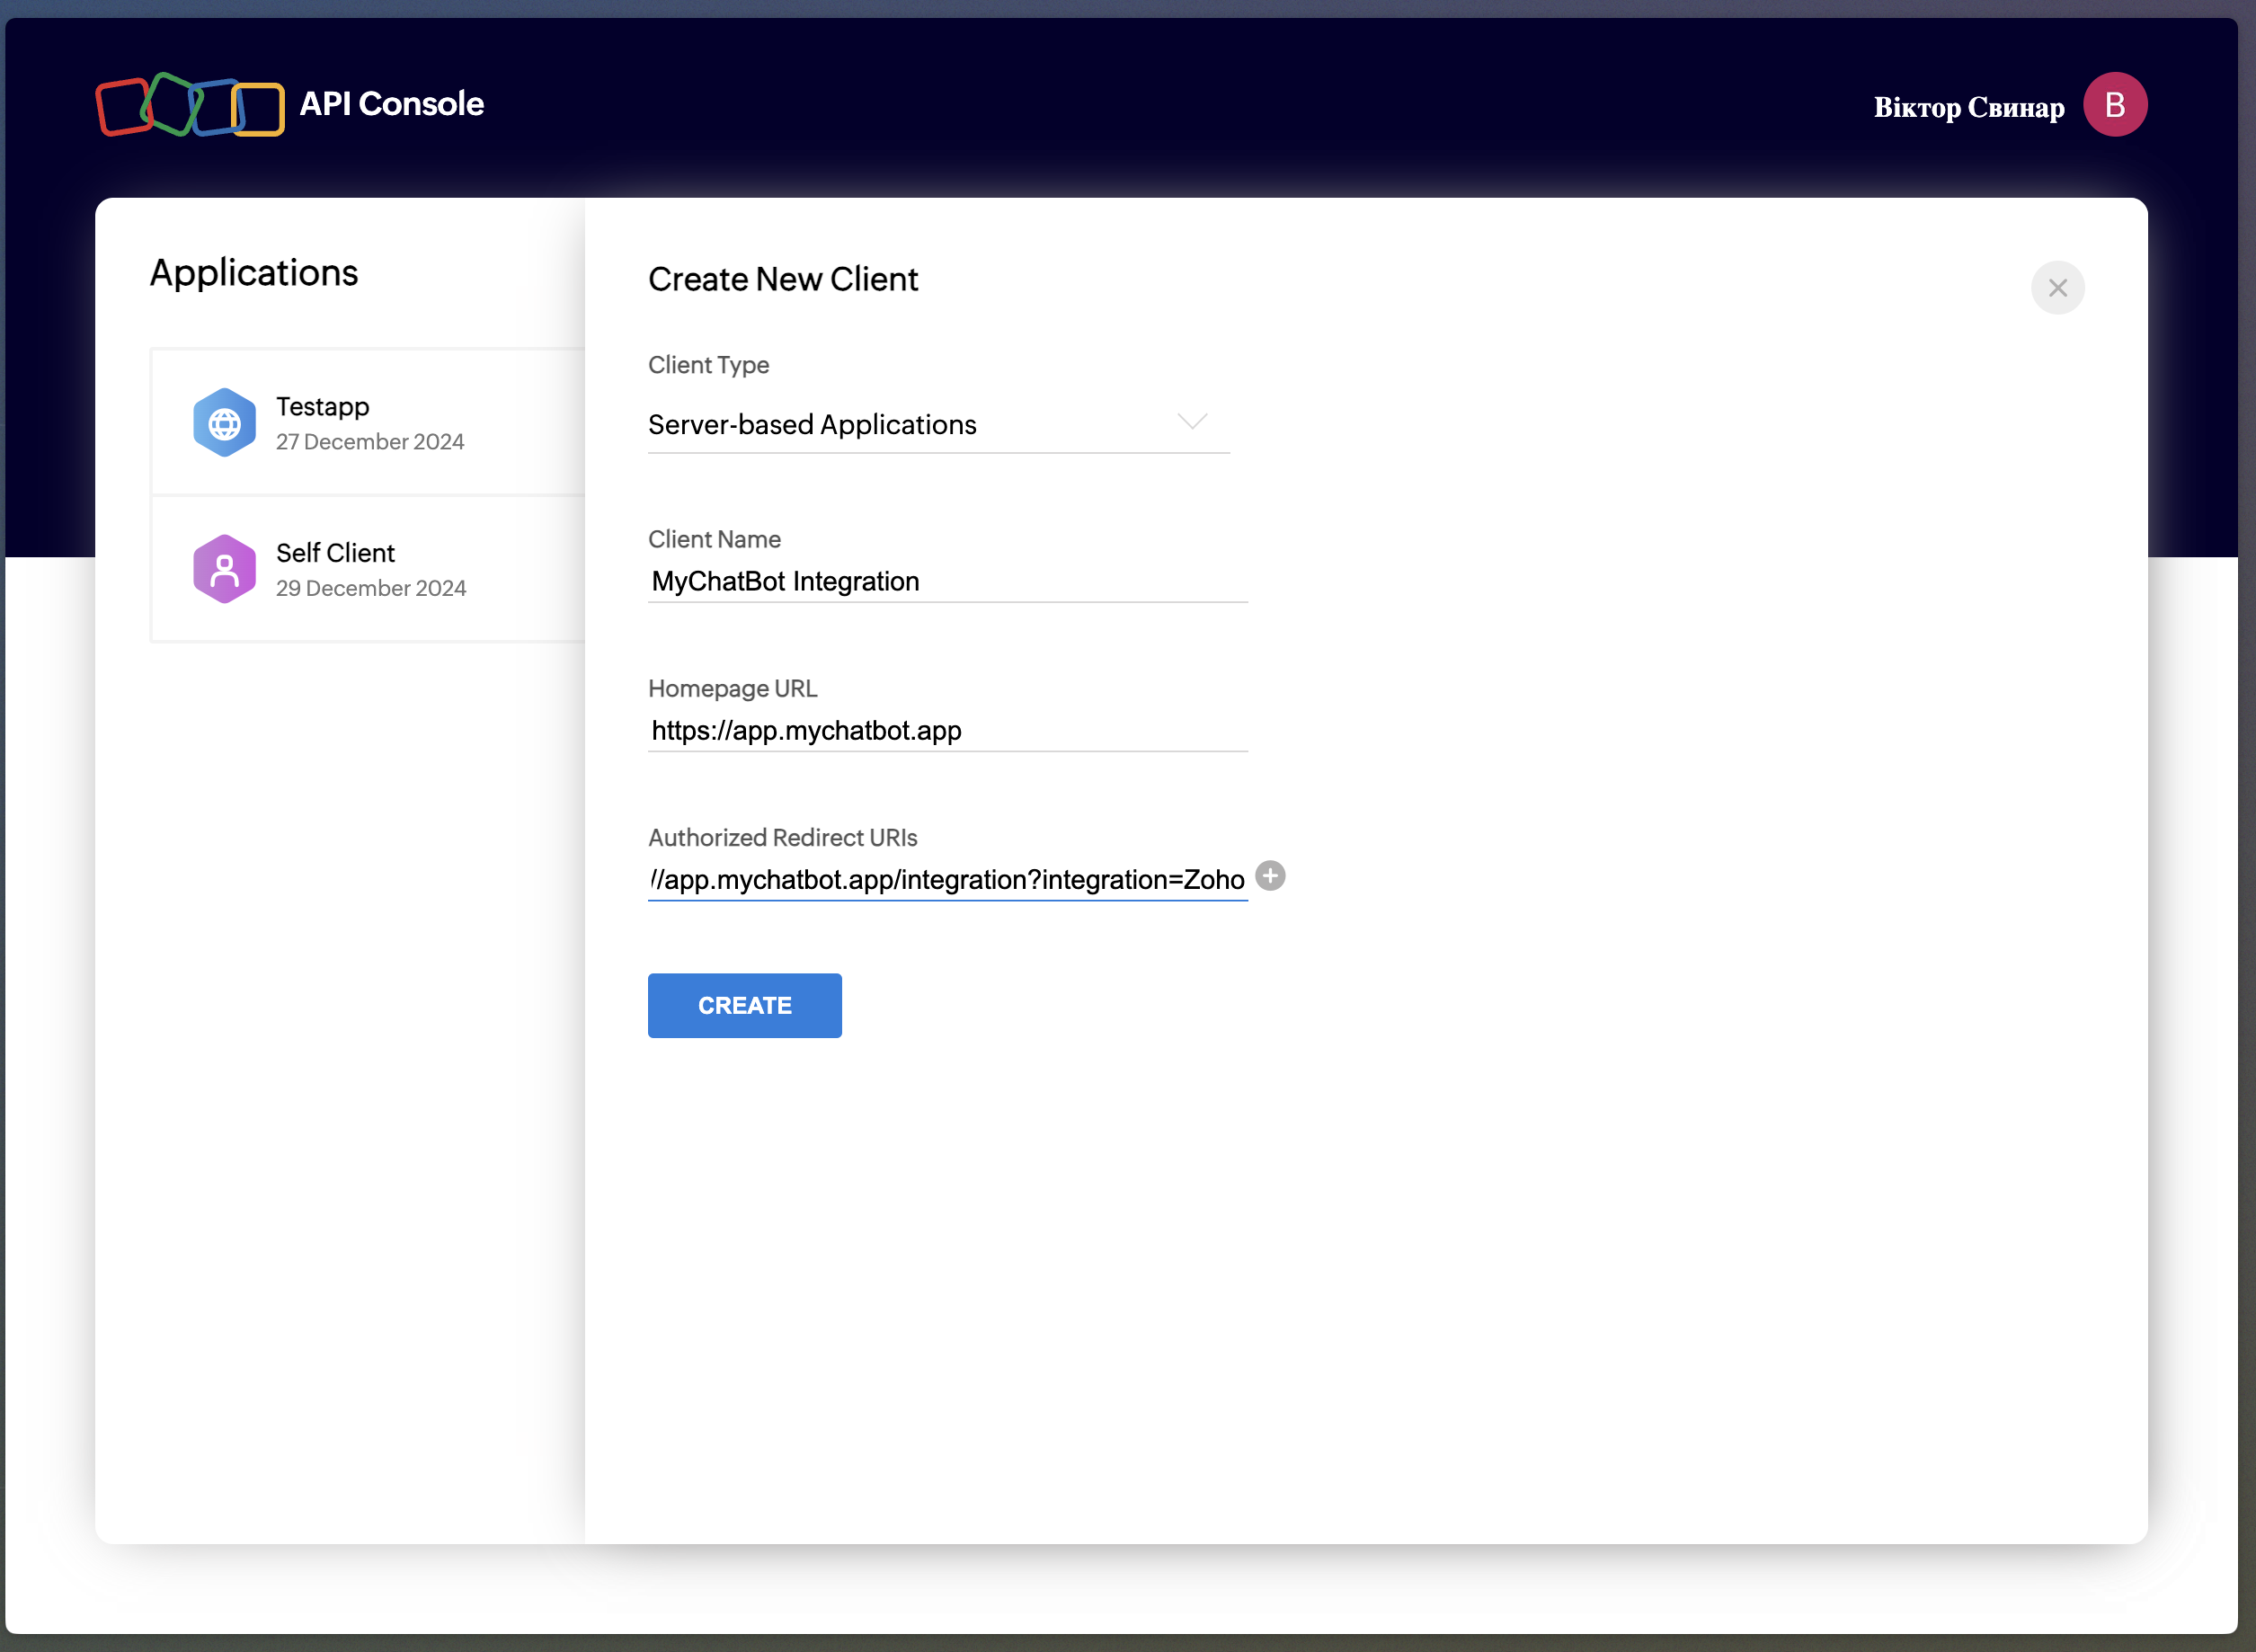
- Click Create to generate your client credentials.
- Copy the Client ID and Client Secret.
- Check the box to allow Multi-DC.
Creating the integration on MyChatBot
In the app
Go to Integrations → select your agent → find Zoho CRM → Connect. Direct link: app.mychatbot.app/integration?integration=Zoho
- Open the Integrations tab in your MyChatBot dashboard.
- Select the agent you want to connect to Zoho CRM.
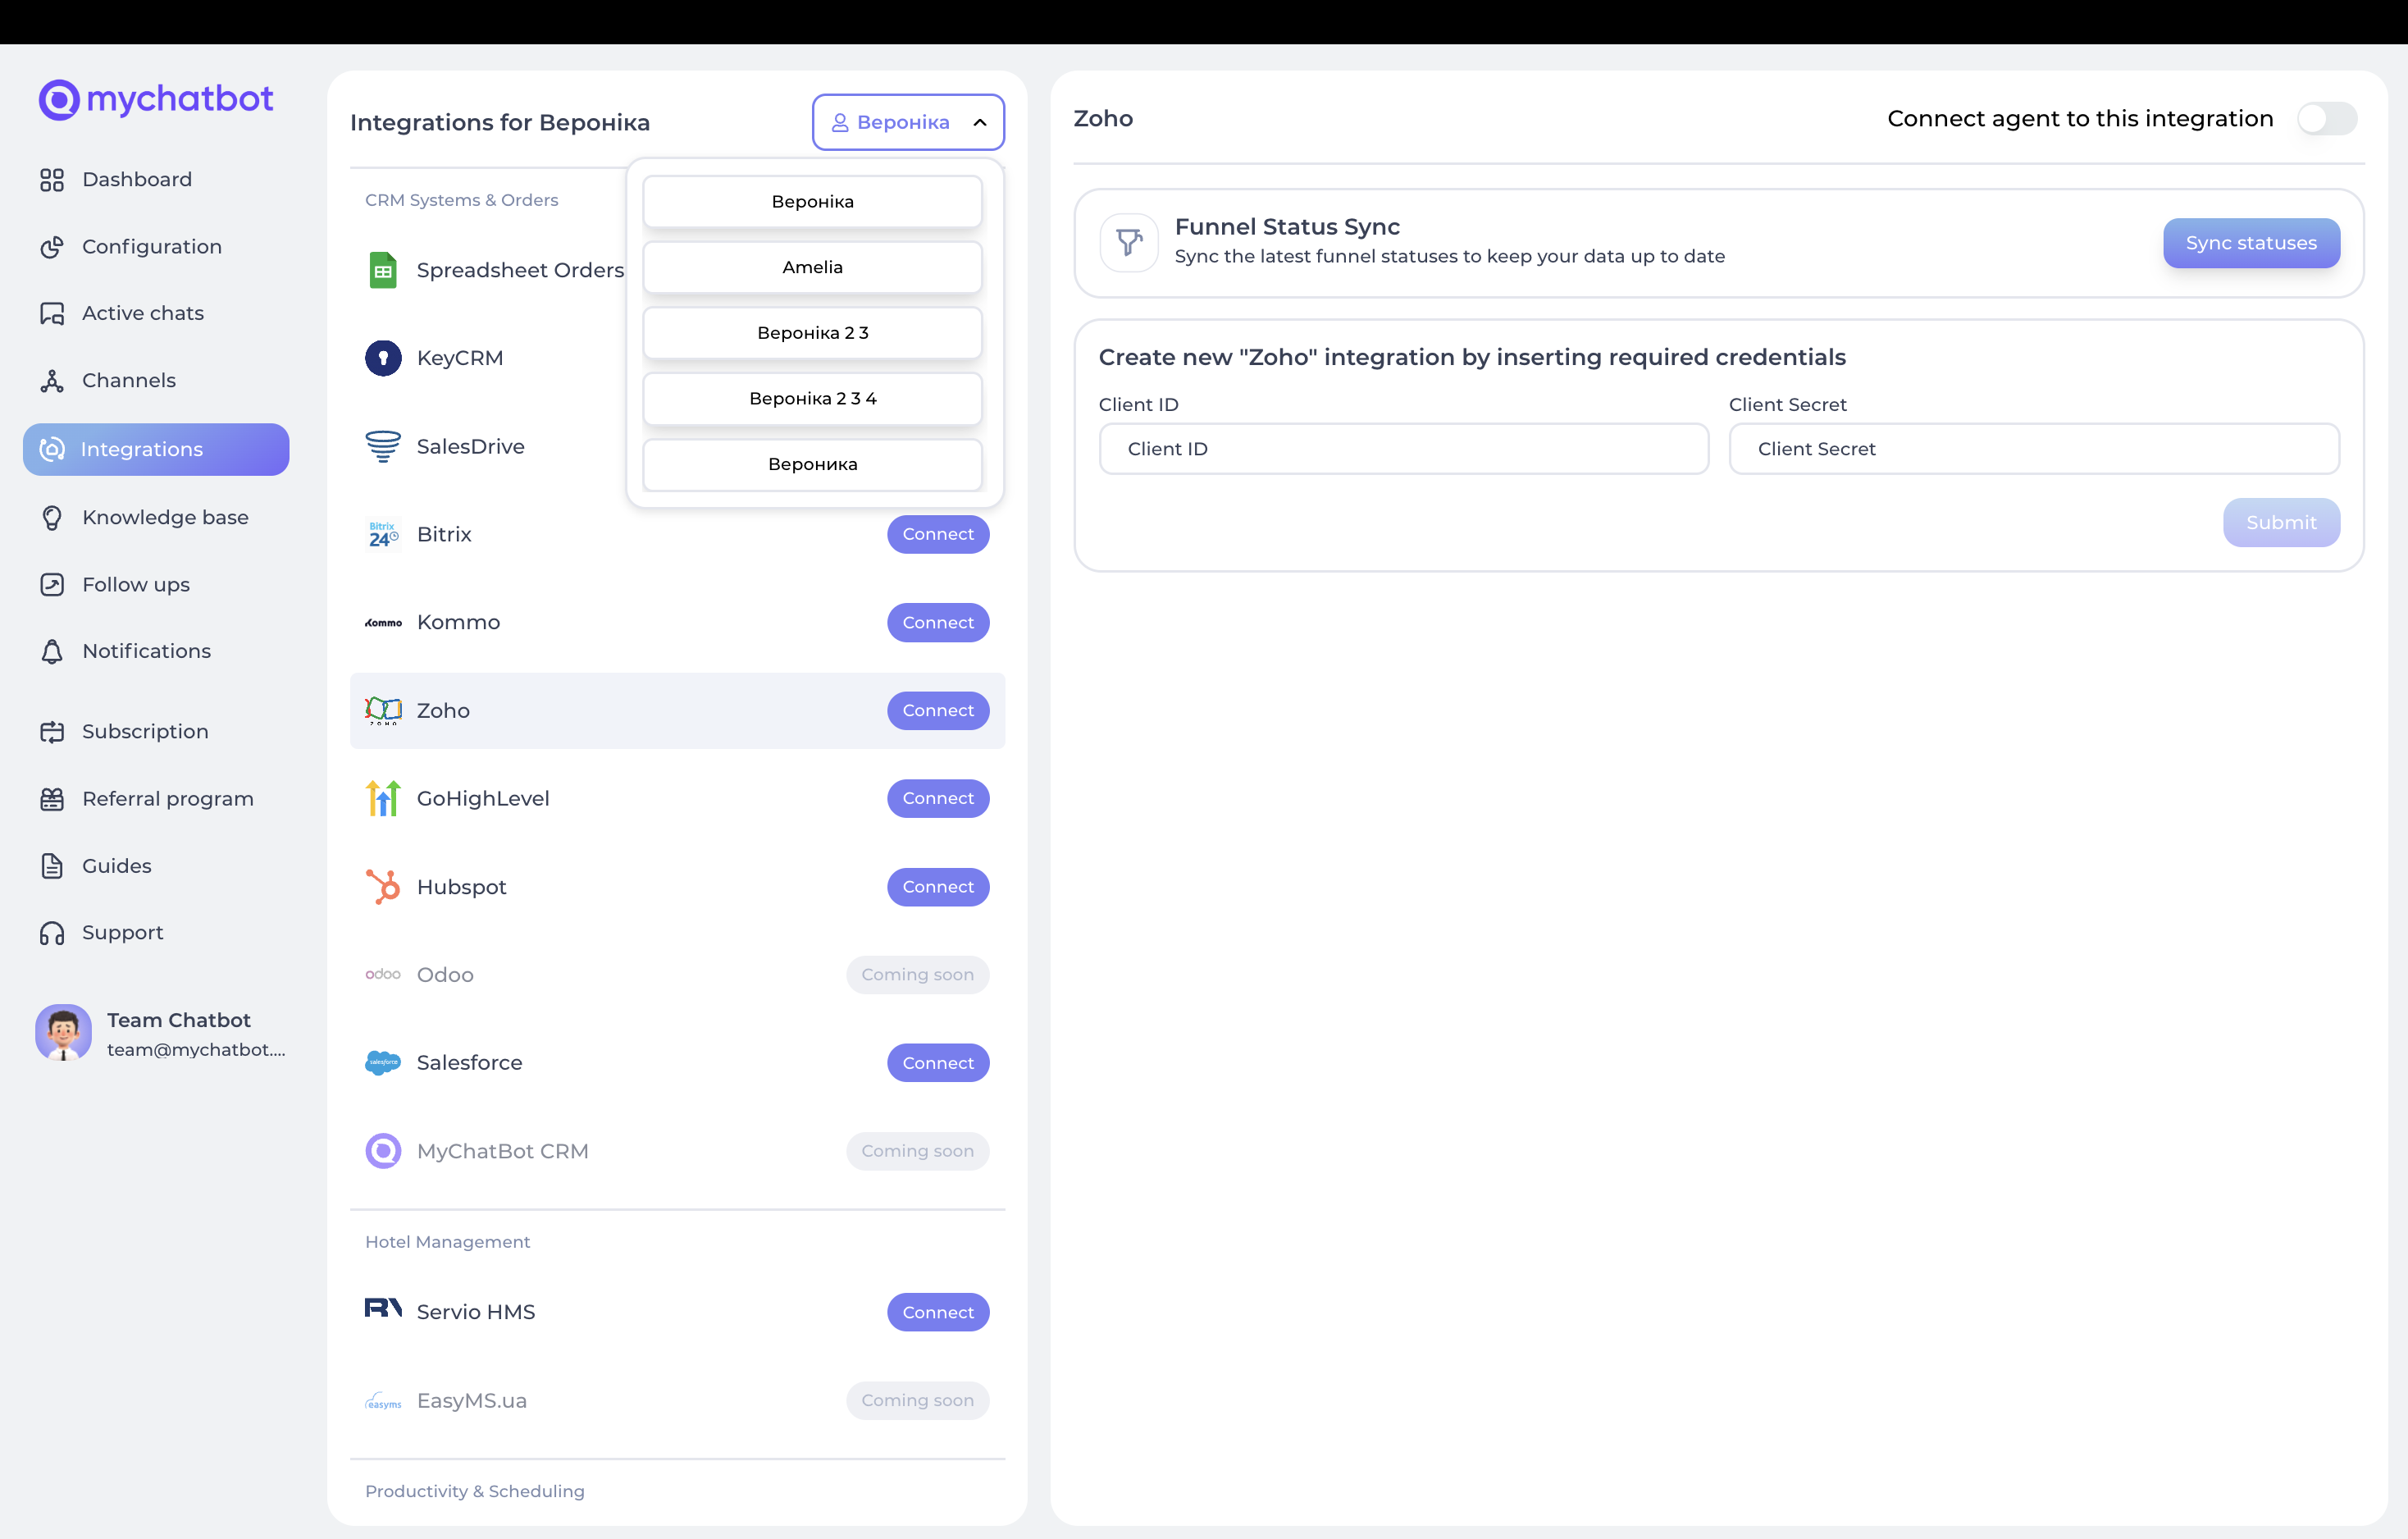
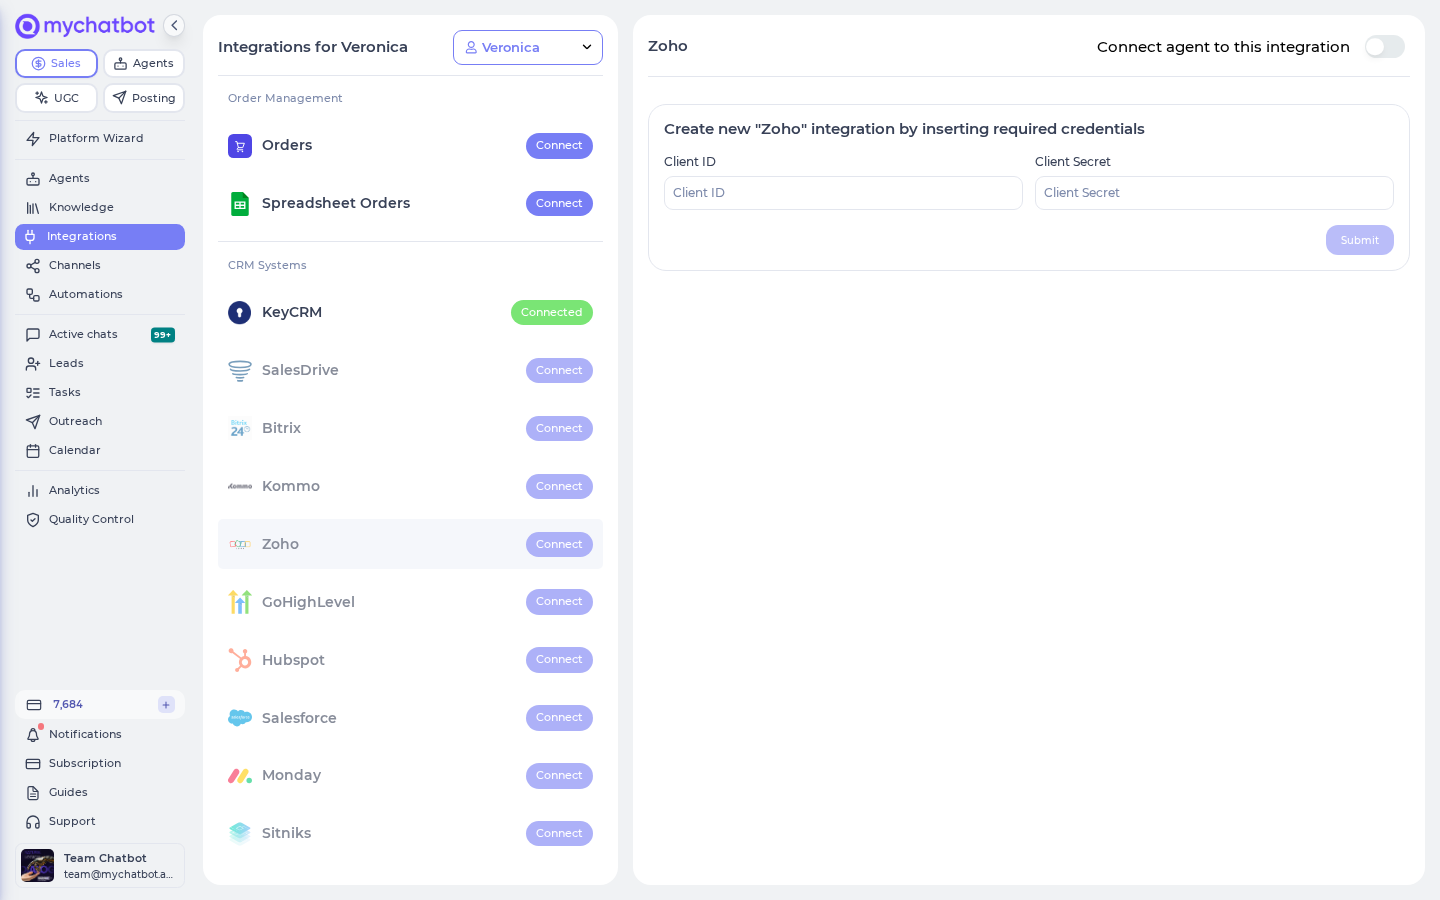
- Scroll down to find Zoho CRM in the integrations list.
- Click Connect.
- Provide the following credentials:
- Client ID: from your Zoho developer console
- Client Secret: from your Zoho developer console
- Access Token: generated token for API access
- Refresh Token: token used to refresh the access token when it expires
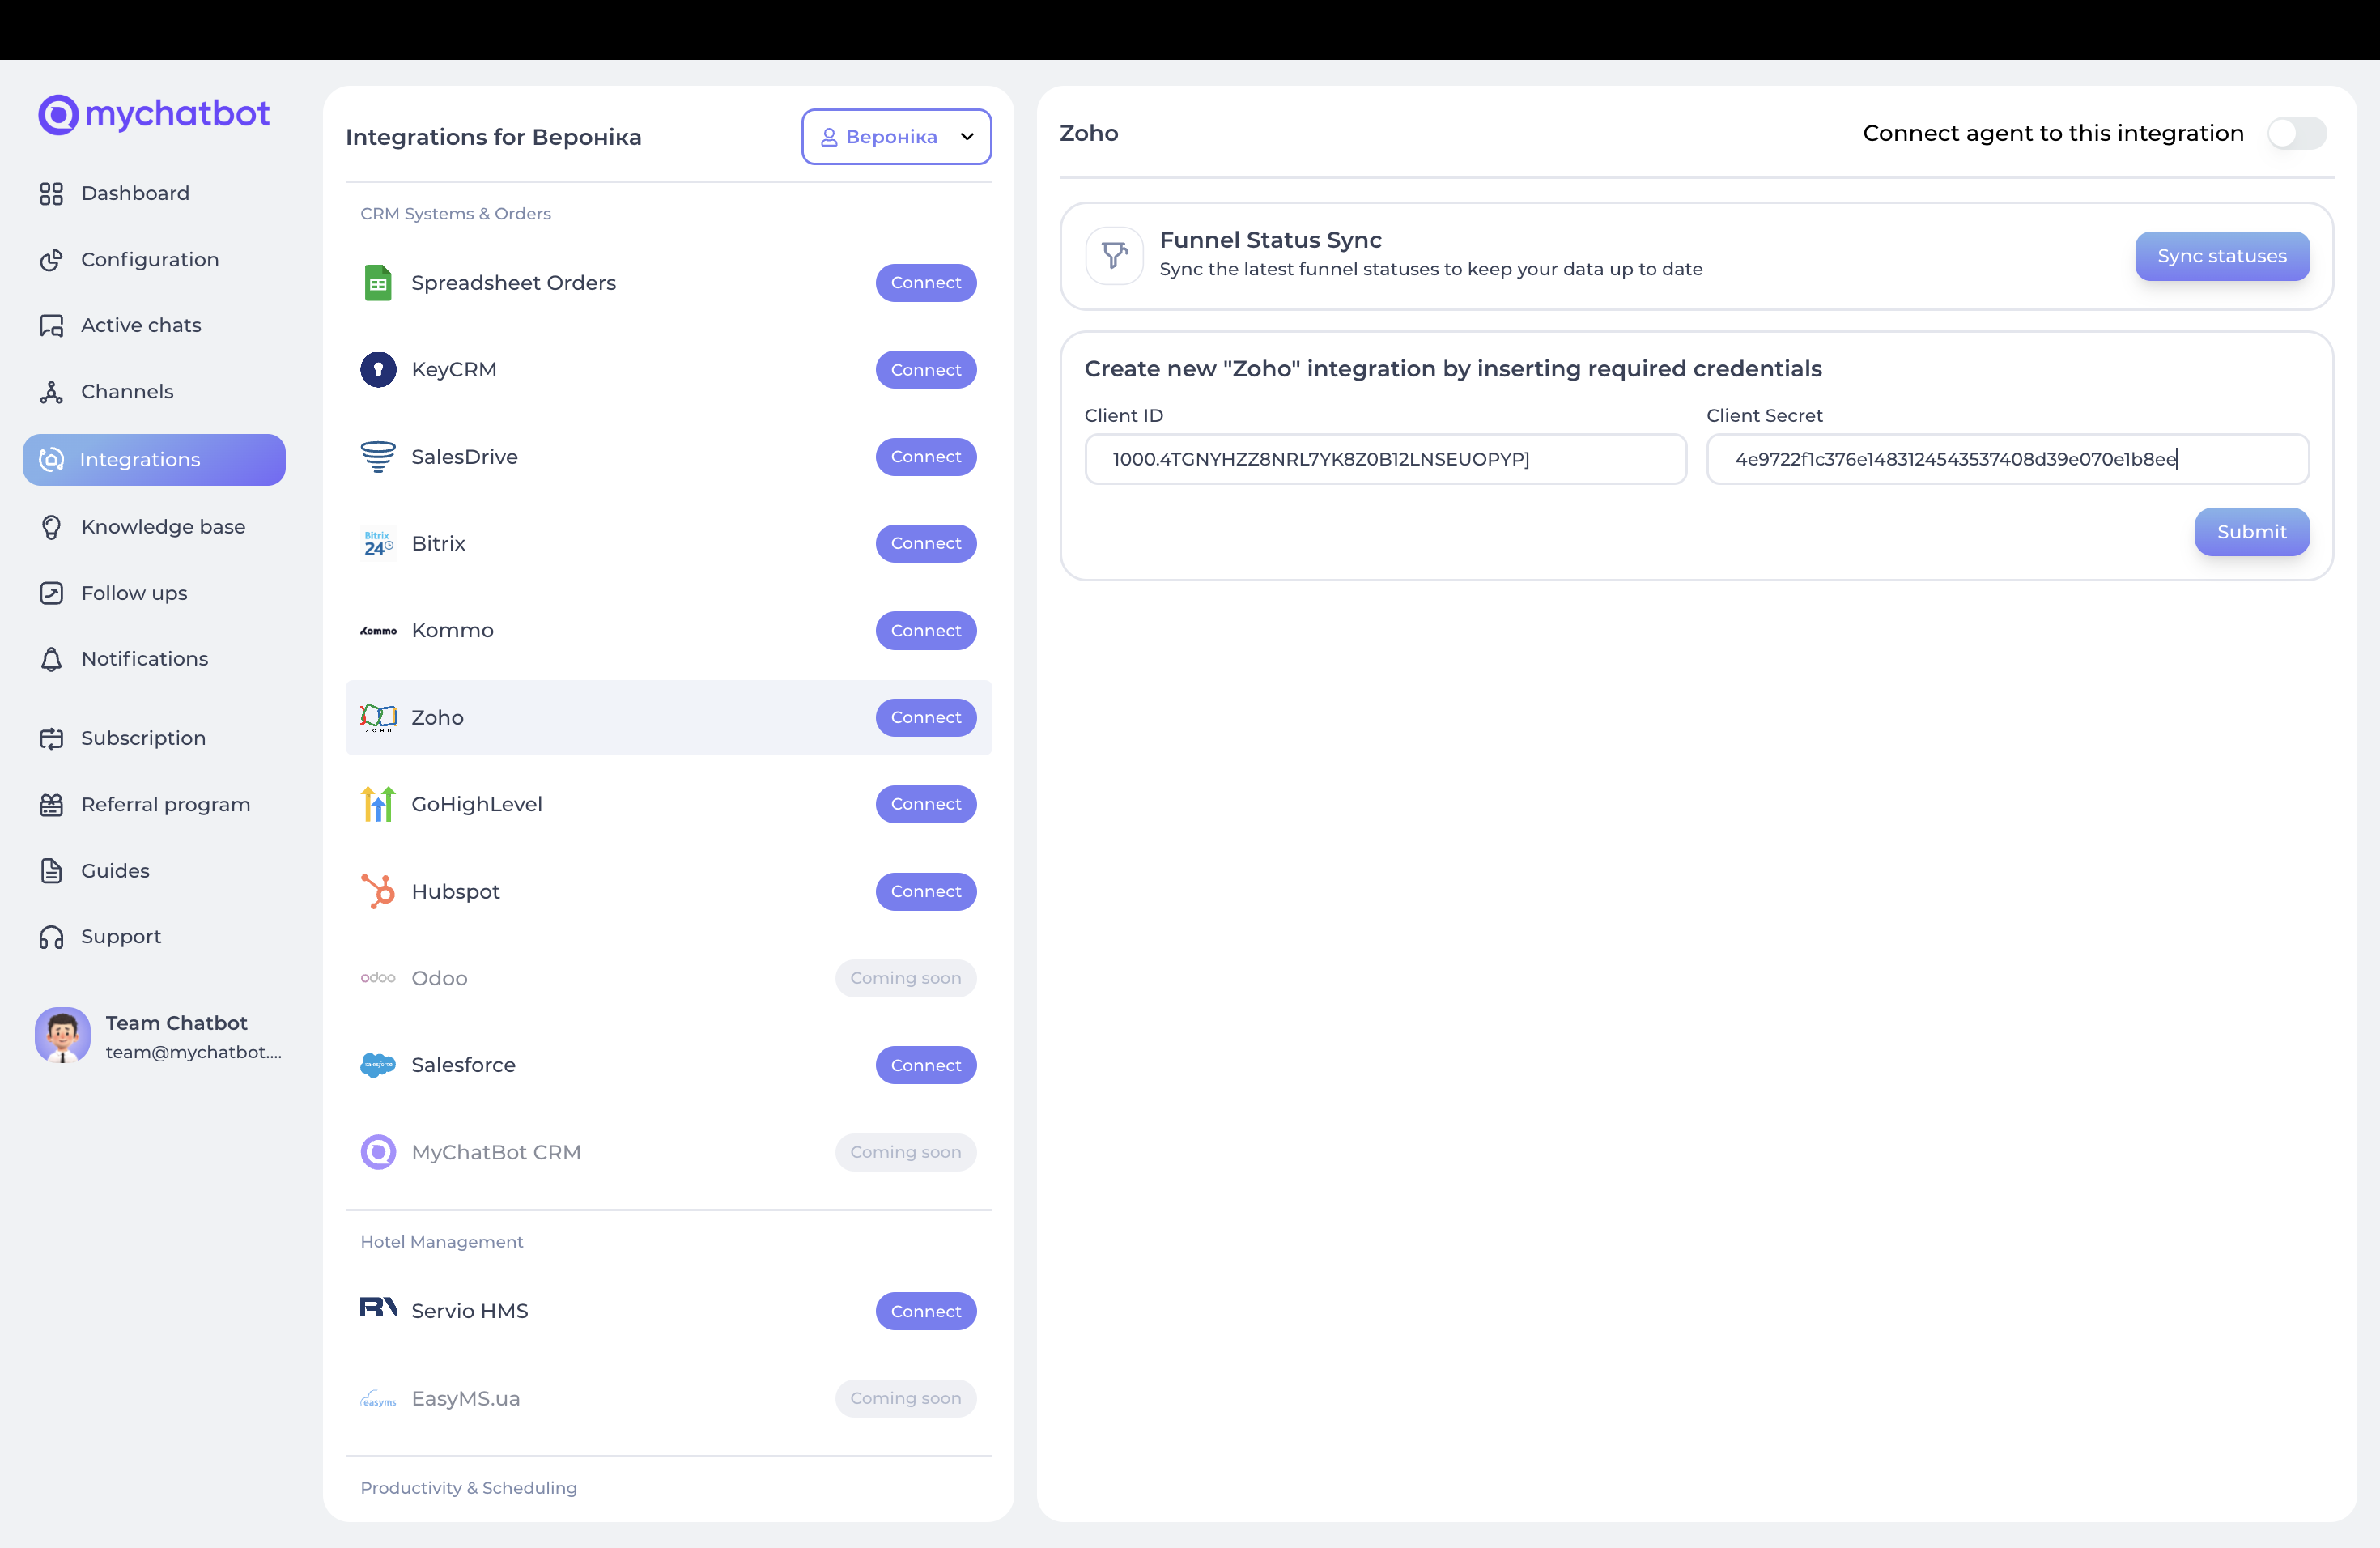
- Click Submit to save your integration.
Entities & data fields configuration
After connecting your Zoho account, choose which entities and fields your agent can access. This is the Entities & Data Fields Configuration panel — "select the entities and their fields you want the assistant to fill."
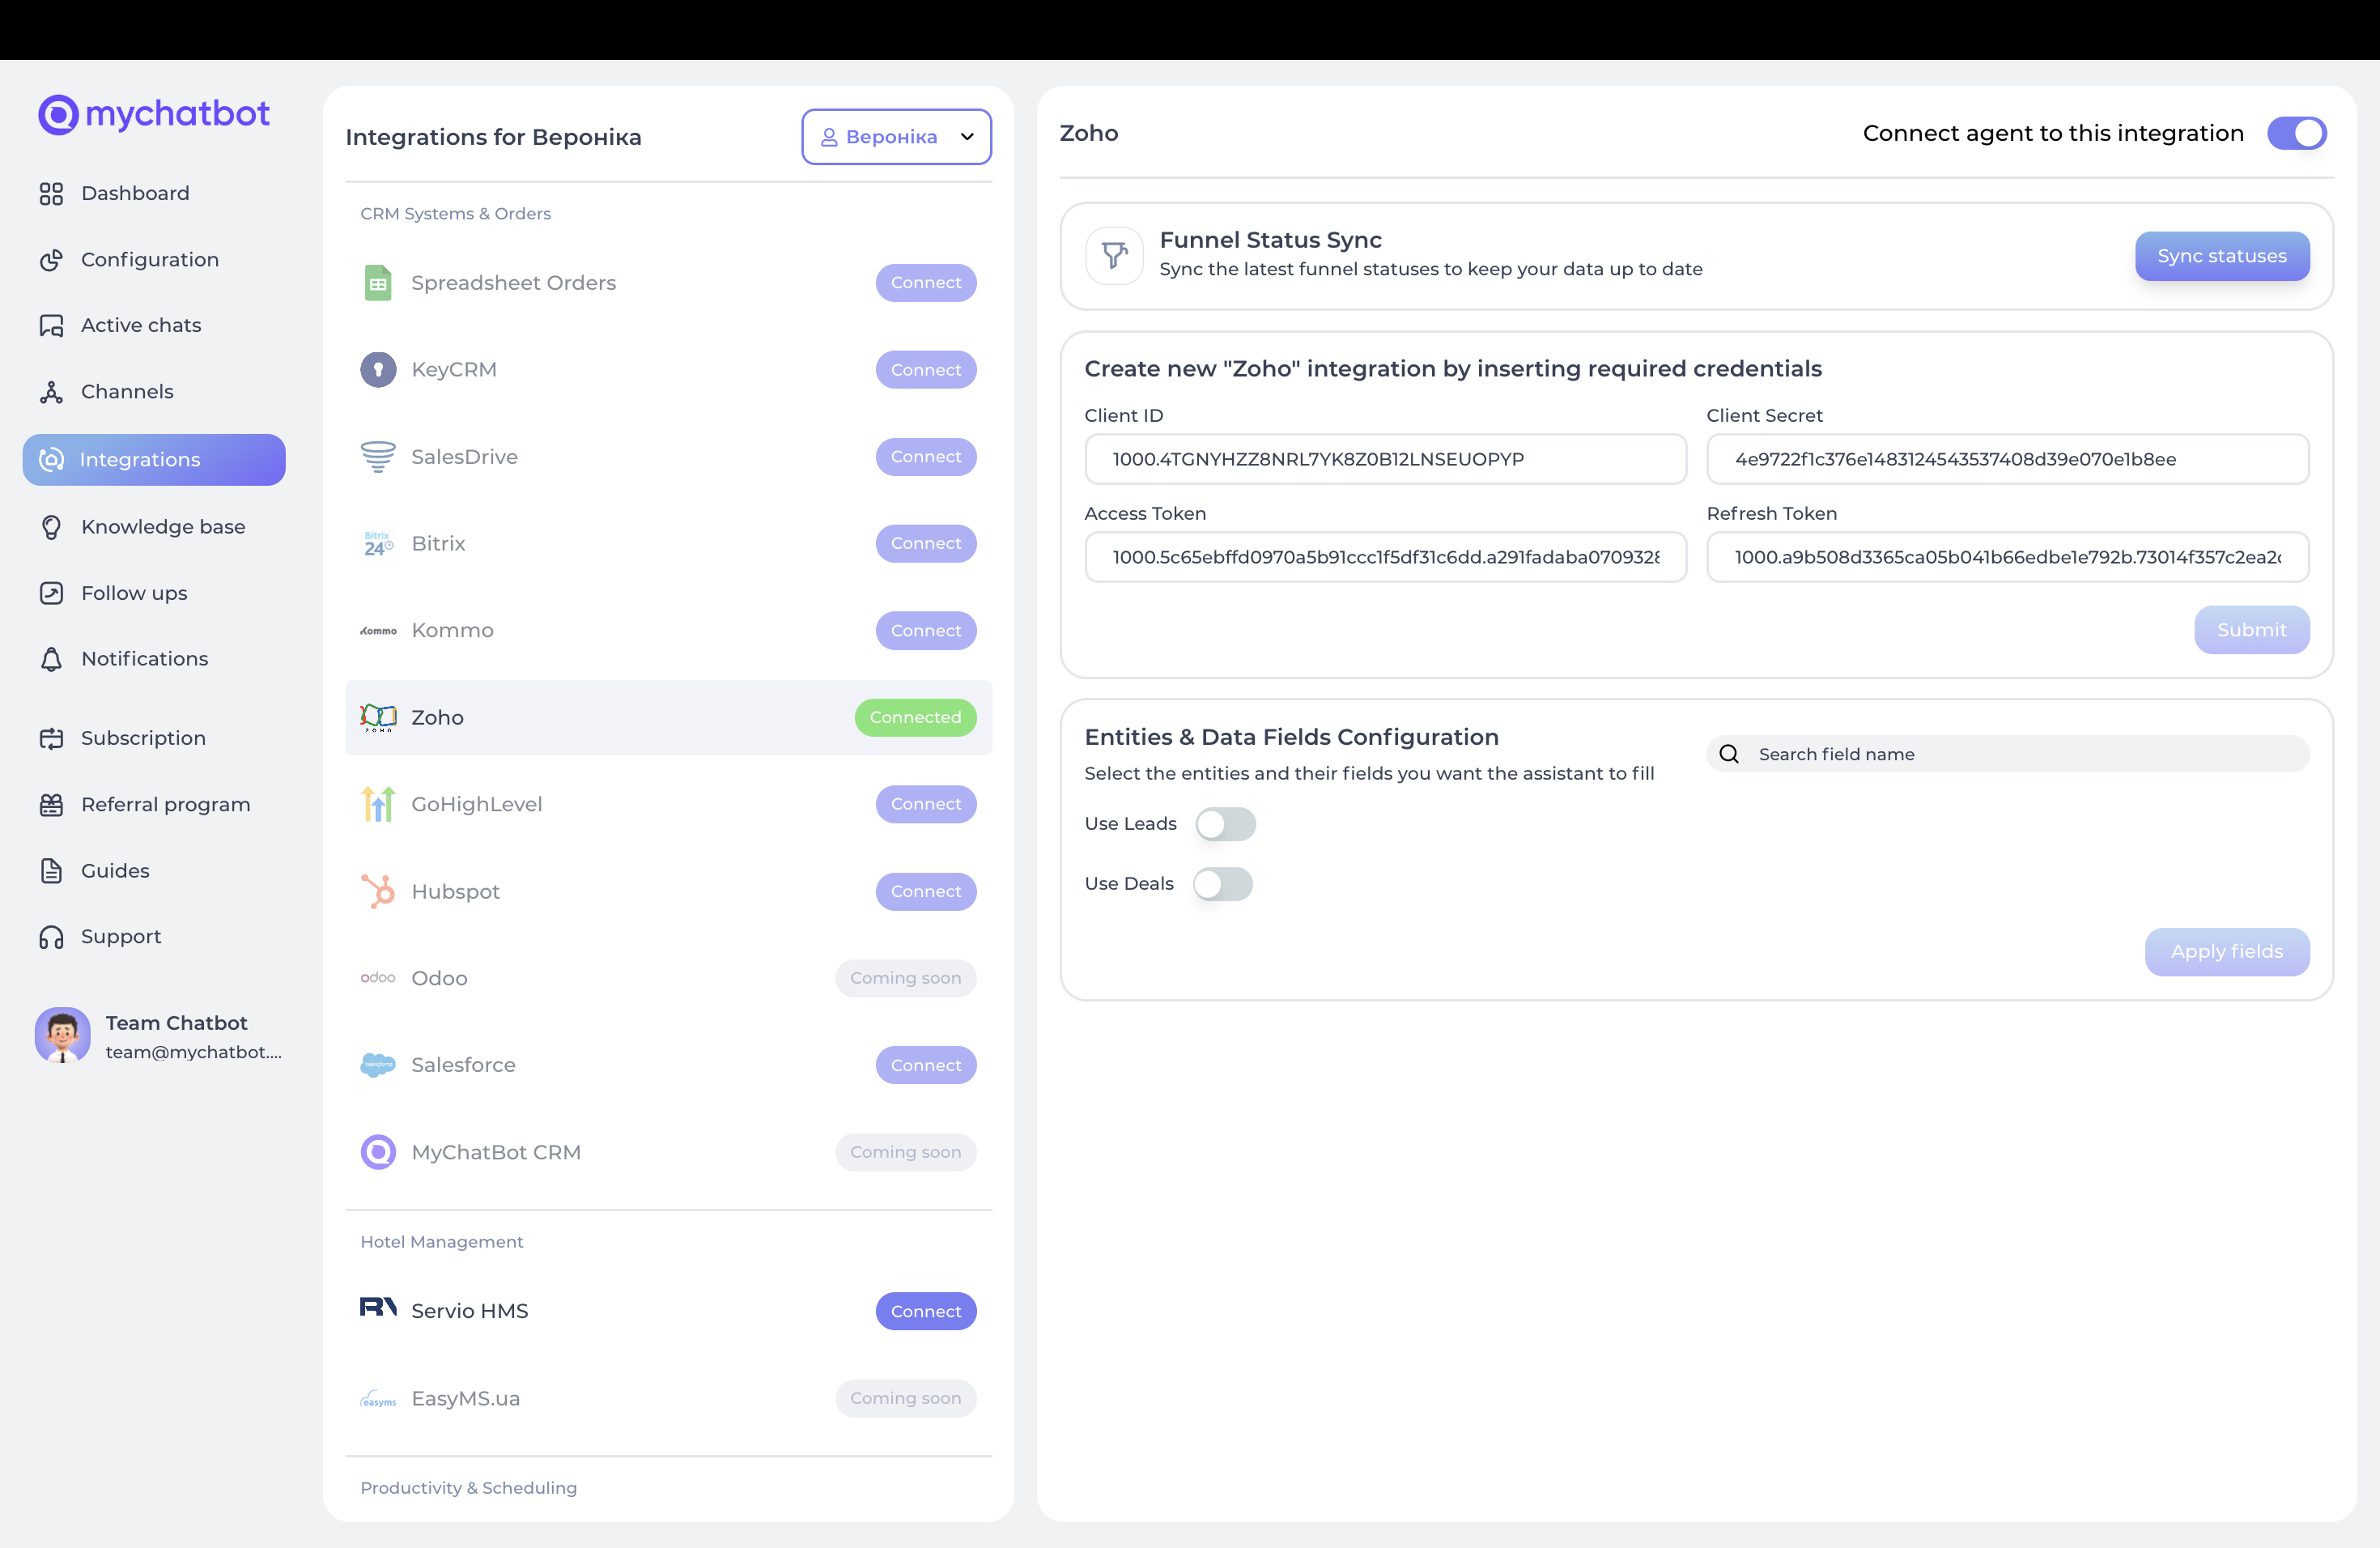
- In the Entities & Data Fields Configuration section, you can:
- Toggle Use Leads to enable lead management.
- Toggle Use Deals to enable deal management.
- For each entity type, select:
- Standard fields from Zoho CRM.
- Custom fields that exist in your CRM.
- Click Apply fields to save your configuration.
Every field you enable here becomes something the agent is allowed to fill on that record. Turn a field off and the agent leaves it alone.
In the app
The Phone Lead/Deal/Entity Settings below the field list let you mark phone as required for leads, deals, or contacts — useful when your team can't work a record without a number.
Understanding entity types
Zoho integration supports multiple entity types:
- Leads: potential customers who have shown interest.
- Deals: sales opportunities with associated contacts and products.
- Contacts: individual people associated with your leads and deals.
Field types
Each entity has two types of fields:
- Standard fields: default fields provided by Zoho.
- Custom fields: user-defined fields specific to your CRM setup.
Special fields
Several special fields require specific attention:
- Lead status / stage
- For leads: represents the current stage in the lead pipeline (e.g., "New", "Contacted", "Qualified").
- Must match exactly with the statuses defined in your Zoho account.
- Lead source
- Identifies where the lead originated.
- Automatically set to
AI-+ the name of your assistant. - Helps track which leads came from your AI assistant.
- Description / Chat Link
- Automatically populated with a link back to the conversation.
- Lets your team review the AI conversation that generated the lead/deal.
- Closing date
- Required for deals in Zoho.
- Must be provided in a valid date format when creating deals.
Working with custom fields
Zoho lets you create custom fields for specific business needs:
- When your agent needs a custom field that doesn't exist yet:
- MyChatBot attempts to create it automatically.
- Auto-creation is capped at a number of custom fields per entity (tuned by MyChatBot).
- A notification appears if the field limit is exceeded.
- Custom field types supported:
- Text fields
- Date fields
- Number fields
- Choice/dropdown fields
Zoho gotchas
Field names and status values must match your Zoho pipeline exactly, including case — a mismatched status fails silently against your pipeline. MyChatBot also caps how many custom fields it will auto-create per entity (tuned by MyChatBot); once you hit that cap, auto-creation stops and you'll get a limit notification, so prioritize which fields matter most.
What your agent can do
After connecting Zoho CRM and enabling entities, your agent can take these CRM actions on its own during a conversation. Every field you selected in Entities & Data Fields Configuration is available for the agent to fill.
| Action | What the agent does | When to enable it |
|---|---|---|
| Create a lead | Adds a new lead (full name required, plus phone, status, and any custom fields you enabled). Source is auto-tagged to your assistant, a chat link is attached, and a matching contact is linked if the phone number is already on file. | Turn on Use Leads to capture new prospects automatically. |
| Update a lead | Edits an existing lead — name, phone, status/stage, or any enabled field values. | Turn on Use Leads to move prospects through your pipeline. |
| Create a deal | Opens a new deal with a contact (full name, phone, and closing date required; amount and custom fields optional). Finds or creates the contact by phone and the account by name, tags the source, attaches a chat link, and updates the matching lead if one exists. | Turn on Use Deals for buying-intent conversations. |
| Add a contact | Records a person's details (full name and phone required) without opening a lead or deal. | Enable contacts to capture details early in a chat. |
The agent chooses the right action for the moment based on your instructions — you don't wire anything up beyond enabling the entities and fields above.
Guiding the agent in its instructions
You steer these CRM actions from your agent's instructions in plain language. The agent picks the right action automatically; you just describe when and with what.
In the app
Edit these in your agent's setup under its instructions/prompt. Open your agent from app.mychatbot.app and add the guidance below.
Creating leads
When a new customer contacts us, create a lead in Zoho with:
- Their full name
- Phone number
- Set status to "New"
- Add any additional information they provide to custom fields
Updating lead status
When a customer shows increased interest:
1. Update their lead status to "Qualified"
2. Add notes about their specific interests

When a customer requests more information:
1. Update their lead status to "Contacted"
2. Add details about what information they requested
Creating deals
When a customer is ready to make a purchase:
1. Create a deal with their contact information
2. Include their full name and phone number
3. Set the closing date to 7 days from today
4. Add the deal amount based on their product selection
5. Include any special requirements in custom fields
Managing contacts
When gathering customer information:
1. Record the customer's contact details
2. Capture their full name and phone number
3. Inform them that their information has been recorded
Best practices
- Lead status progression — move leads through your pipeline logically:
- New leads start with "New" status.
- Progress to "Contacted" after initial conversation.
- Move to "Qualified" when specific criteria are met.
- Data completeness — encourage your agent to collect:
- Complete contact information (name, phone, email).
- Specific needs or requirements.
- Timeline for the purchase decision.
- Deal creation timing — create deals when:
- The customer shows clear buying intent.
- Specific products/services have been selected.
- Pricing has been discussed.
- Custom field usage — use custom fields for:
- Industry-specific information.
- Customer preferences.
- Special requirements.
- Source of referral details.
Troubleshooting
- Authentication issues
- Ensure your access and refresh tokens are current.
- If authentication fails, regenerate tokens in Zoho.
- Field creation limits
- If auto-creation reaches the field limit, prioritize which fields are most important.
- Consider reusing existing fields for multiple purposes with clear formatting.
- Data mapping problems
- Ensure field names match exactly between your agent instructions and Zoho CRM.
- Check for case sensitivity in field names.
- Date format issues
- Use standard date formats for the closing date (YYYY-MM-DD).
- For future dates, use clear relative instructions in your agent setup.