
Appearance
Integrations overview
MyChatBot integrates with popular CRM systems, schedulers, and other business tools. Connecting one lets your assistant work directly with the software you already use — so it can look up a customer, create a lead, book an appointment, update an order, and keep your funnel statuses in sync, all inside a normal conversation.
Use cases
- Write every qualified chat into your CRM as a lead or deal, with exactly the fields you tick.
- Keep lead funnel statuses aligned between MyChatBot and the CRM with one Sync statuses click.
- Let the assistant book, check, and cancel appointments (Altegio, Wlaunch, Google Calendar, or the native Calendar).
- Record confirmed purchases as orders (KeyCRM, SalesDrive, native Orders) or as rows in a sheet (Spreadsheet Orders).
- Bolt on any extra ability through a Custom MCP server.
At a glance
| You need | Where | Result |
|---|---|---|
| A supported CRM, scheduler, or business tool | Your existing business software | A system the assistant can read from and write to |
| The right assistant selected | Integrations page → dropdown in the header (app.mychatbot.app/integration) | The title reads Integrations for <agent> — everything below applies to that assistant |
| That tool connected for the assistant | Pick it under Available Integrations, authenticate, Submit | The tool's card shows a Connected chip for that assistant |
Pick your tool
Each supported integration has its own setup page with step-by-step screenshots. Start from the specific tool you use — see Supported integrations below.
Where to set them up
In the app
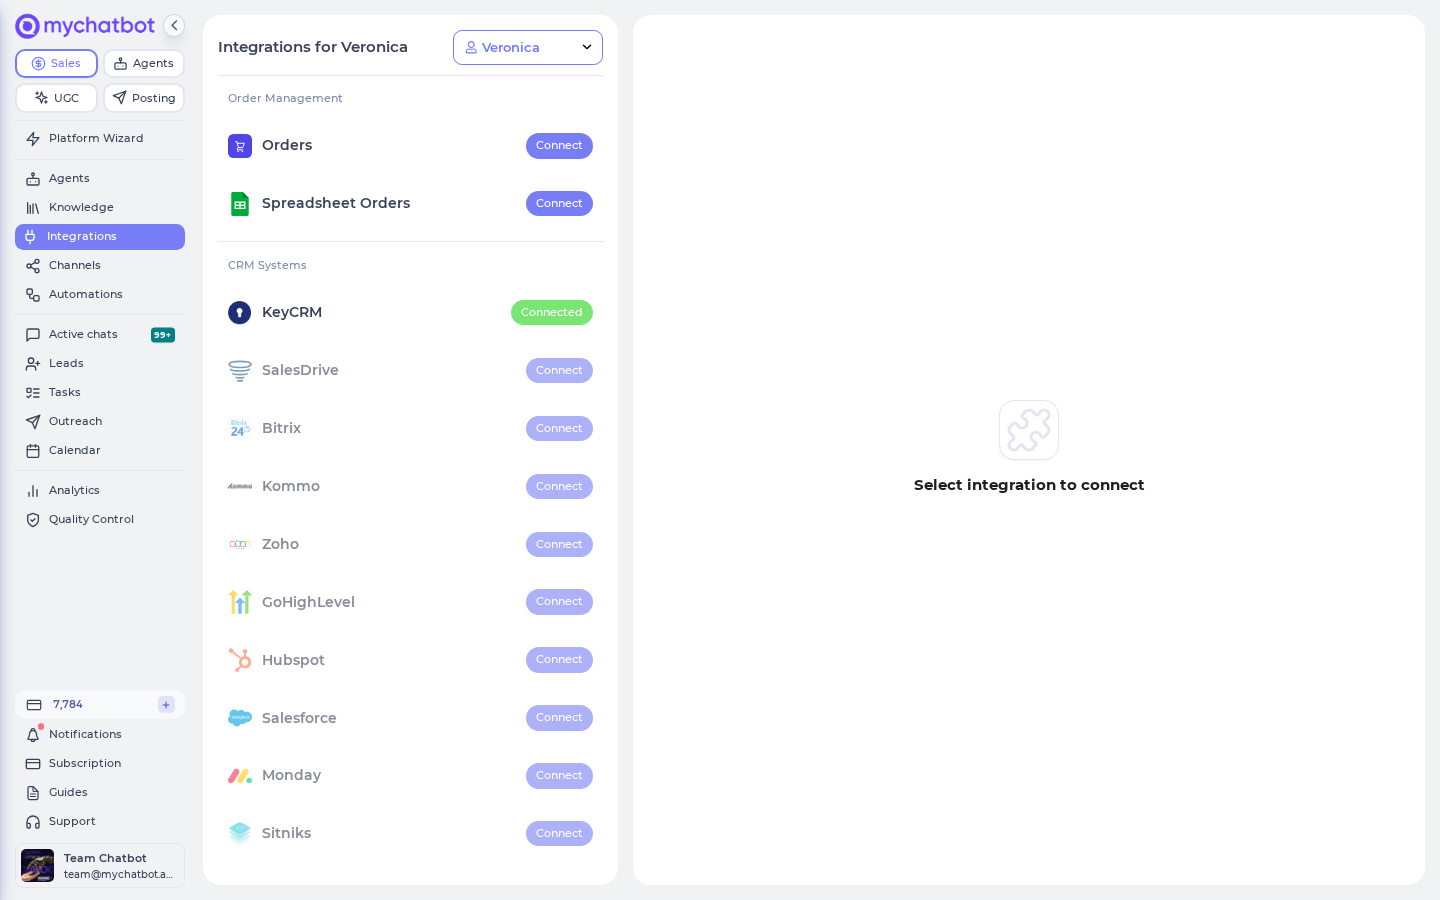
Everything on this page happens under Integrations in the left sidebar → app.mychatbot.app/integration. The page lists every tool under Available Integrations, grouped into five categories: Order Management, CRM Systems, Hotel Management, Productivity & Scheduling, and MCP Providers.
Integrations are configured per assistant
The dropdown in the page header picks which assistant you're configuring — the title changes to Integrations for <agent>. Status chips, credential forms, and every setting on the page apply to that assistant only. Connecting a CRM for one assistant does nothing for your other assistants: switch assistants in the dropdown and connect again, or reuse the existing connection (see Reuse a connection for another assistant).
You can deep-link straight to a tool with the integration URL parameter — for example app.mychatbot.app/integration?integration=KeyCRM. The selected assistant is kept in the URL as well, so a link can preselect both the assistant and the tool.
How connecting works
Connecting is the same shape for every tool, with the tool deciding how you authenticate:
- Open Integrations → app.mychatbot.app/integration.
- Pick the assistant in the header dropdown. Until you do, the settings panel reads Select assistant to connect.
- Pick a tool from Available Integrations (the panel prompts Select integration to connect).
- Authenticate. Depending on the tool this is either a one-click Connect (OAuth — you approve access on the provider's own login screen) or a short form titled Create new "<tool>" integration (fields like API Key, Domain, Client ID / Client Secret, or Username / Password). The tool's own setup page tells you exactly which values to paste and where to find them.
- Submit. The Submit button stays disabled until every required field is filled. Once saved, the tool's card in the list shows a Connected chip for this assistant.
Submitting the form (or choosing an existing connection) is what attaches the tool to the selected assistant. The Connect agent to this integration switch at the top of the settings panel shows that attachment — flip it off to detach the assistant from the tool. (It only works as an off-switch: while the tool isn't connected, the switch is inactive.)
One CRM — and one scheduler — per assistant
An assistant can have only one CRM system connected at a time: as soon as one tool in the CRM Systems category shows Connected, the others in that category gray out until you disconnect it. The scheduling tools Altegio, Wlaunch, and Google Calendar are mutually exclusive in the same way — connecting one disables the other two for that assistant.
Card statuses
Every card under Available Integrations carries a status chip:
| Chip | Meaning |
|---|---|
| Connected | Connected for the currently selected assistant |
| Connect | Available on your plan — select the card to set it up |
| PRO | Needs a higher plan (shown on the Standard plan or with no active plan) |
| Standard | Included in the Standard plan (only Spreadsheet Orders) |
| Coming soon | Listed but not selectable yet |
Plan availability
On the Standard plan (or with no active plan) only Spreadsheet Orders can be connected — every other tool shows PRO and can't be selected until you upgrade. Tools that are already Connected keep working.
Reuse a connection for another assistant
Because integrations are scoped per assistant, the page saves you from re-entering credentials. If another assistant already has the selected tool connected, a panel titled You can choose from established connection appears:
- Open Select Existing Connection and pick a connection — options are labeled with the names of the assistants using it.
- Click Choose this integration.
MyChatBot creates a copy of that connection for the current assistant and shows a notice: "This <tool> integration was copied from an existing connection used by <agents>." Each assistant keeps its own copy, so field selections, pipeline, and sync settings can differ per assistant. To copy from a different source later, switch off Connect agent to this integration first — then pick another existing connection or create a new one.
Supported integrations
Each of these has a dedicated, screenshot-driven setup page:
| Integration | What it's for | Setup page |
|---|---|---|
| HubSpot | CRM — contacts, deals, lead capture | HubSpot |
| Salesforce | CRM — enterprise sales pipeline | Salesforce |
| Zoho | CRM — leads and contacts | Zoho |
| Bitrix24 | CRM + funnel/pipeline sync | Bitrix24 |
| Kommo | CRM — messaging-first pipeline | Kommo |
| KeyCRM | eCommerce order & CRM automation | KeyCRM |
| SalesDrive | CRM — orders and leads | SalesDrive |
| GoHighLevel | CRM + marketing automation | GoHighLevel |
| Altegio | Appointment scheduling / bookings | Altegio |
| Google Calendar | Scheduling — read and create events | Google Calendar |
| Spreadsheet Orders (Google Spreadsheet) | Read/write orders and data in a sheet | Google Spreadsheet |
| Task Manager | Create and track internal tasks | Task Manager |
Also on the page (no dedicated guide yet)
These tools appear on the same Integrations page and follow the same connect flow — the form tells you exactly what to paste:
| Integration | Category | What you enter |
|---|---|---|
| Orders (native) | Order Management | Nothing to authenticate — see Orders |
| Calendar (native) | Productivity & Scheduling | Nothing to authenticate — see Calendar |
| Servio HMS | Hotel Management | API Key, Service URL — plus options: Read prices from Servio, Hotel ID, Max additional places, Enforce minimum stay |
| EasyMS | Hotel Management | Username, Password, Organization ID |
| Sitniks | CRM Systems | API Key — adds a Sitniks Products catalog-indexing panel once connected |
| Monday | CRM Systems | API Key |
| NetHunt | CRM Systems | API Key, Username; optional Leads Folder / Deals Folder (names are case-sensitive and must match NetHunt exactly) |
| OneBox CRM | CRM Systems | OneBox CRM domain, login, Rest API Password |
| Odoo | CRM Systems | API Key, Domain, Username |
| Wlaunch | Productivity & Scheduling | API Key |
| Custom MCP | MCP Providers | MCP Name, MCP URL, optional Custom Headers — then tick the tools to expose and Apply tools |
Don't see your tool?
More CRMs and business apps are available as agent connectors (see below), and you can wire up anything else with a Custom connector or a Custom MCP server.
Choose what the assistant can fill
For most CRM systems, an Entities & Data Fields Configuration panel appears after connecting — "Select the entities and their fields you want the assistant to fill":
- Turn on Use Leads / Use Deals (or Use Entities, depending on the CRM) to decide what the assistant may create and update.
- Tick the fields per entity — grouped into Standard fields, Most used custom fields, and Other custom fields.
- Where the CRM has pipelines, pick where new records land (Select Leads Pipeline / Select Deals Pipeline).
- Under Phone Lead/Deal/Entity Settings, require a phone number before the assistant writes a record (Lead Phone Required, Deal Phone Required, Entity Phone Required).
- Click Apply fields to save.
The panel isn't shown for tools that don't map fields this way — Servio HMS, EasyMS, Altegio, Wlaunch, Task Manager, Custom MCP, and the native Orders / Calendar tools have their own settings instead, and the OAuth tools (Spreadsheet Orders, Google Calendar) don't use it either.
Keeping your funnel in sync
Once a CRM with pipelines is connected, a Funnel Status Sync panel — "Sync funnel statuses to keep your CRM data up to date" — appears at the top of the tool's settings:
- Click Sync statuses to pull the CRM's funnel/pipeline statuses so the assistant can move a lead through the right stages. Wait for the confirmation "Synchronization of statuses has been completed successfully!"
- As the panel notes, "Statuses will be synced to the agent's assigned pipeline." — each assistant syncs to its own pipeline, so run it for every assistant that uses the CRM.
- Re-run it whenever you change pipelines or stages in the CRM.
- For how statuses and labels map to conversations, see Labels and statuses.
- To have the assistant nudge leads over time, see Follow-ups.
Test it
- After Submit, check the tool's card under Available Integrations — the chip should now read Connected.
- For a CRM: click Sync statuses and wait for "Synchronization of statuses has been completed successfully!"
- Message your assistant on any connected channel and ask for something that touches the tool — leave contact details so it creates a lead, or ask to book a time — then confirm the record shows up in the external tool.
- Switch the header dropdown to another assistant: the card should show Connect (not Connected) unless you attached that assistant too — that confirms the per-assistant scoping.
Native integrations vs. agent connectors vs. MCP
MyChatBot exposes outside tools in three ways. This page covers the first row — the others live in the Agents area.
| Surface | What it is | Where in the app | Best for |
|---|---|---|---|
| Native integrations | A CRM/scheduler wired into your assistant and the Sales Platform (lead sync, funnel sync) | Integrations → /integration | The tools listed above — deep, per-assistant CRM sync |
| Agent connectors | Turn an external app on for an agent so it can act inside that app during a run — HubSpot, Gmail, Slack, Notion, and many more (external app connectors, powered by our connector service) | Agents → Connectors → /agents/connectors, then the agent's Settings → Connectors | Letting an agent take actions in a SaaS tool on the fly |
| MCP endpoints | Point an external tool (Claude Code, Cursor, etc.) at MyChatBot's product search, sales management, or content endpoints | See MCP & connectors | Driving MyChatBot from outside |
Native integration or agent connector?
Pick a native integration when you want CRM lead/funnel sync tied to a Sales assistant. Pick an agent connector when you want an agent to reach into a SaaS tool (like reading a Gmail thread or posting to Slack) mid-conversation.
See also
- Custom connectors — connect any tool an agent should use
- MCP & connectors — the standalone Product / Sales-Management / UGC MCP endpoints
- Labels and statuses — how CRM statuses map to conversations
- Follow-ups — automated lead nudges
- Orders and Calendar — the native order management and booking tools