
Appearance
Leads & Pipelines
The Leads page is the Sales Platform's built-in CRM surface: every contact your agents talk to (plus any leads you create or import yourself) in one place, viewable as a sortable table or as a drag-and-drop pipeline board with funnel stages.
In the app
Open Leads in the left sidebar at app.mychatbot.app/leads. The toggle at the top right switches between the Leads table and the Pipeline board; the app remembers your last choice per account.
At a glance
| You need | Where | Result |
|---|---|---|
| Browse and edit leads in bulk-friendly rows | Leads view (table) | Inline edit of Status, Labels, and Pipeline per row |
| A Kanban view of your funnel | Pipeline view (board) | Drag cards between stages; each column is a funnel status |
| Work in one specific pipeline | Pipeline dropdown next to the page title | Board columns and Status filter scope to that pipeline; the default one is marked (default) |
| Add a single lead by hand | ⋮ menu → New lead | "Create external lead" modal |
| Bring in a whole list | ⋮ menu → Import leads | Google Spreadsheet import wizard at /leads/import |
| Change many leads at once | Pipeline view → Select | Bulk toolbar: Status, Pipeline, Manager, Labels |
| Add / rename / reorder funnel stages | Pipeline view → gear icon (Customize columns) | "Funnel statuses" editor |
| Create / rename / delete a pipeline, change the default | Account Settings → Pipelines | "Manage Pipelines" screen (see Managing pipelines) |
Two views, one dataset
- Leads — a paginated table. Best for scanning details, inline edits, and deleting leads.
- Pipeline — a board where each column is a funnel status of the selected pipeline. Best for moving deals through stages and bulk operations.
The current view is kept in the URL (?view=list or ?view=pipeline), so you can bookmark or share either one. If your account has pipelines, a dropdown next to the title switches between All Pipelines and a single pipeline — that choice is also kept in the URL and remembered between visits.
Where pipelines and stages come from
Funnel statuses (stages) and labels are managed in the agent's configuration under Lead Management (with Manage leads locally and Pipeline Statuses), synced from a connected CRM (a one-way import — see CRM-synced stages), or created right on the pipeline board (see Managing funnel stages). Pipelines themselves — the entries in the header dropdown — are created, renamed, deleted, and given the default flag in Account Settings → Pipelines (see Managing pipelines). See Labels and Statuses for how agents set them during conversations.
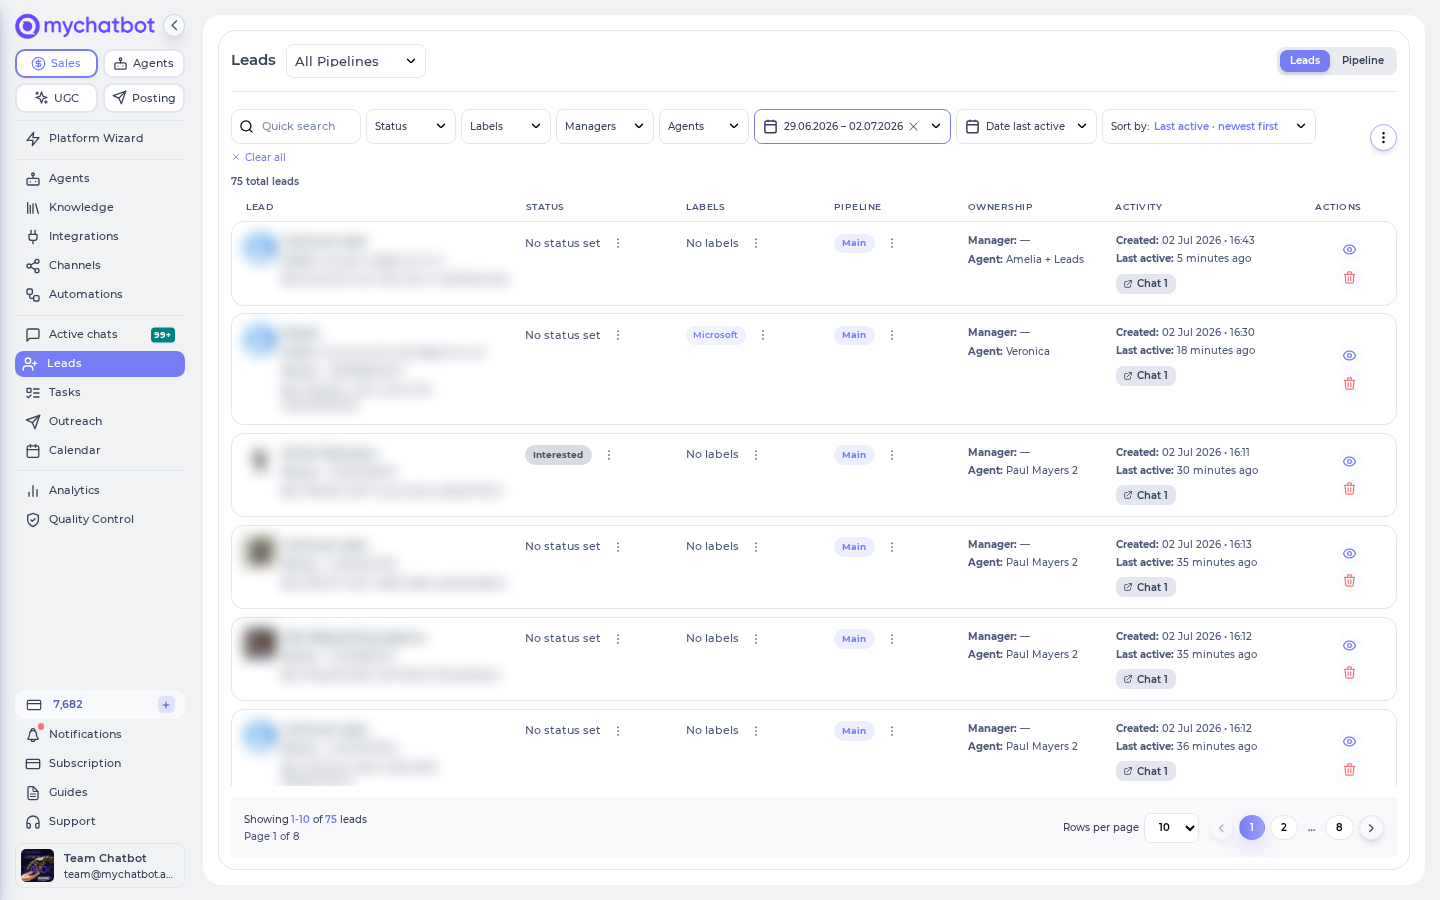
The leads table
The table shows "N total leads" above these columns:
| Column | Contents | Inline actions |
|---|---|---|
| Lead | Avatar, name, notes badge ("N notes"), Email, Phone, ID | — |
| Status | Funnel status chip (colored like its board column) or "No status set" | Pencil icon → pick a status; re-selecting the current one clears it ("Status updated" / "Status cleared") |
| Labels | Label chips or "No labels" | Pencil icon → toggle any existing labels on/off ("Label added" / "Label removed") |
| Pipeline | Pipeline chip or "No pipeline" | Pencil icon → pick a pipeline; re-selecting clears it ("Pipeline set to …" / "Pipeline cleared") |
| Ownership | Manager (human owner) and Agent (AI agent that handles the conversation) | — |
| Activity | Created, Last active, and links to the lead's conversations (Chat 1, Chat 2, …) or "No chats yet" | — |
| Actions | Eye icon ("Open in chats") jumps to the lead's conversation with the client card open; trash icon deletes the lead | — |
Deleting asks for confirmation: Delete Lead — "Are you sure you want to delete {name}? This action cannot be undone. All data associated with this lead will be permanently removed."
The table deletes any lead — conversations included
The table's trash icon works on every lead, channel-connected or manual. "All data associated with this lead" includes the lead's conversations: deleting a connected lead also permanently removes its chats from the Chats page. If the person later writes to you again on the channel, they arrive as a brand-new lead with no history.
This is intentionally stronger than Remove lead in the record panel and on board cards, which works only for manual leads (see The lead record panel). The table view is the only place to delete a channel-connected lead.
When there are more leads than fit one page, pagination appears: Rows per page (10 / 20 / 50, default 10) with Previous page / Next page.
The lead record panel
Following a lead link from elsewhere in the app (for example a task's linked contact) lands on the Leads page with the lead's full record open. The panel shows:
| Section | What you can edit |
|---|---|
| Personal Info | Full name |
| Work Info | Email, phone, company |
| Assignments | Manager, Status, Labels, Pipeline |
| Notes | Add a note (title + content), read and delete existing notes |
- Back to leads returns to the list; Remove lead appears only for manually created leads (leads without a linked channel conversation) — on the board, attempting it on a connected lead shows "Only manual leads can be removed" ("Lead removed" on success). The panel and board deliberately refuse to touch connected leads; the table's trash icon has no such guard and deletes any lead together with its chat history (see the warning above).
- If a lead has no chats yet and you have outreach-capable channels connected, the panel offers first-touch actions: Message via Personal WhatsApp, Message via Telegram account, Call via Ringostat (phone required), Send email via Gmail (email required). Replies are routed to the agent shown on the button.
- Saving a phone number that already belongs to another contact opens Phone number already in use — "This phone number already belongs to {name} ({phone}). Merge these contacts into one?" Confirming with Merge combines the two records ("Contacts merged successfully"). Duplicate emails are rejected with "A client with this email already exists".
Pipeline board
Each visible funnel status is a column, plus a permanent No status column where leads without a stage land. Column headers show a live lead count; long columns load in pages with a Load more (N remaining) button.
Cards show the lead's name, email/phone, a notes badge, the channel it came from (or "No channel" for manual/imported leads), an Active badge when the lead was active in roughly the last day (otherwise the last-active date), labels, and Manager / Agent / Channel rows. Open on a card jumps to the lead's conversation in Chats.
Moving leads:
- Drag a card to another column → "Moved to {status}". Dropping on No status clears the stage.
- Dragging a card into a different pipeline whose stage list doesn't contain the card's current status asks: Create "{status}" in {pipeline}? → Create & move adds the stage there and moves the card.
Board empty state: "No leads match your filters yet. Try adjusting them or add new contacts."
Managing funnel stages (Customize columns)
Click the gear icon at the top right of the board to open the Funnel statuses editor ("Use the arrows to reorder, update colours, hide rarely used stages, or delete empty ones."):
| Control | Effect |
|---|---|
| Up / down arrows | Reorder columns |
| Color palette | Recolor a column (also recolors its status chips in the table) |
| Eye icon | Hide / show a column — at least one must stay visible ("Keep at least one column visible") |
| Pencil icon | Rename the stage |
| Trash icon | Delete an empty stage — blocked with "Move or close leads in this stage before deleting it" otherwise |
| Add new funnel status | Type a name (e.g. "Demo scheduled") and click Add |
| Done | Close the editor |
The No status column can't be removed: "Always visible – leads without a stage land here."
Stage scope
When a specific pipeline is selected in the header dropdown, new stages are created in that pipeline and the board shows only its stages. With multiple pipelines and All Pipelines selected, stage names display as "Stage (Pipeline name)".
CRM-synced stages (one-way import, no write-back)
Sync statuses (on your CRM's card under Integrations) copies the CRM's stage list into MyChatBot: it creates any stage you don't have yet in the agent's assigned pipeline ("Statuses will be synced to the agent's assigned pipeline.") and changes nothing in the CRM. Nothing on the Leads page writes back either:
| You do this on the Leads page | What the external CRM sees |
|---|---|
| Drag a card to another stage, edit Status inline, or bulk-change statuses | Nothing — only MyChatBot's lead record changes; the deal in the CRM does not move. The CRM deal's stage changes only through the integration itself (for example when the agent updates the deal during a conversation), and a stage arriving from the CRM side can later overwrite the status you set here |
| Rename or delete a stage in the Funnel statuses editor | Nothing — but sync matches stages by name, so the next Sync statuses run re-creates the stage under its original CRM name (a renamed stage effectively comes back as a duplicate) |
| Recolor, reorder, or hide a stage | Nothing — and these changes survive re-syncs, since sync only adds missing names and never touches existing stages |
In short: synced stages are not locked on this screen, but treat the CRM as the source of truth for its own stage list, and don't expect a board drag to move the deal in the external CRM.
Bulk operations
- Click Select on the board (it turns into Cancel while active).
- Click cards to select them, or use the checkbox in a column header to Select all in column.
- The toolbar shows "N selected" with four dropdowns:
| Dropdown | Options |
|---|---|
| Status | Any funnel status of the selected pipeline, or No status |
| Pipeline | Any pipeline, or No pipeline |
| Manager | Any team member, or Unassigned |
| Labels | Toggle labels, then Apply labels (replaces the selection's labels) |
Picking a status, pipeline, or manager applies immediately ("Updated N leads"; partial failures report "Updated X of Y leads"). Moving a batch to a pipeline that's missing some of the leads' current statuses asks Create {statuses} in {pipeline}? → Create & move first creates the stages, then moves everyone.
Managing pipelines
Pipelines themselves — the entries in the Leads header dropdown — are managed in Account Settings → Pipelines at app.mychatbot.app/profile/pipelines. The tab is visible to account admins/owners only ("Create and manage pipelines to organize your leads and funnel statuses.").
| Action | How | Notes |
|---|---|---|
| Create | New Pipeline → Pipeline Name (e.g., "Sales Pipeline, Marketing Funnel") + optional Description → Create | Name is required ("Pipeline name is required") |
| Rename / edit description | Pencil icon (Edit pipeline) | The new name shows immediately in the header dropdown and Pipeline chips |
| Change the default | Star icon (Set as default) on any non-default pipeline | The current default carries a Default badge. The default receives leads whenever nothing picks a pipeline explicitly — "Lead will be created in the default pipeline" in the New lead modal, and it's preselected as Import to pipeline |
| Delete | Trash icon (Delete pipeline) → confirm Are you sure you want to delete "{name}"? | Only offered for non-default pipelines, and only succeeds once the pipeline is empty — see below |
A pipeline can only be deleted when nothing depends on it anymore:
- The default pipeline can't be deleted ("Cannot delete the default pipeline") — make another pipeline the default first.
- All of its funnel stages must be gone — otherwise deletion fails with "Cannot delete pipeline with existing statuses. Please delete or move statuses first." Delete the stages in the Funnel statuses editor; each stage must itself be empty of leads.
- No agent may be assigned to it — otherwise "Cannot delete pipeline assigned to assistants. Please reassign assistants first." Point the agent at another pipeline in its configuration under Lead Management.
Because every stage has to be emptied before it can be removed, leads are never stranded in a stage of a deleted pipeline. Leads that were still in the pipeline without a stage are not deleted — they stay in your list and their Pipeline column simply shows No pipeline.
Pipelines are also created for you
You don't have to create every pipeline by hand: a spreadsheet import with a mapped Pipeline column creates missing pipelines automatically (see Duplicates and unknown values), and every agent is tied to a pipeline in its Lead Management settings — that assignment drives where new conversations land ("Clients are automatically assigned to a pipeline when they interact with an agent").
Filtering, search & sorting
The toolbar above both views:
| Control | Behavior |
|---|---|
| Quick search | Matches names, contact details — and lead IDs. Typing a search clears the date filters so results aren't hidden by a date window |
| Status | Multi-select of funnel statuses (shown with their pipeline name when you have several pipelines); selected values appear as removable chips |
| Labels | Multi-select of labels |
| Managers | Multi-select of team members |
| Agents | Multi-select of AI agents |
| Date created | Calendar range picker with Apply / Close; the chip shows the active range with an × to clear |
| Date last active | Same picker for last activity |
| Sort by | Last active · newest first (default), Last active · oldest first, Created · newest first, Created · oldest first |
| Clear all | Resets every filter and the sort |
Default date window
On a fresh visit the list opens with a Date created filter covering only the last few days — older leads are hidden until you clear the chip (or hit Clear all). If you're "missing" leads, check this filter first. Filters persist for the browsing session, so a range you set earlier can still be active later.
Creating a lead manually
⋮ menu → New lead opens the Create external lead modal:
| Section | Fields |
|---|---|
| Personal | Full Name (required), Email, Phone (validated as an international number — "Invalid phone number format") |
| Work | Company, plus a note that will appear on the lead card |
| Additional info | Your account's custom lead fields (shown when any exist) |
| Assignments | Funnel Status (stages of the target pipeline, or "No status"), Labels, Manager |
Where the lead lands is shown in the modal:
- A pipeline selected in the header → "Lead will be created in the currently viewed pipeline."
- Otherwise → "Lead will be created in the default pipeline."
- If the agent's Lead Management settings disable auto-assignment, the pipeline reads None (Auto-assignment disabled) with the hint: "Automatic pipeline assignment is disabled. You can enable it in the 'Lead Management' section of the Assistant Configuration."
Manually created leads have no channel yet — use the record panel's outreach buttons (Personal WhatsApp, Telegram account, Ringostat, Gmail) to start the first conversation.
Importing leads from a spreadsheet
⋮ menu → Import leads opens the Import Leads wizard at /leads/import. The source is a Google Spreadsheet: "Connect your Google account to import leads from a spreadsheet. The first row must contain column headers (e.g., Name, Email, Phone)."
Importing a CSV
Google Sheets opens CSV files directly — upload your CSV to Google Drive (or File → Import in a new sheet), then pick that spreadsheet here.
The flow:
- Select Spreadsheet → sign in with Google → pick the file in the Google picker.
- Review the preview ("N rows found", "Preview (first 5 rows)"). You can edit any cell right in the preview — click it, change the value, press Enter ("Cell updated successfully"); edits are written back to the sheet. After editing the sheet elsewhere, use Reload Preview; Change spreadsheet picks a different file.
- Fix phone validation issues (see below).
- Map columns to lead fields — "Unmapped columns will be stored as metadata."
- Pick the target pipeline and click Import N Leads.
Column mapping targets:
| Lead field | Notes |
|---|---|
| Full Name (required) | Can combine several columns — Add column (to concatenate); "Columns will be concatenated with spaces" |
| Phone / Email | At least one must be mapped ("Please map at least Phone or Email column") |
| Company, Manager, Labels, Notes, Ad Title | Optional |
| Pipeline | Optional — when mapped, "Pipeline will be determined from spreadsheet column"; when not, choose one in the Import to pipeline dropdown (default pipeline preselected) |
| Funnel Status | Optional — sets each lead's stage from the sheet |
| Custom fields | Every custom lead field on your account gets its own mapping row |
The wizard auto-detects likely mappings from your header names; anything left as "-- Not mapped --" is kept on the lead as extra metadata ("N unmapped column(s) will be stored as metadata").
Duplicates and unknown values
Rows that match an existing lead update it — no duplicates. Each row is matched against your existing leads by phone number and email (after normalization). When a row matches:
- The existing lead is updated in place: Full Name, Company, Manager, Ad Title, and custom-field values from the sheet are written onto it, and a missing email or phone is filled in (an email/phone the lead already has is never overwritten).
- Its Pipeline, Funnel Status, and Labels are left untouched — an import never moves an existing lead to another pipeline or stage and never rewrites its labels. To restage existing leads in bulk, use Bulk operations on the board instead.
- The Notes column is written only for newly created leads, so repeated imports don't stack duplicate notes.
Re-running the same import is therefore safe: matched rows count toward Successfully imported again, but no duplicate leads appear. Rows that match nothing are created as new leads.
Unknown mapped values are created or skipped, per field:
| Mapped field | When the sheet value doesn't exist on your account |
|---|---|
| Pipeline | The pipeline is created automatically (names match case-insensitively) and the lead lands in it |
| Funnel Status | If no stage with that name exists anywhere on the account yet, it's created in the lead's pipeline and appears as a new board column |
| Labels | Comma-separated in one cell; each unknown label is created |
| Manager | Matched against your team members by name; an unknown name is skipped — the lead imports without a manager, with no error |
Imports add, they never clean up
Because unknown pipelines, stages, and labels are auto-created, a typo in the sheet ("Qualifed" instead of "Qualified") silently creates a new stage or label. Check the sheet's values against your existing names before importing — auto-created stages and labels stay on the account even if you delete the imported leads afterwards.
Phone validation runs on the preview before you can import:
| Result | Meaning |
|---|---|
| Valid | Number parses as a valid international number |
| Warnings — "N phone number(s) will be normalized" | "Phone numbers without a '+' prefix will be normalized automatically during import based on detected country patterns." — import proceeds |
| Errors — "N phone number(s) cannot be imported" | Unrecognized format, undeterminable country code, too short, invalid characters, or empty. The import button is disabled ("Fix phone number errors in your spreadsheet to enable import") — fix the highlighted cells, then reload the preview |
During and after the import:
- Progress screen: "Please wait while we import your leads. This may take a few minutes." with Processed / Total counters, the contact currently importing ("Contact X of Y"), and a running list of skipped sheet rows ("N sheet row(s) skipped (invalid values)").
- Import Complete! shows Total processed, Successfully imported, and Failed — failures mean "missing or invalid contact information (phone or email required)". Finish with View Leads or Close.
- If the status can't be refreshed mid-import: "Could not load import status. You can try again, or open Leads — the import may still finish in the background."
Lead fields
| Field | Set by | Shown |
|---|---|---|
| Full Name, Email, Phone, Company | Agent (from conversation), manual entry, or import | Table Lead column, record panel |
| Funnel Status | Agent, inline edit, board drag, bulk ops, import | Status chip / board column |
| Labels | Agent, inline edit, bulk ops, import | Label chips |
| Pipeline | Auto-assignment, inline edit, board drag, bulk ops, import | Pipeline chip / board scope |
| Manager | Inline record edit, bulk ops, import | Ownership column, card |
| Notes | Record panel, "New lead" modal, import (Notes column) | Notes badge + record panel |
| Ad Title | Ad-sourced channels or import | Client card details |
| Custom fields | Client card (+ Add new field: text or dropdown), then fillable in New lead → Additional info and mappable in imports | Client card Additional info |
Deleting a custom field (from the client card) removes it from the account's field list — "Values already saved on existing leads will remain in their metadata," but "Removing it from the account list cannot be undone."
Use cases
- Run a lightweight CRM without connecting one — let agents set statuses/labels mid-conversation, then manage the funnel visually on the Pipeline board.
- Migrate a lead list — import a spreadsheet with pipeline + status columns and land every lead in the right stage, then trigger first contact from the record panel's outreach buttons.
- Re-segment before a campaign — filter by Status + Labels + Manager, switch to Pipeline view, Select → bulk-apply a label, then target that label in Follow-ups.
- Team handoff — filter unowned leads, bulk-assign a Manager, and track their movement by stage.
- Run separate funnels per team or product — create a second pipeline in Account Settings → Pipelines, point an agent at it under Lead Management, and jump between funnels with the header dropdown.
Test it
- Open app.mychatbot.app/leads, clear the Date created chip, and confirm your lead count ("N total leads") looks right.
- ⋮ → New lead → create a test lead with your own phone number. Check the hint says which pipeline it will land in.
- Switch to Pipeline view and drag the test card to another stage — you should see "Moved to {status}", and the change should be reflected in the table view's Status chip.
- Click Select, select two cards, and bulk-apply a label — expect "Updated 2 leads".
- Make a 3-row Google Sheet (Name / Phone / Email), run Import leads, deliberately break one phone number, and confirm the import button disables until you fix it and hit Reload Preview.
- Run the same import a second time — Import Complete! reports the same totals, but "N total leads" doesn't grow and no duplicate rows appear.
- Open the imported lead's record (it has no chats) and verify the outreach buttons for your connected channels appear.
- In Account Settings → Pipelines, click New Pipeline and create a test pipeline — it should appear in the Leads header dropdown immediately. Then delete it (trash icon): with no stages or agents attached, it disappears after the confirmation.
See also
- Labels and Statuses — the deep dive on labels and funnel statuses, how agents apply them, and CRM status sync.
- Assistant configuration → Lead Management — where each agent's pipeline assignment and auto-assignment settings live.
- Follow-ups — target status + label combinations with automated sequences and broadcasts.
- Automations — capture leads from forms, webhooks, and Meta Lead Forms straight into this page.
- Task Manager — tasks and reminders linked to your leads.
- Integrations overview — sync leads with an external CRM instead.