
Appearance
Connectors cheat sheet
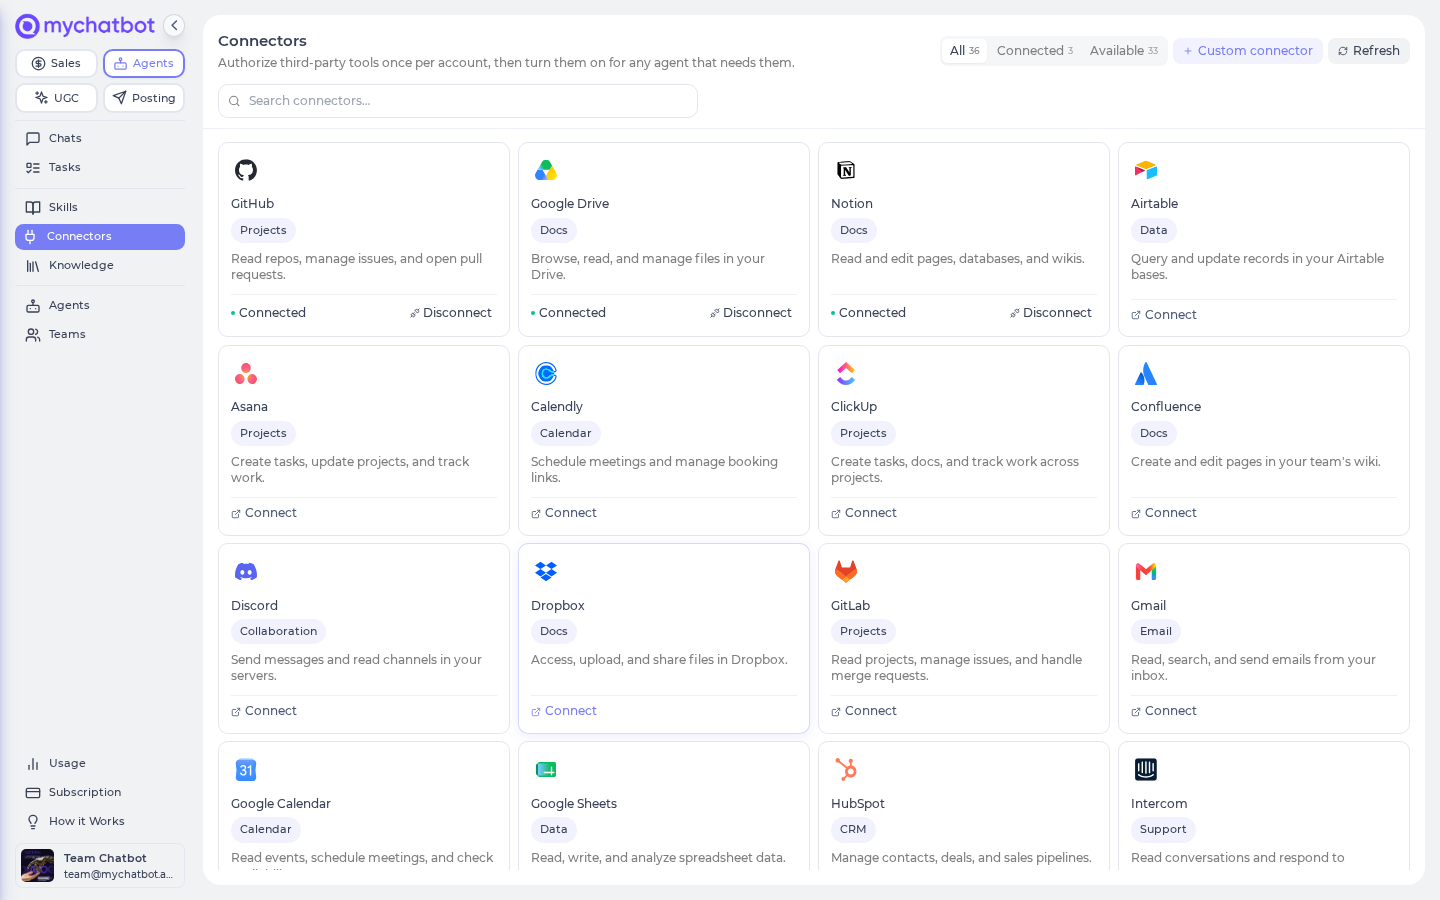
Connectors let an agent read or write outside its built-in tools. There are three families: areas of your own Sales Platform, external apps (HubSpot, Gmail, Slack, Notion, and other CRMs and productivity tools), and custom MCP servers you host yourself. Reach for this page when you're wiring an agent up to your data and actions.
Everything here happens in two places:
- The Connectors page — where you authorize a tool once for your whole account.
- An agent's Settings → Connectors — where you turn an authorized tool on for that specific agent.
In the app
Manage account connectors at Agents → Connectors — app.mychatbot.app/agents/connectors. Turn them on per agent at Agents → your agent → Settings → Connectors.
The three connector families
| Family | Where you connect it | Sign-in | What the agent gets |
|---|---|---|---|
| From your Sales Platform | Connectors page → From your sales platform section | None — one click | One area of your own Sales Platform (leads, chats, orders, …) |
| External apps | Connectors page → a provider card | One-time sign-in (OAuth) | The app's tools, scoped to your account (powered by our connector service) |
| Custom | Connectors page → Custom connector | You supply the URL + headers | Your own MCP server, called exactly as you configured it |
A card must read Connected before an agent can use it
Turning a connector on inside an agent does nothing until that connector is Connected on the Connectors page. A card that shows Connect (not yet authorized) or Reconnect (authorization expired) is skipped at run time — the agent simply won't see those tools.
From your Sales Platform
The From your sales platform section on the Connectors page lets you hand an agent one slice of your own MyChatBot account — no sign-in required, just click Connect. Each area maps to a part of the Sales Platform sidebar, so you can give an agent, say, lead management without also giving it billing.
| Area | What the agent can do | Use it for |
|---|---|---|
| Configurations | Create and edit assistants, manage their skills, and run test chats | Bot config, skills, testing |
| Leads | Create, update, and organize contacts — notes, tasks, labels, and pipeline stages | Lead / contact management |
| Chats | Read chat history and pull message context | Conversation context |
| Channels | See and toggle messaging channels and fetch their setup links | Multi-channel setup |
| FollowUp | Build and run follow-up campaigns, preview the audience, send one-off messages, and place outbound calls | Campaigns / outreach |
| KnowledgeBase | Manage FAQs, product catalogs, and product feeds | FAQ, catalogs, product feeds |
| Integrations | List your third-party integrations and fetch their config links | CRM sync setup |
| Dashboard | Read account summary, subscription, and usage stats | Account summary / billing |
| Orders | List orders and read order stats | Orders / commerce |
| Calendar | List calendar events, staff, and services | Calendar / scheduling |
One big toggle vs. individual areas
In an agent's Settings → What it can do there's a single Sales Platform tools toggle. Turning it on gives the agent the whole Sales Platform surface at once (plus a doc search over channels, integrations, and knowledge bases). The Connectors section below it lets you attach the same platform one area at a time.
The two are mutually exclusive: when Sales Platform tools is on, the individual area connectors are greyed out ("Already covered by Sales Platform tools above"). Turn the big toggle off if you want to pick areas à la carte.
Use a Sales Platform area from Claude Code / Cursor
Any Sales Platform area is also reachable as an MCP server, so tools like Claude Code or Cursor can work with it from your editor. On the Connectors page, click the small i (Connect AI tools) on a From your sales platform card to open a dialog with three copyable blocks — the server address, a Claude Code command, and a Cursor config.
The server address looks like this (the dialog fills in your account and the area you picked):
https://api.mychatbot.app/api/mcp/sales-management?account_id={ACCOUNT_ID}&domain={AREA}Add just the Leads area to Claude Code:
bash
claude mcp add --transport http sales-leads \
  "https://api.mychatbot.app/api/mcp/sales-management?account_id=ACC123&domain=sales_clients"
Or in Cursor's mcp.json:
json
{
  "mcpServers": {
    "sales-leads": {
      "url": "https://api.mychatbot.app/api/mcp/sales-management?account_id=ACC123&domain=sales_clients"
    }
  }
}
Drop the &domain= part to get every area on one server.
The MCP address is the key — treat it as a secret
There's no separate password on this address; the account id in the URL is what grants access. Copy it from the Connect AI tools dialog, keep it private, and don't paste it anywhere public.
External app connectors
External connectors bridge apps like Salesforce, HubSpot, Zoho, Bitrix24, Kommo, KeyCRM, Go HighLevel, Altegio, SalesDrive, and productivity tools such as Gmail, Notion, Slack, and OneDrive. The exact cards you see are whatever your account's Connectors catalog offers (external app connectors are powered by our connector service behind the scenes).
To connect one:
- On the Connectors page, click the app's card.
- You're taken to the provider to sign in and approve access.
- You land back on the Connectors page and the card flips to Connected, pinned to the top of the grid.
To stop using it, click Disconnect on the card. Agents that relied on it lose access until you reconnect.
Don't see the app you need?
Use the Request a connector card at the end of the grid to tell us which integration to add.
Custom MCP servers
If you host your own MCP server, register it directly — no catalog entry, no sign-in. Open Connectors → Custom connector (app.mychatbot.app/agents/connectors/custom) and fill in the form:
| Field | What to enter |
|---|---|
| Name | Shown on the connector card (e.g. My Warehouse MCP) |
| Description | Optional — what the connector does |
| Logo URL | Optional — falls back to a default icon if blank or unreachable |
| MCP server URL | Your endpoint; must start with http:// or https:// |
| Transport | Streamable HTTP (use this if unsure) or Server-Sent Events (SSE) |
| Custom headers | Sent on every request — typically an auth token like Authorization: Bearer …; header names must be unique |
| Acknowledgement | You must tick "I understand custom connectors can introduce risks" to submit |
Click Add connector. It appears as its own card on the Connectors page and, from then on, as a toggle inside every agent's Settings → Connectors.
No credential refresh, no address guard
Custom connectors don't rotate credentials for you — if your server changes its token, edit the connector's headers or add it again. MyChatBot also sends requests to exactly the URL you enter, with no safety filtering, so never point a custom connector at an internal or private address you don't control. That's what the acknowledgement checkbox is confirming.
Turn a connector on for an agent
Authorizing a connector on the Connectors page makes it available; it doesn't attach it to anything yet. To let a specific agent use it:
- Open the agent, go to the Settings tab, and find the Connectors section.
- Toggle on each connector you want this agent to reach into, then Save.
The Connectors section only lists toolkits your account has Connected — so if something's missing, connect it on the Connectors page first (the section links you there).
A toggle is not a connection
An agent toggle only takes effect if the matching card is Connected on your account. If it's toggled on but shows Not connected / Needs reconnect, the agent silently skips it. Confirm the card status before relying on the connector in a task or schedule.
Switching how something's connected
Connected cards pin to the top of the grid. A connector can be connected only one way at a time — there's no merge. To change it (say, swap a custom server for an official app of the same name), Disconnect the existing one first, then connect the other.
Best practices
Do
- Prefer the narrowest Sales Platform area that covers the task (e.g. Leads) over the whole Sales Platform tools toggle when the agent only needs part of the surface.
- Confirm each card reads Connected before you count on it in a task or schedule — the agent toggle alone isn't enough.
- Keep it to a handful of connectors per agent. Each one is opened fresh at the start of a run, so more connectors means a slightly slower first response.
- Put custom-connector secrets in the connector's Custom headers, not in the agent's instructions.
Don't
- Don't assume toggling a connector on an agent connected anything — authorize it on the Connectors page first.
- Don't point a custom connector at an internal or loopback address; there's no safety guard on the URL.
- Don't treat Sales Platform tools (the single toggle) and the individual From your sales platform connectors as interchangeable — one is the whole platform, the others are slices.
- Don't share a Sales Platform MCP address publicly; the account id in it is the only thing gating access.
Test it
- Connect the connector on the Connectors page (sign-in for an external app, one click for a Sales Platform area, the form for a custom server). Confirm the card reads Connected and pins to the top.
- Open the agent, go to Settings → Connectors, toggle the connector on, and Save.
- Ask the agent to do something that needs exactly one of that connector's abilities (e.g. "list my open leads" for Leads).
- If nothing happens, check the card status first — Not connected / Needs reconnect means the run skipped it. For a custom server, re-check the URL, transport, and headers.
See also
- Tools & toggles — the What it can do capabilities, including Sales Platform tools
- MCP & connectors — how agents reach external tools at run time
- Knowledge bases — the FAQ, catalog, and feed sources behind KnowledgeBase
- Build an agent — where settings, tools, and connectors come together
- Troubleshooting — "connector connected but no tools" and other run-time skips