
Appearance
Build an agent
The happy path from an empty agent to a working, tested AI sales agent connected to a live channel. Follow the seven steps in order the first time; after that, each step is independently editable from the agent's Settings tab.
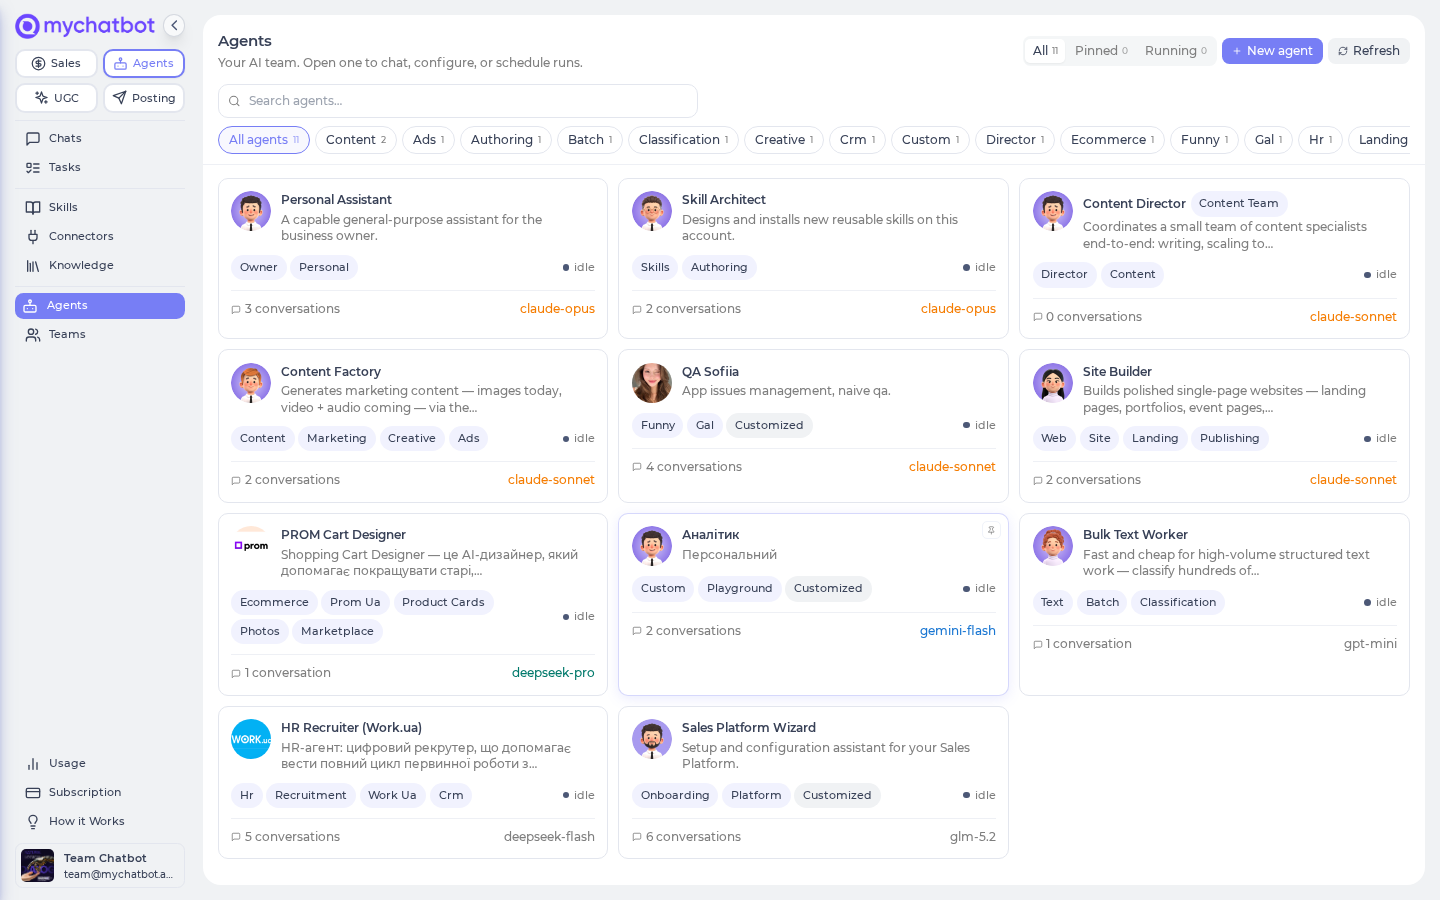
Everything here lives in the Agents Platform — switch to it with the product switcher at the top of the sidebar, or go straight to app.mychatbot.app/agents.
Cheat sheet
Every agent runs on platform defaults (a role, a default model, starter instructions, and a curated set of tools) plus your customizations layered on top. Anything you leave blank keeps the platform default; Reset to defaults on the Settings tab wipes your changes and returns the agent to factory state. A Customized badge marks agents you've changed.
| # | Step | What you set | Where in the app |
|---|---|---|---|
| 1 | Pick or create an agent | Built-in agent, or a new custom one | Agents list → New custom agent |
| 2 | Set instructions | The agent's role, tone, and rules | Agent → Instructions tab |
| 3 | Toggle tools | Which capabilities are live | Agent → Settings → What it can do |
| 4 | Attach knowledge / connectors / skills | External data & actions | Settings + the Knowledge/Connectors/Skills pages |
| 5 | Pick model | Which model powers it | Settings → Identity → Model |
| 6 | Test in chat | Validate before going live | Agent → New conversation |
| 7 | Connect a channel | Route real customers in | Settings → Channels → Telegram |
Customize, don't rebuild
Your changes sit on top of the platform defaults. Any field you leave untouched falls back to the default, and Reset to defaults (Settings tab) returns the agent to factory state at any time.
1. Pick or create an agent
MyChatBot ships with built-in agents — each has a role (a Sales Platform setup assistant, general-purpose work assistants, a skill builder, and more), a sensible default model, and a curated default-on toolset. You layer your own instructions, tool toggles, connectors, and skills on top of any of them.
When you want a blank canvas, create a custom agent. You get up to 10 custom-agent slots per account.
Create a custom agent from scratch
In the app
Agents list → New custom agent (app.mychatbot.app/agents/new). The page shows how many slots are free (e.g. "3 slots free (out of 10)").
- Give it a Name (up to 80 characters — this is what you'll see in the agents list).
- Pick a Model from the dropdown (the agent's default model is tagged · default).
- Optionally add a Description and starter Instructions — you can refine both after creation.
- Click Create agent. The agent now appears in your regular agents list, and you can open it to configure tools, skills, connectors, and channels.
Deleting a custom agent frees its slot
Settings → Delete this agent wipes the agent (and its conversations, schedules, and tasks) permanently and returns the slot to the free pool, so you can create a different agent in its place. Out of slots? Reset an existing custom agent instead, or contact support to raise your cap.
2. Set instructions
Instructions are the agent's prompt: role, greeting, sales flow, tool-usage rules, and error handling. They layer on top of the agent's built-in expertise — you're telling it what to focus on, what to avoid, and how to respond.
In the app
Open the agent → Instructions tab ("How it thinks and talks"). Edit the text and Save.
Two ways to author them:
- Edit directly — type into the Instructions editor and save. Full control over content and formatting.
- Let the agent edit itself — turn on the Edit its own settings tool (step 3). You can then ask the agent, in a chat, to tighten its own instructions ("be more terse", "always greet by brand name"). Every self-change pauses for your approval before it takes effect.
Give the agent concrete business context to work from — for example:
text
We are Roast1, an online coffee shop selling bags of coffee of different types.
The greeting should be casual and informal.
A good instruction covers:
- Role & objectives — what the agent is for.
- Greeting protocol — how it introduces itself.
- Lead qualification — the questions and signals that qualify a buyer.
- Product search protocol — how and when to search your catalog.
- Tool usage guidelines — when to reach for each enabled tool.
- Error handling — what to do when a request is out of scope or a tool comes back empty.
The agent only knows its tools, not your plumbing
The agent doesn't know about the spreadsheets, feeds, or CRMs behind the scenes — it only knows the abstract capabilities it can use (e.g. "search products", "look something up in business knowledge"). Write instructions in terms of those capabilities, not your data sources.
3. Toggle tools
Each toggle switches a whole capability on or off for the agent. Enable only what the agent needs — extra tools add decision noise and slow it down.
In the app
Agent → Settings tab → What it can do. Flip on the tools this agent should reach for. Off means the agent won't see them and will answer from memory and the conversation only.
| Toggle | What the agent can do | When to use |
|---|---|---|
| Read a web page | Fetch and read one specific URL as text | You already know the exact page |
| Search the web | Run a web search, get ranked results + snippets | Needs fresh info but doesn't know which URL |
| Watch videos | Understand a video at a URL (or a clip shared in chat) and answer questions about it | Customers send video clips or paste video links |
| Think step by step | Add explicit reasoning steps before answering | Hard questions on lighter/cheaper models (frontier reasoning models already do this) |
| Track multi-step plans | Write a checklist for a long task and tick it off as it goes | Research and multi-tool workflows you want to watch progress on |
| Web browsing | Open pages, click, fill forms, log in, and screenshot | Answering requires interacting with the live web |
| Run code & crunch data | Run Python, install libraries, work with files, make charts | Data work, file transforms, calculations |
| Schedule & delegate | Schedule its own future runs and hand tasks to other agents | Recurring reports, "remind me Monday", fan-out work |
| Wait for media renders | Poll long-running image/video jobs without freezing the chat | Media-generating agents |
| Save reusable skills | Capture a recurring workflow as a named skill any agent can reuse | Generalist agents that see repeated patterns |
| Edit its own settings | Change its own instructions, model, tools, name, and skills — with your approval on every change | Tuning behavior mid-conversation |
| Business knowledge | Look things up in the sources you've connected (website, docs, FAQs, Drive, product catalog) | Sales agents that must search a catalog or brand docs (see step 4) |
| Sales Platform tools | Create assistants, connect channels, run pipelines, and search MyChatBot docs | Agents that also set up the Sales Platform for you |
"Sales Platform tools" does not power product search
Product search comes from Business knowledge plus an attached product catalog (step 4). Sales Platform tools is a separate concern — it adds the ~80 Sales-Platform setup actions plus a MyChatBot-docs search. You can leave it off and still have full product search.
"Edit its own settings" never surprises you
When this is on, the agent proposes a change and waits for your approval before anything takes effect — nothing changes without your sign-off.
4. Attach knowledge base, connectors & skills
Three separate attachment surfaces. All are optional, and all fall back cleanly when something isn't wired.
Knowledge base
Business knowledge is delivered by knowledge sources, gated behind the Business knowledge toggle. Sources are connected once per account and then made available to any agent that has the toggle on.
In the app
Manage sources on the Knowledge page (app.mychatbot.app/agents/knowledge). Then, on each agent's Settings tab, turn on Business knowledge to give that agent access. Sources are read live at answer time — never a stale copy.
Source types you can add:
- Open Web — cached page content the agent can read.
- Google Drive / Notion / Slack / OneDrive / Gmail / Calendar — piggyback on the connections you've made on the Connectors page (connect them there first).
- From your sales platform — the product catalogs, FAQs, and business docs you've already set up in the Sales Platform. The agent reads each one by semantic search at run time — same content, no re-upload.
Let the agent search your products
This is the end-to-end path from "empty" to "the agent searches my products":
Set the knowledge base up in the Sales Platform. Product, FAQ, and document knowledge lives in the Sales Platform (the classic MyChatBot dashboard where you manage assistants, channels, and pipelines) — open its Knowledge base section and add the source that matches your catalog:
Source type What it holds Best for FAQ Q&A pairs Recurring questions Product catalog Manually entered SKUs, prices, specs Small, hand-curated catalogs Product feed Auto-indexed JSON / XML / Google Shopping Live inventory Product spreadsheet A Google Sheet, periodically synced Catalogs you keep in Sheets Business documents Policies, terms, shipping/returns/warranty guides Support and policy answers Add it as a knowledge source. On the Knowledge page, under From your sales platform, click Add as a knowledge source on the catalog you just created.
Turn on Business knowledge for the agent (Settings → What it can do).
At run time the agent gains product search, filtering, and product-details lookups over that catalog. You can attach several catalogs at once — the agent keeps them separate.
Business knowledge — not Sales Platform tools — powers product search
Adding a product source under Business knowledge is all you need for the agent to search your catalog. Leave Sales Platform tools off and product search still works.
Knowledge sources fail open
If a source errors mid-conversation (say the underlying integration was deleted), the agent notices, skips it, and keeps going — it won't hard-fail the chat. Silence from a source usually means it's misconfigured, not down. MyChatBot tunes search relevance for you; contact support if results for your catalog need adjusting.
Connectors
Connectors let the agent take actions in outside systems on your behalf — HubSpot, Gmail, Slack, Notion, Shopify, OneDrive, and more (external app connectors, powered by our connector service).
In the app
Connectors page (app.mychatbot.app/agents/connectors): authorize a toolkit once per account (Connect → sign in), then turn it on per agent under Settings → Connectors. An agent only sees connectors that are both authorized on your account and switched on for that agent.
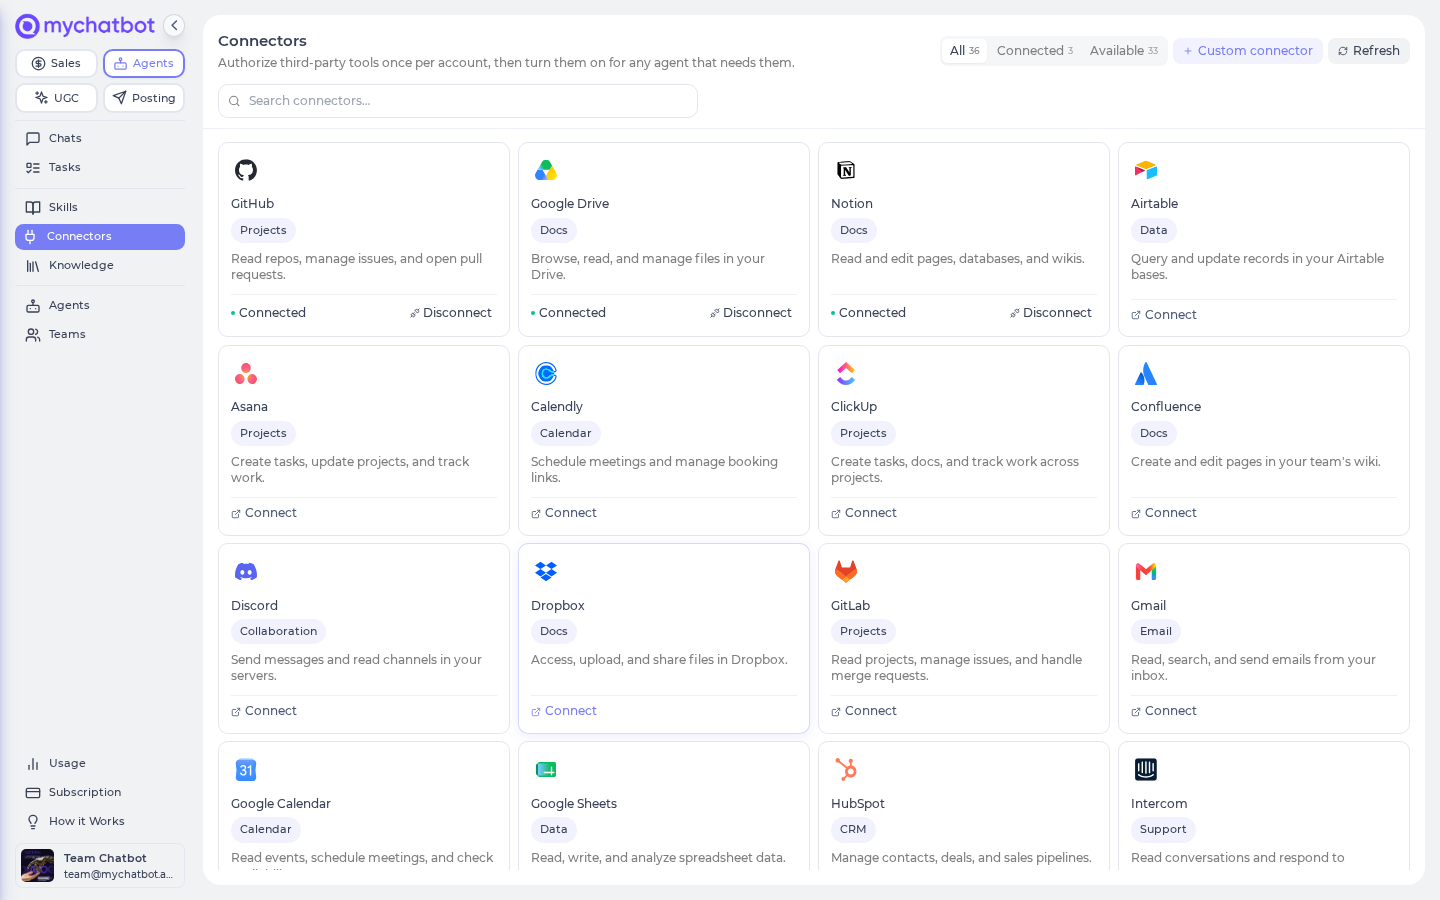
You can also plug in parts of your own Sales Platform as agent tools (the From your sales platform section — no sign-in needed), or register your own MCP server as a Custom connector (app.mychatbot.app/agents/connectors/custom) — give it a name, its MCP server URL, transport, and any auth headers.
A Sales Platform connector and its third-party twin can't both be on
For a given app you connect either the instant Sales-Platform connector or the third-party sign-in connector — the UI enforces this so they never fight over the same tools. When one is active, the other shows "Already covered by Sales Platform tools above."
Don't see the integration you need? Use Request a connector on the Connectors page and we'll review it.
Skills
Skills are reusable, named capabilities the agent can reach for — like publishing a page, browsing the web, using a code sandbox, or pulling product data.
- Built-in skills ship with the platform and are available account-wide.
- Custom skills are ones you (or an agent with Save reusable skills on) create — up to 20 per account. Any agent on your account can use them.
In the app
Browse and manage the library on the Skills page (app.mychatbot.app/agents/skills). Attach specific skills to an agent under Settings → Skills — an agent only sees the skills you've attached to it, even though the library is account-wide.
5. Pick model
Each agent runs on one model, chosen from a broad catalog of the models you see in the picker — GPT-5, Claude Opus, Gemini, Grok, and more. The agent's default model is tagged · default; leaving the field blank keeps that default.
In the app
Set the model when you create the agent, or change it later under Settings → Identity → Model. Save to apply.
Models differ in how hard they think: some are tuned to reason deeply, others to answer fast and cheap. The picker's display names are what you choose between — pick one that matches the depth the agent's job needs.
Switching models can change how deeply it thinks
Reasoning depth travels with the model you pick. If you move an agent from a deep-thinking model to a faster, lighter one, you may lose that step-by-step behavior. If depth matters, choose a model tuned for it (or turn on Think step by step in step 3).
6. Test in chat
Before touching a channel, talk to the agent yourself.
In the app
Open the agent and click New conversation (app.mychatbot.app/agents → your agent). These test chats are their own conversations, kept separate from live channel traffic, so you can experiment without polluting customer history.
Test it:
- Send the exact greeting a real customer would ("Hi, I was checking out your site and wanted to learn more").
- Confirm the greeting protocol, brand name, and an inviting follow-up question all fire.
- Ask a product question and verify the agent actually searches your catalog instead of guessing.
- Trigger an out-of-scope request and confirm the error-handling path (graceful decline or handoff).
- Re-run these prompts after any instruction, tool, model, or connector change.
Every test message counts toward usage
Test chats consume model tokens (billed as messages), and conversation history is kept for 60 days. Make each test prompt count — specific, realistic inputs surface more than "hi" a dozen times.
7. Connect a channel
The Agents Platform natively manages Telegram. The website widget, WhatsApp, and native calls are managed on the Sales Platform side.
In the app
Agent → Settings → Channels → Telegram bot. Create a bot with @BotFather, copy its token, paste it into Bot token from @BotFather, and click Connect. There's a "How to create a bot with @BotFather" link right there if you need it.
Once connected, the bot goes live: inbound Telegram messages are routed to your agent, one conversation per Telegram chat, with the agent's full configuration applied. Telegram conversations also show up (read-only) under the agent's Conversations tab. To stop them, use Disconnect on the same screen.
Don't double-send while a reply is in flight
If a second message arrives in the same Telegram chat before the first reply finishes, the agent asks the user to wait rather than risk overwriting the in-progress reply. Expect a brief "please wait" under rapid-fire messages — it's the safety guard, not an error.
Best practices
Do
- Start simple: minimal instructions and only the tools the agent will actually use, then add complexity as you learn its behavior.
- Turn on Think step by step and Business knowledge for sales agents that must search a catalog and qualify leads.
- Edit instructions incrementally and test after each change; use Reset to defaults if a change regresses.
- Re-run your test prompts after any instruction, tool, model, or connector change.
Don't
- Don't over-tool. Too many enabled toggles add decision noise and slow the agent down.
- Don't assume the model kept its depth after a model switch (see step 5).
- Don't turn on Sales Platform tools just to get product search — that's Business knowledge plus an attached product catalog (step 4).
- Don't test in a live channel; use a New conversation first.
See also
- Agents platform: concepts — how agents, defaults, and customizations fit together
- Tools & toggles cheat sheet — every toggle in detail
- Knowledge bases for agents — FAQ, catalogs, feeds, spreadsheets
- MCP & connectors — Sales Platform and third-party connectors
- Custom connectors cheat sheet — your own MCP endpoints
- Models & reasoning cheat sheet — choosing a model
- Skills — built-in vs custom skills
- Memory — what the agent remembers across conversations
- Tasks, crons & schedules — automate recurring runs
- Connect Telegram — full channel setup
- Agents troubleshooting & best practices — known gotchas