
Appearance
Take restaurant orders in chat
"Two large margheritas, extra basil, deliver to 12 Oak Street" — your AI reads the menu, collects the toppings, and writes a real order while you plate the last one.
- What you'll have — A sales assistant that knows your menu, takes orders right in the conversation — items, quantities, toppings, delivery address, phone — and drops each one into a proper Orders list you can watch fill up. Works the same on WhatsApp, Instagram, your website widget, wherever your customers already message you.
- Who it's for — Restaurants, pizzerias, cafés, dark kitchens, bakeries, food trucks — anyone who takes orders by chat and is tired of copying them into a notebook by hand.
- Time & plan — About 20-30 minutes to set up. Works on any Sales plan (Standard or above), or during the 3-day trial. Every reply the assistant sends — including order-taking turns — draws from your shared sales-message balance.
Ingredients
| Switch on | Where | Why |
|---|---|---|
| A sales assistant | Agents → Agent configuration | The AI that chats with customers and takes the order |
| Your menu as a Product Spreadsheet | Knowledge → Product Inventory | So the assistant can look up dishes, prices and descriptions in chat |
| The Orders integration | Integrations → your assistant → Order Management → Orders | Native order-taking — no external account needed |
| Order fields (delivery address, phone) | Orders card | What the assistant collects for every order |
| Custom item fields (size, toppings) | Orders card | What the assistant collects per dish |
| At least one channel | Channels | Where customers reach the assistant (widget, WhatsApp, Instagram…) |
| Requires payment via Stripe (optional) | Orders card | Take payment when the order is placed |
One assistant, every channel
You set order-taking up once, on the assistant. It then works on every channel that assistant is connected to — website widget, WhatsApp, Instagram, Telegram — with no extra setup per channel.
Steps
1. Pick (or create) your sales assistant
Open Agents in the sidebar — the page is titled Agent configuration at app.mychatbot.app/configuration. Choose the assistant that will take orders from the Select an assistant dropdown, or create one. Give it a friendly Name and a Communication style that sounds like your front counter.
One active assistant on Standard and Pro
On the Standard and Pro plans, only one assistant stays active at a time. That's fine for a single order-taker — just make sure the one you set up here is the active one. Multipro and Corporate allow several active assistants.
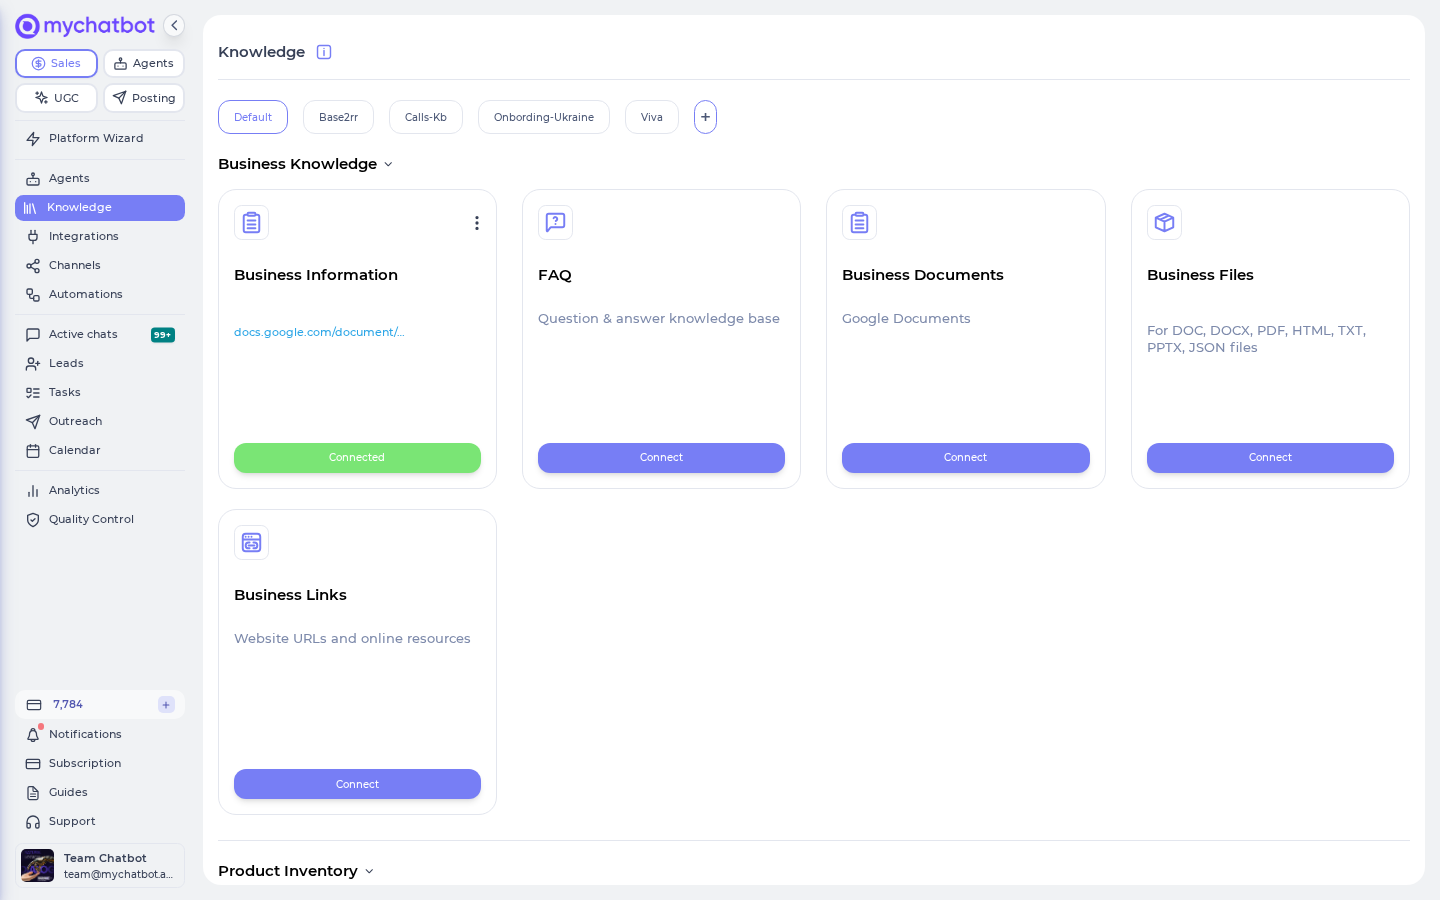
2. Load your menu as a Product Spreadsheet
Open Knowledge in the sidebar and go to Product Inventory (app.mychatbot.app/knowledge). Add a Product Spreadsheet — this is a Google Spreadsheet with one row per dish. Use these column headers:
| Column | Put here |
|---|---|
| id | A short code for the dish (e.g. pizza-margherita) |
| product | The dish name (e.g. "Margherita Pizza") |
| description | What's in it — ingredients, allergens, "serves 2" |
| price | The price |
| link | An optional link to the dish on your site |
| image_link | An optional photo of the dish |
Map your headers to those fields when prompted, then let it index. Once it finishes, your assistant can search the menu and pull the right dish, price and description into any chat.
Put the real details in the description
The assistant reads whatever you write. "Margherita — tomato, mozzarella, basil. Vegetarian. 30cm." searches far better than just "Margherita." Add sizes, allergens and portion notes here and answers get sharper.
Prefer a live feed?
If your menu already lives somewhere that publishes a product feed, you can connect that instead of a spreadsheet — same result, the assistant gets a searchable menu. See Getting inventory in.
3. Turn on the Orders integration
Go to Integrations, pick the same assistant, and find the Orders card under Order Management — subtitle "Native order management for your AI agent." This is MyChatBot's own order-taking, so there's no external system to link. The card explains it plainly: "Native order management — [your assistant's name] can create, update and cancel orders."
Set the Currency to match your prices, then click Connect.
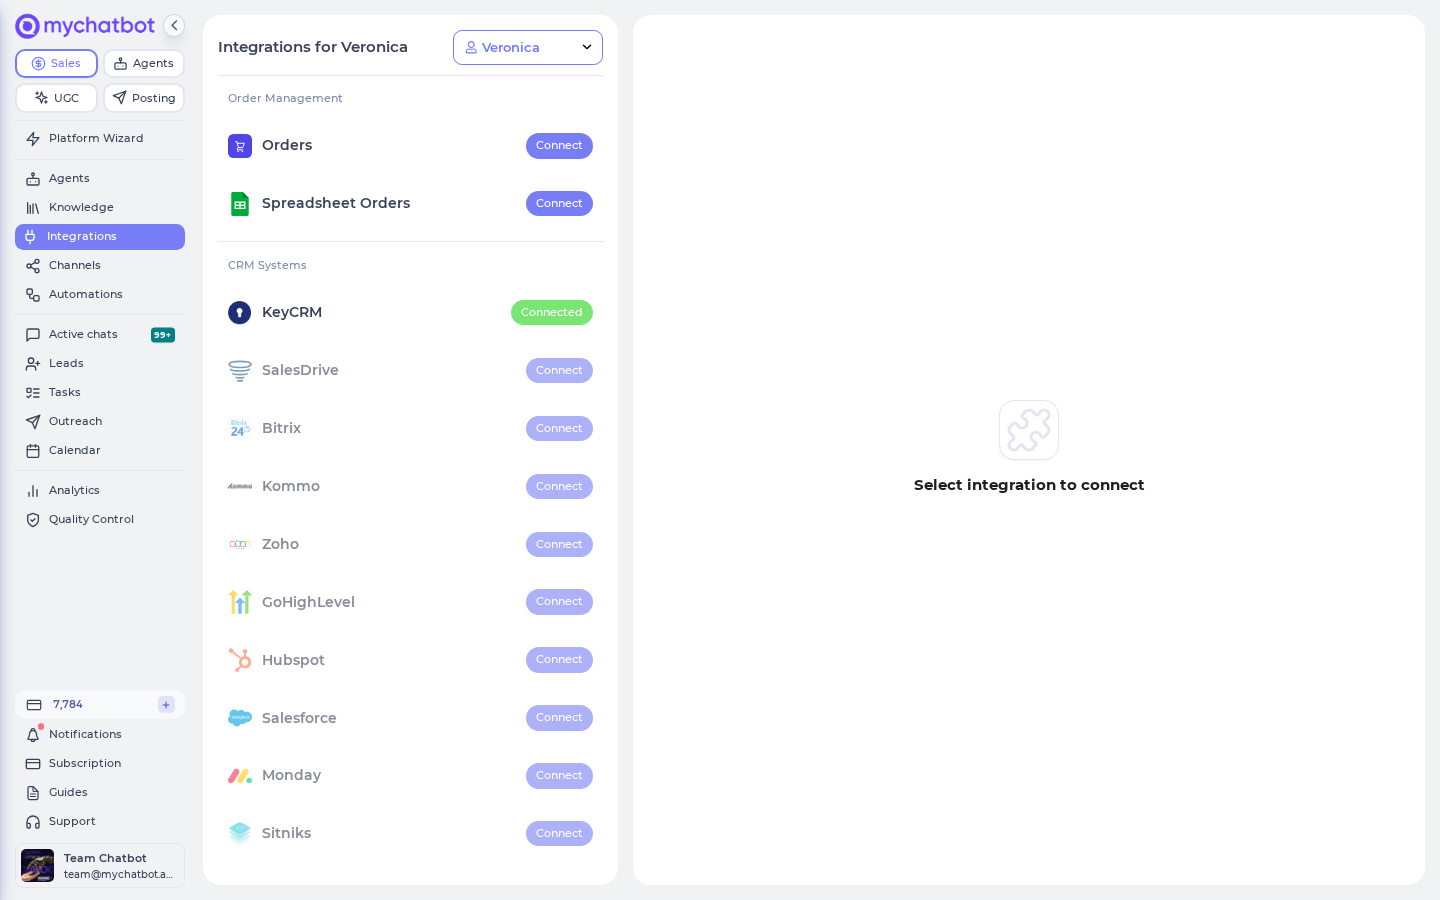
Orders and Spreadsheet Orders don't mix
An assistant uses one order system at a time. If you see "Spreadsheet Orders is already connected to this assistant," disconnect that first — native Orders and the older Spreadsheet Orders can't both run on the same assistant.
4. Add the order fields (delivery address, phone)
On the Orders card, find Order fields — "Per-order fields the agent should collect (e.g. delivery address, phone number). These apply to the whole order, not individual items."
Click + Add field for each one you need:
- Phone number — type Text, mark it Required
- Delivery address — type Text, Required for delivery orders
- Pickup or delivery? — type Select (dropdown), options
Pickup, Delivery
The assistant will make sure it has these before it finishes an order.
5. Add the per-item fields (size, toppings)
Just below, find Custom item fields — "Extra fields added to each item above. The agent will collect these per item (e.g. size, color, toppings)." These attach to each dish in the order, so a two-pizza order can have different toppings on each.
Add a few:
- Size — type Select (dropdown), options
Small, Medium, Large - Toppings / extras — type Text
- Notes — type Text (e.g. "no onions", "well done")
Click Save Config when you're done.
Give the assistant the rules
Open your assistant's instructions and spell out how you want orders taken — for example: "Always confirm the full order and total before placing it. Ask pickup or delivery; if delivery, get the address. Read prices from the menu — never guess. Minimum order 300." The assistant reads the menu and knows the fields, but your house rules live here.
Prices come from the menu you loaded
When the assistant places an order, it reads each item's price from the menu you loaded in Step 2 — it isn't looked up from a master price list behind the scenes. So keep your Product Spreadsheet prices accurate and current, and tell the assistant in its instructions to always take the price from the menu. A clean menu is what keeps totals correct.
6. Connect a channel
Open Channels and connect this assistant to at least one place customers can order from — the website widget, WhatsApp, Instagram, or Telegram. Order-taking works the same on all of them; you don't set it up per channel.
7. (Optional) Take payment at checkout
If you want to collect payment when the order is placed, connect your Stripe account on the Orders card and switch on Requires payment via Stripe. New orders then move to Awaiting Payment with a payment link, and flip to paid once the customer pays.
Try it
- Open your assistant's test chat (or any connected channel) and order like a real customer: "Hi! Can I get two large margheritas with extra basil, and a small hawaiian — delivery to 12 Oak Street."
- Watch the assistant look up the dishes, quote the prices from your menu, collect the size and toppings on each pizza, and ask for your phone number since it's a delivery.
- Let it confirm the order and the total, then place it.
- Open the Orders page in the sidebar — app.mychatbot.app/orders — and watch the order appear with its order #, the items, quantities, toppings, delivery address and total.
- Click it to see the full breakdown. Try asking the assistant to add a dish or cancel the order — the Orders list updates to match.
If the order lands with the right items, extras and total, your order-taker is live.
Keep an eye on your message balance
Every reply your assistant sends — order turns included — draws from your Sales plan's shared sales-message balance, the same bucket used across all your channels. A busy Friday night can burn through it fast. If that balance hits zero, a background job switches all your assistants off across every channel, and they don't turn back on by themselves until you top up or your plan renews. So if the bot goes quiet mid-rush, check your balance on the Analytics page first.
Level it up
Sell everywhere at once. The same assistant, menu and order setup can run on WhatsApp, Instagram, Telegram and your website widget together — connect them all from Channels and every channel takes orders into the same list.
Confirm and follow up. Orders don't send reminders on their own. Use Follow-ups to message customers when the food's on its way, ask how it was, or win back someone who dropped off mid-order.
Route orders like leads. Every order links back to the client and the chat it came from, so you can label and pipeline order-takers like any other customer — see Leads & pipelines.
Add voice. Connect the assistant to phone calls and customers can order by talking to it — the same order tools work on a live call. Voice minutes draw from the same sales-message balance.
A couple of honest limits
Native orders don't track stock or "sold out" — the assistant will happily take an order for a dish even if the kitchen's out, so mark unavailable items in your menu (or its description) when you need to. And there's no automatic push to a kitchen-display or POS out of the box; if you run one, you can bridge orders to it with a CRM like KeyCRM. Everything else — items, extras, totals, delivery details — is fully native.
See also
- Orders — the full reference for the Orders integration: fields, item schema, statuses, payment, and every gotcha.
- Getting inventory in — how your menu gets indexed for search.
- Search tools — the product-search tool your assistant uses to read the menu.
- Assistant configuration — shaping how your assistant chats and takes orders.
- WhatsApp · Instagram · Website widget — where your order-taker can live.
- Follow-ups — reminders and win-back for orders.