
Appearance
Qualify real-estate inquiries (with photo search)
A buyer sends "something like this, two beds, under 300k" with a photo — and your AI finds the closest listings, asks the right questions, and books the viewing while you sleep.
- What you'll have — A sales assistant that treats your listings as a searchable catalog, matches a photo a buyer sends to the closest properties (with the listing's own photo so they can confirm), qualifies the lead by collecting budget, timeline and must-haves across the whole conversation, and books a viewing straight into your calendar — on whatever channel the buyer used.
- Who it's for — Agencies, brokers, and solo agents who get a firehose of "is this still available?" and "do you have anything like…" messages and want the easy ones handled and the serious ones qualified and booked before a human ever picks up.
- Time & plan — About 30-40 minutes to set up, plus a little indexing time in the background. Works on any Sales plan (Standard or above), or during the 3-day trial. Everything here — the catalog, photo search, qualification, and booking — draws from your shared sales-message balance.
There's no "real estate" preset — and you don't need one
MyChatBot doesn't ship a real-estate template, so you'll wire the pieces yourself: a listings catalog, a few buyer-context fields, a calendar, and instructions. That's the whole trick of this guide — every building block already exists, we're just pointing them at property.
Ingredients
| Switch on | Where | Why |
|---|---|---|
| A sales assistant | Agents → Agent configuration | The AI that talks to buyers and does the qualifying + booking |
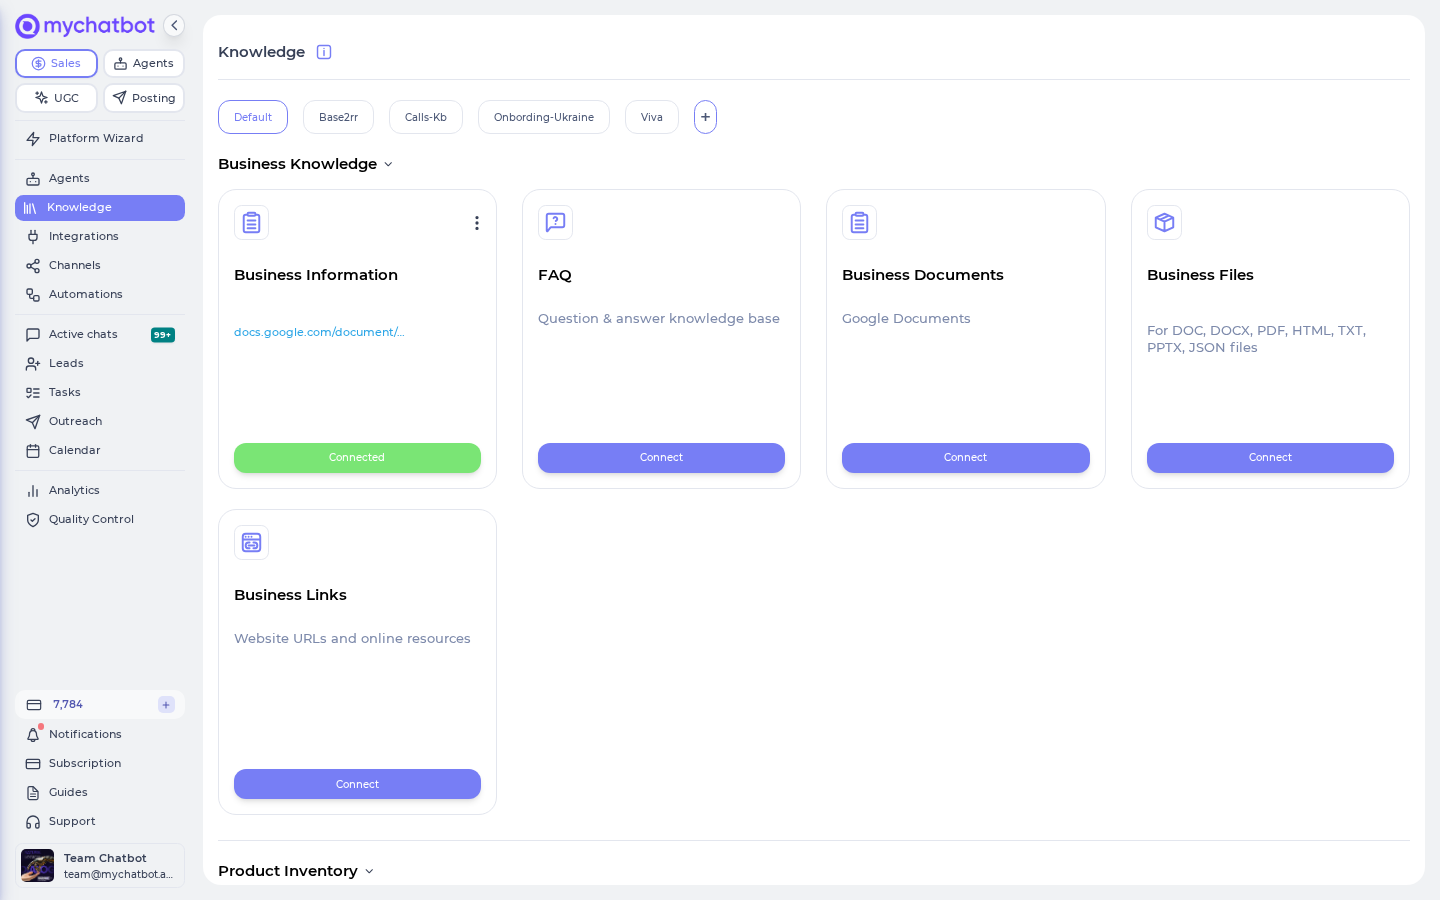
| A listings catalog — Product Feed or Product Spreadsheet | Knowledge → Product Inventory | Turns your listings into searchable products (each with its own photo + link) |
| Index images | On that catalog | Required for "find listings like this photo" — off means text-only search |
| Agentic Search (optional) | On that catalog | Multi-step search for large or fuzzy inventories |
| Client Context with a few fields | Agent configuration → Client Context | Collects budget, timeline, must-haves across the whole conversation |
| The Calendar integration | Integrations → your assistant → Calendar | Books viewings — native, no external account needed |
| At least one channel | Channels | Where buyers reach the assistant (widget, WhatsApp, Telegram, Instagram…) |
Steps
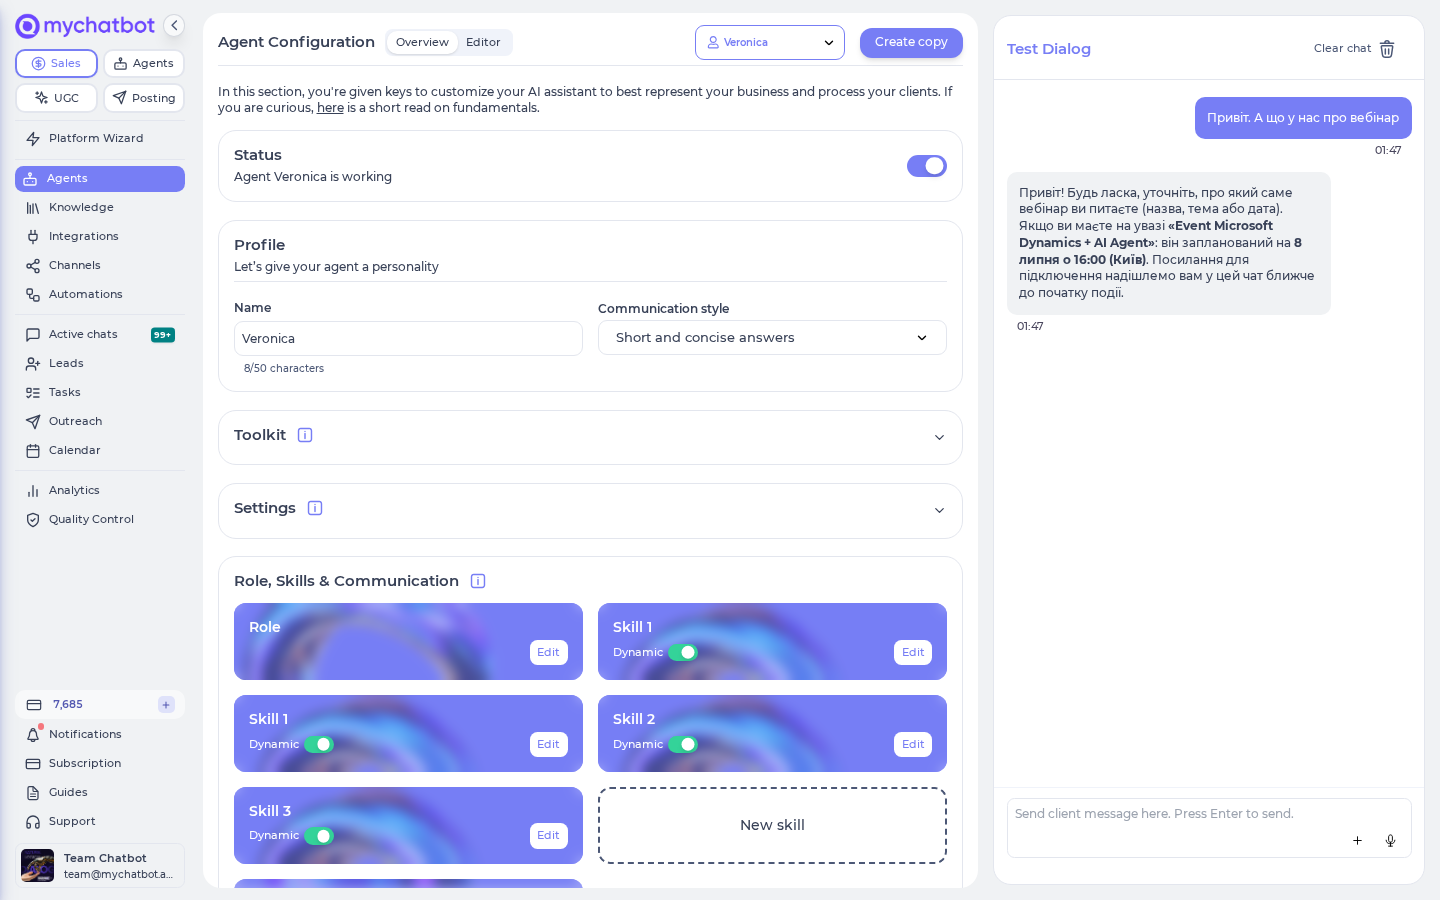
1. Pick (or create) your sales assistant
Open Agents in the sidebar — the page is titled Agent configuration at app.mychatbot.app/configuration. Choose the assistant that will handle inquiries from the Select an assistant dropdown, or create one. Give it a clear Name and a Communication style that sounds like your agency's front desk.
One active assistant on Standard and Pro
On Standard and Pro, only one assistant stays active at a time. That's plenty here — just make sure this is the active one. Multipro and Corporate allow several active assistants.
2. Get your listings in as a catalog
Open Knowledge in the sidebar and add a Product Inventory source. This is where your listings become products the assistant can search — each with a title, description, price, link, and photo. Choose the format that matches how your listings live today:
- Product Feed — a live URL (XML / JSON / Google-Shopping / YML) that your listing system already produces. Best if your inventory changes often; it auto-refreshes in the background.
- Product Spreadsheet — a Google Sheet where each row is a listing. Perfect if you keep properties in a sheet and want a quick start.
Whichever you pick, make sure every listing includes an image link (the property's photo) and, ideally, price and location in the description. The assistant only knows what's in the feed.
Don't use "Product Files" for your listings
There's a separate Product Files option for uploading PDFs or documents — do not use it for your catalog. That path is text-only and carries no photos, so "find listings like this photo" silently won't work. Your listings must come in as a Product Feed or Product Spreadsheet with an image link per property.
3. Turn on Index images
On your catalog, switch on Index images — "Include all images in your index." This is the step that makes photo search possible: it processes each listing's photo so that when a buyer sends a picture, the assistant can find the closest-looking properties.
Indexing runs in the background — give it a few minutes before you rely on photo search. Text search ("2-bed near the river under 300k") works either way, but photo-to-listing matching only works with Index images on.
Show the buyer the matched photo
Photo matching is smart but not psychic — two similar-looking apartments can rank close together. Tell your assistant (in Step 5) to always reply with the matched listing's own photo and link so the buyer confirms "yes, that one" before you go further. It turns a good guess into a certain match.
4. (Optional) Turn on Agentic Search
Next to Index images you'll see Agentic Search — "For complex product discoveries."
Leave it off for the fastest, simplest lookups — great for most agencies. Turn it on when your inventory is large or buyer questions get layered ("something like this photo, but with a balcony, walkable to a school, under 350"), and you want the assistant to search step by step instead of in one shot.
On a trial, leave Agentic Search off
Agentic Search runs the assistant's search step by step, so it's a bit more work per lookup than plain search — handy for large or fuzzy inventories, but not free. Plain (non-agentic) text and photo search don't carry that extra cost. So while you're kicking the tyres on a trial, leave Agentic Search off and let text and photo search carry you — turn it on once you're on a paid plan and your inventory actually needs the multi-step search.
5. Tell the assistant how to qualify and book
Back in Agent configuration, open your assistant's instructions. The product-search tool is already wired to your catalog — you don't add it. Just point the assistant at the flow you want, for example:
When a buyer asks about a property or sends a photo, search the listings catalog and reply with the closest matches — always include each listing's photo and link so they can confirm. Then qualify: ask their budget, how soon they want to move, and their must-haves. Once they've confirmed a listing and they're a serious buyer, check availability and book a viewing.
Keep it plain and specific. If a buyer sends a photo, the assistant automatically uses it as a visual search — you just tell it what to do with the results.
6. Collect buyer context (budget, timeline, must-haves)
Still in Agent configuration, find Client Context and switch on Enable client context collection — "Collect and maintain client data points across conversations." Under Data points to collect, click Add field for each thing you want the assistant to gather as it talks. For a real-estate qualifier, good starters:
| Label | Key | Description |
|---|---|---|
| Budget Range | budget_range | The buyer's budget for the property |
| Timeline | timeline | How soon they want to move or buy |
| Bedrooms | bedrooms | Minimum bedrooms they need |
| Financing | financing | Cash, mortgage pre-approved, or exploring |
The assistant fills these in naturally over the course of the chat — no form — and the data follows the same buyer across every channel, so a lead who DMs today and messages on WhatsApp tomorrow is still one person with one budget.
7. Turn on the Calendar for viewings
Go to Integrations, pick the same assistant, and find the Calendar card under Productivity & Scheduling. This is MyChatBot's own booking calendar — no external account to link. Set your Timezone, a Default Duration (a viewing is often 30 minutes), and your Business Hours, then add the minimum the calendar needs:
- + Add Staff — one entry per agent who shows properties. Model each agent as a "staff member."
- + Add Service — add a service called Viewing (set its duration; price optional).
A viewing needs one staff member and one service
Booking only works once you have at least one staff member and one service. The staff/service model comes from appointment businesses, so it maps a little oddly to property tours — think of it as agent + "Viewing" and it works fine. Until both exist, the calendar refuses to book.
Then add Booking Instructions in the free-text box — your routing rules, referencing agents and services by their #number — and Save Config. Note that staff and services are numbered independently: agents are Staff #1, #2… and services are Service #1, #2…, so a rule points at each by its own sequence. For example: "Staff #1 (Maria) covers downtown listings and handles Service #1 (Viewing); always confirm the exact address and the buyer's phone number before booking. Minimum 24 hours' notice."
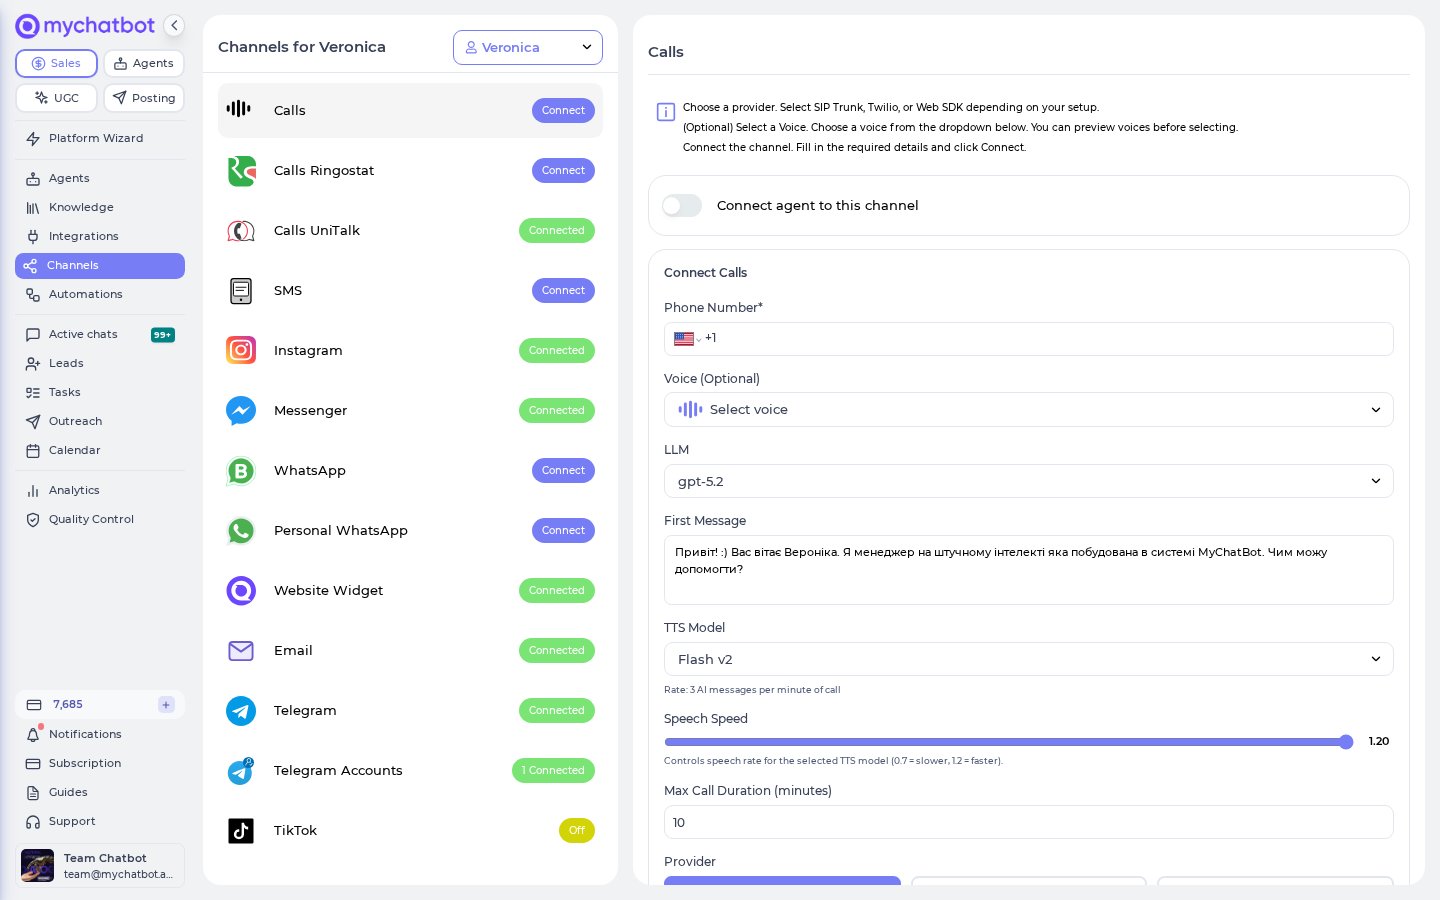
8. Connect a channel
Open Channels and connect this assistant to at least one place buyers reach you that can carry photos — the website widget, WhatsApp, Telegram, Instagram, Viber, or Facebook Messenger. Everything you set up — search, qualification, booking — works the same on all of them; you don't configure it per channel.
Try it
From a connected channel (or the assistant's test chat), play a buyer:
- Send a photo of a property (or a screenshot from a listing site) and say "anything like this?" The assistant should reply with the closest listings and their photos so you can confirm.
- Ask a text question — "two beds near the center under 300k?" You should get matching listings with links.
- Let it qualify you — answer its budget and timeline questions, then check that it remembers your answers later in the chat.
- Book a viewing — "can I see the second one Tuesday at 3?" The assistant checks availability, offers a slot, and confirms.
- Open the Calendar page in the sidebar — app.mychatbot.app/calendar — and watch the viewing land as Confirmed in that agent's column, with a link back to the exact chat.
If the photo comes back with the right listings and the viewing appears on the calendar, your qualifier is live.
Keep an eye on your message balance
Every reply your assistant sends — searches, qualification, booking turns — draws from your Sales plan's shared sales-message balance, the same bucket across all channels (voice included). If that balance hits zero, a background job switches all your assistants off across every channel, and they don't turn back on by themselves until you top up or your plan renews. If your bot suddenly goes quiet, check your balance on the Analytics page first.
Level it up
- Push qualified leads to your CRM. Connect any CRM you already run — HubSpot, Kommo, Bitrix24, KeyCRM, SalesDrive, Salesforce, Zoho, GoHighLevel and more — and have the assistant create a lead with the budget and timeline it collected, so a hot buyer lands in your pipeline the moment they're qualified. See Leads & pipelines.
- Sharpen search with listing attributes. Beds, price, and square footage only become filterable if they're present as fields in your feed (not just prose in the description). Add them per listing and the assistant can filter precisely — "3 beds, 100-150 sqm, under 400k."
- Add voice. Connect the assistant to phone calls and buyers can describe what they want out loud and book a viewing by talking — the same tools work on a live call. Voice minutes draw from the same sales-message balance.
- Sell everywhere at once. The same assistant, catalog, and calendar can run on your website widget, WhatsApp, Telegram, and Instagram together — connect them from Channels and your qualifier becomes multi-channel instantly.
Refreshing the catalog isn't a one-click rebuild
A live Product Feed auto-refreshes in the background, so new listings show up on their own. But if photo search or attribute filters ever look stale on an older catalog, there's no self-serve "rebuild from scratch" button — remove the catalog and add it again, or reach out to support. Fresh, well-formed feeds rarely hit this.
See also
- Getting inventory in — how your listings become a searchable catalog
- Image search — how photo-to-listing matching works, and its limits
- Search tools — the product-search tool your assistant uses
- Calendar — the full booking reference: staff, services, statuses, and gotchas
- Assistant configuration — Client Context and everything else you can tune
- Leads & pipelines — routing qualified buyers into your pipeline
- Channels overview — where your qualifier can live