
Appearance
Run email outreach campaigns
Send a warm, personalized email to a whole segment of leads at once — and let your assistant handle every reply.
- What you'll have — A sales assistant that emails a targeted list of leads from your own Gmail inbox, then reads and answers the replies automatically. Every send and every response threads into one conversation per person, tracked in your dashboard alongside your other channels.
- Who it's for — Sales and account teams doing 1:1 or segment outreach: re-engaging dropped leads, announcing a promo to recent contacts, or activating a fresh list you just imported.
- Time & plan — About 30 minutes to set up. Works on any Sales plan (Standard or above), or during the 3-day trial. No add-on needed. (Note: a trial gives you only ~30 sales messages — enough to test, not to run a real campaign. See the balance tip below.)
This is CRM-driven outreach, not a bulk email tool
Think 1:1 and small-segment sends from your own mailbox — like a great salesperson working a list, not a mass email platform. There's no domain warm-up, unsubscribe-link injection, or open/click tracking here. You'll see delivered and failed counts, and real replies land back in your inbox as conversations.
Ingredients
| Switch on | Where | Why |
|---|---|---|
| A sales assistant with email-tuned instructions | Agent → Settings | Supplies the reply intelligence and tone |
| The Gmail channel, connected | Channels tab | Sends the outreach and receives replies |
| Leads with email addresses (plus statuses/labels) | Your CRM / Leads | Defines who you'll target |
| Follow-ups & Outreach | Outreach in the left sidebar | Where you build and launch the campaign |
Steps
1. Prepare your sales assistant
Pick the assistant that will run the campaign, or create one, then give it a few email-specific instructions so replies read like real emails.
Open Agent → Settings and add guidance to its instructions, for example:
When responding to emails:
- Open with a greeting and address the sender by name if you know it
- Be concise but complete
- Sign off with your assistant name and a short signature
- Reference earlier emails in the thread when it helps
Menu path: Agents → your agent → Settings (app.mychatbot.app)
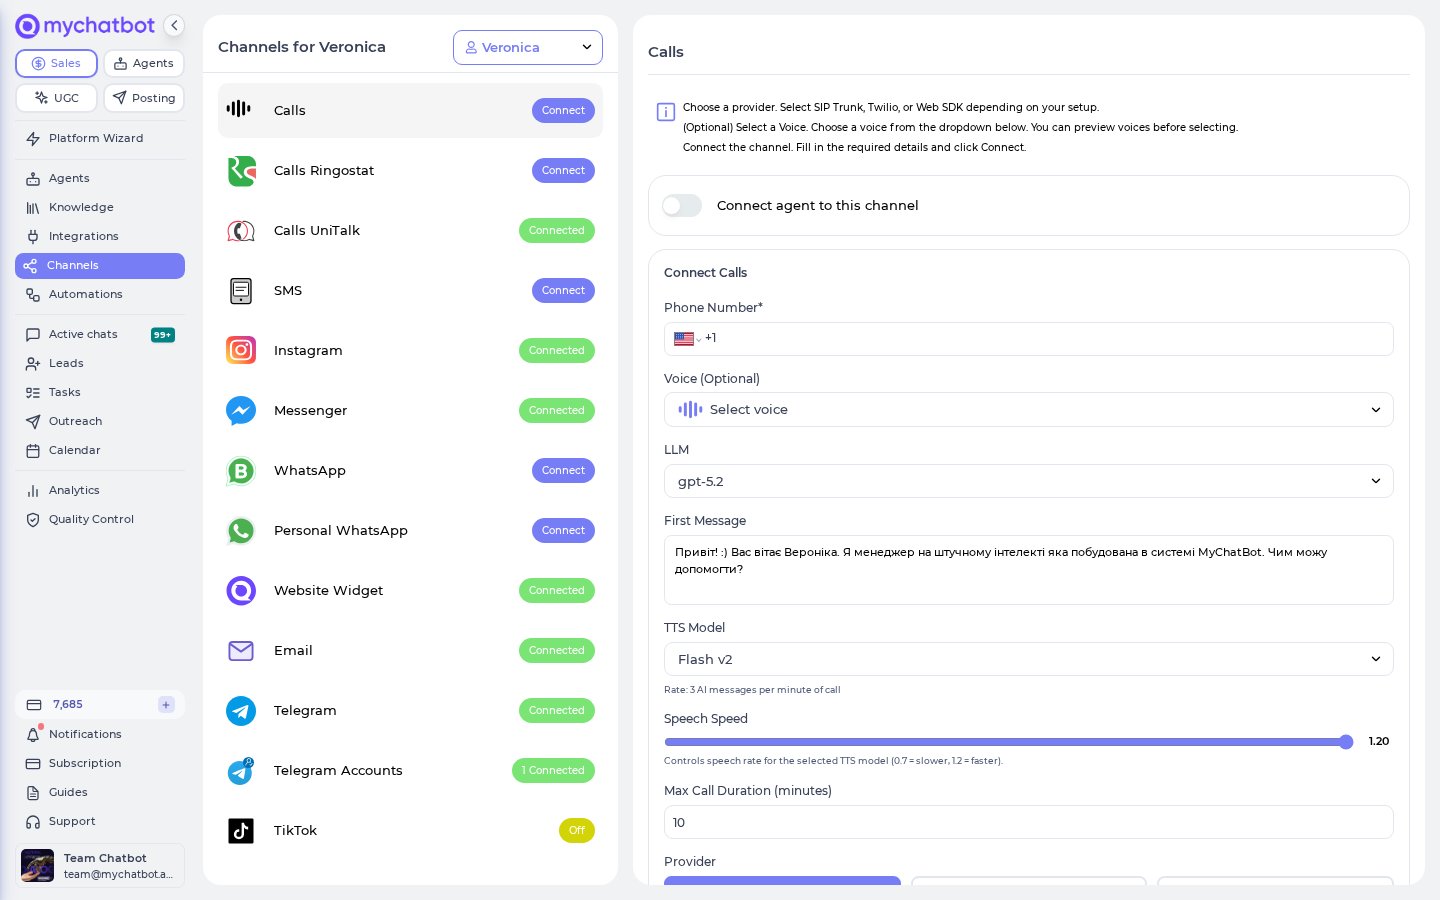
2. Connect your Gmail inbox
Your campaign sends from a real Gmail account, so connect one first.
- Open the Channels tab and select your assistant.
- Find the Gmail card, type the sending address in Email Address, and click Connect Gmail.
- Finish the Google sign-in and grant every permission it asks for. When you return, the card shows as connected.
Menu path: Channels → your agent → Gmail → Connect Gmail (app.mychatbot.app/channels)
Grant all permissions, and watch for expiry
If Google blocks third-party access or you skip a permission, sending fails or quietly stops. If replies dry up, look for a Gmail authorization required banner on the Gmail card and click Reconnect.
3. Turn the channel on for outreach
Still on the Gmail card, set it up for campaign sending:
- Turn on Connect agent to this channel to make the inbox live.
- Turn on Automation Channel if this inbox is driven only by campaigns (not live back-and-forth chat).
- Set Reply Delay (s) (default 30) if you also want the assistant to auto-reply to inbound emails in a natural, human-paced way.
4. Get your leads ready
Your audience comes from your leads. Make sure the people you want to reach have an email address stored, and apply the statuses, labels, and pipeline stages you'll target — for example a dropped status or a pricing_question label.
Your assistant can tag these during conversations, or you can import a fresh list. Either works.
Menu path: Leads (left sidebar) (app.mychatbot.app)
Targeting the right tags matters
The campaign audience is filtered by these statuses and labels — so tag deliberately. See Labels and statuses for how your assistant applies them automatically.
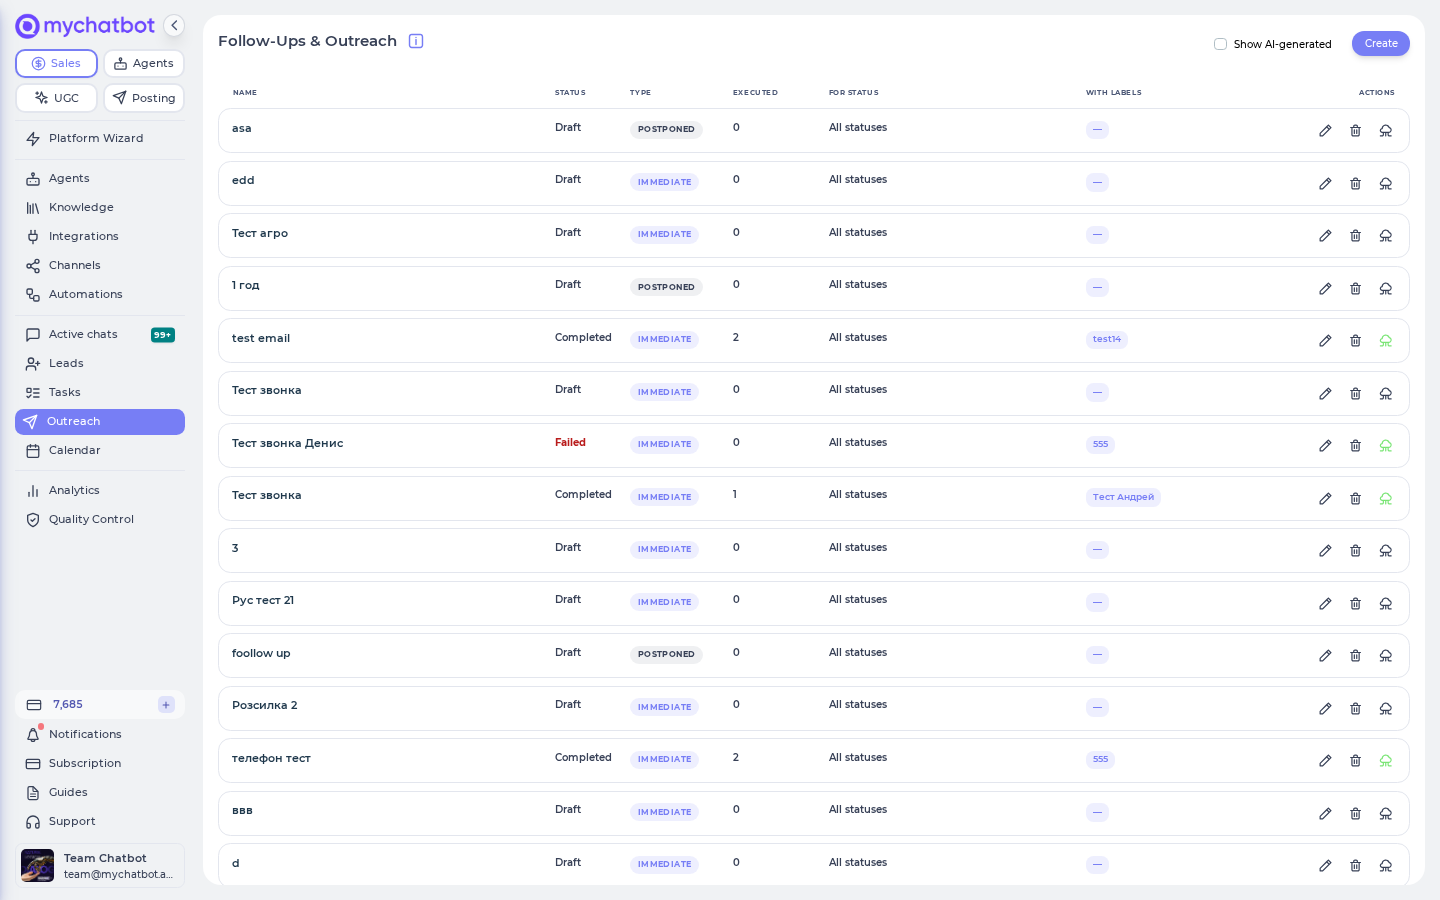
5. Create the campaign
Open Outreach in the left sidebar (the page is titled Follow-ups & Outreach) and click Create. Give it a name, then pick your outreach type:
- Immediate outreach — a one-time blast to a filtered segment, run now or scheduled. This is the classic email campaign. Click Continue to open the wizard.
- Postponed contextual — a multi-step drip that fires when a lead goes silent. Great for nurture sequences (covered in Level it up).
For a campaign, choose Immediate outreach.
Menu path: Outreach → Create → Immediate outreach (app.mychatbot.app/follow-up)
6. Build your audience
In the wizard's Client Targeting block, start with Client Source:
- Clients with chats — people who've already talked to you.
- All clients — everyone matching your filters (defaults to the past 7 days when you switch, so you don't grab your whole base).
- Clients without chats — a fresh imported list that's never chatted.
Then narrow it down. Under Contact details, turn on Has email so only emailable leads are included. Add Statuses, Labels, Pipeline, or custom field filters to match the exact segment you want.
The Audience Preview refreshes as you go and shows exactly who will be contacted — use the Open links to spot-check a few people before you send.
Start small to test the message
Set an Audience limit (for example, 1) or filter down to a single test lead first. Once the message reads right, widen the audience.
7. Choose Email as the channel
In Outreach Configuration, pick your Gmail channel (it's listed with its agent, e.g. "Gmail (<agent name>)"). The picker labels this channel Gmail — matching the card name on the Channels tab — so scan for "Gmail", not "Email".
Keep the channel to Email only
If you select several channels, they're attempted in order and the first successful send stops the rest — so a "email" campaign could quietly go out over another channel instead. For email-exclusive delivery, select only the Email channel.
8. Write the message and subject
In the Message block, choose how the message is generated:
- Agent instruction — describe the outcome, tone, and talking points, and the assistant writes a personalized email for each lead.
- Custom message — write the exact text to send, using
{name}and{context}as placeholders.
When Email is selected, an Email Subject & Attachments tab appears. Add a subject line (or let the assistant generate one), and attach any files.
Attachment size
Files go out through your Gmail account, so keep attachments under Gmail's 25MB limit.
9. Schedule and launch
In the Schedule block:
- Run now — starts in about 3 minutes.
- Schedule for later — pick a date and time. You'll see an estimated start-to-end window based on audience size.
- Sending interval — cap the send rate so you don't overload the mailbox. Recommended for anything beyond a handful of emails.
Click Save outreach to arm it. The status header moves through Scheduled → Running → Completed, with a live progress bar.
Watch your sales-message balance on big sends
Every email consumes your shared sales-message balance — the same bucket used across all your channels, voice included. A large blast can drain it, and if it hits zero, a scheduled job turns all your assistants off until you top up. For big campaigns, check your balance first and top up if it's getting close.
Try it
Run a one-person test end to end:
- Create an Immediate outreach and filter the audience down to your own email (by label, custom field, or a limit of 1).
- Confirm the Audience Preview shows exactly 1 client and that they have an email.
- Pick the Gmail channel, write a short message and subject, choose Run now, and click Save outreach.
- Within ~3 minutes the status moves to Completed, and Outreach Results shows your client as Sent. Check your test inbox for the email.
- Reply to it — your assistant reads the reply and answers, and the whole exchange threads into one conversation in your dashboard.
Level it up
- Turn it into a nurture drip — Instead of a one-off blast, create a Postponed contextual follow-up. Target a status + label, then build a step sequence (e.g. nudge 2 hours after a lead goes silent, again after 1 day, a final offer after 3 days), with a per-step email subject. Any reply stops the remaining steps. Remember to Publish — a draft never fires.
- Localize the send time — When scheduling for later, use Call time adjustment per lead to shift each send into the lead's own timezone (store an IANA value like
America/New_Yorkin each lead's Additional information). - Auto-generate subjects — Let the assistant write the subject line per lead by turning on Generate Email Subject automatically based on instructions, so every email feels tailored.
- Add another channel as a fallback — For a lead who has both an email and a phone, list Email plus another outreach channel on the step; the first successful send wins. (Only do this when you want a fallback, per Step 7.)
See also
- Email channel — connecting and tuning your Gmail inbox
- Follow-ups & Outreach — the full campaign and drip reference
- Labels and statuses — how your assistant tags leads for targeting
- Leads — importing and organizing the contacts you'll target
- Build an agent — creating and configuring the sales assistant